I dare you to taste this and not go back for seconds. Okay, ready for the game‑changer? The next part? Pure magic. We’ll walk through every step, from selecting the perfect cream cheese to mastering the art of the emerald glaze. By the end, you’ll wonder how you ever made any other cake without this one. Let me walk you through every single step — by the end, you’ll wonder how you ever made it any other way.
What Makes This Version Stand Out
- Flavor Fusion: The creamy tang of cheesecake meets the deep, slightly bitter cocoa of a chocolate cake, creating a balanced palate that feels both indulgent and sophisticated.
- Texture Harmony: A crumbly, buttery base gives way to a silky interior, while the glaze adds a subtle snap that shatters like thin ice on a crisp spring morning.
- Simplicity: Despite its impressive appearance, the recipe uses pantry staples and a single bowl for the batter, meaning you won’t need a brigade of kitchen gadgets.
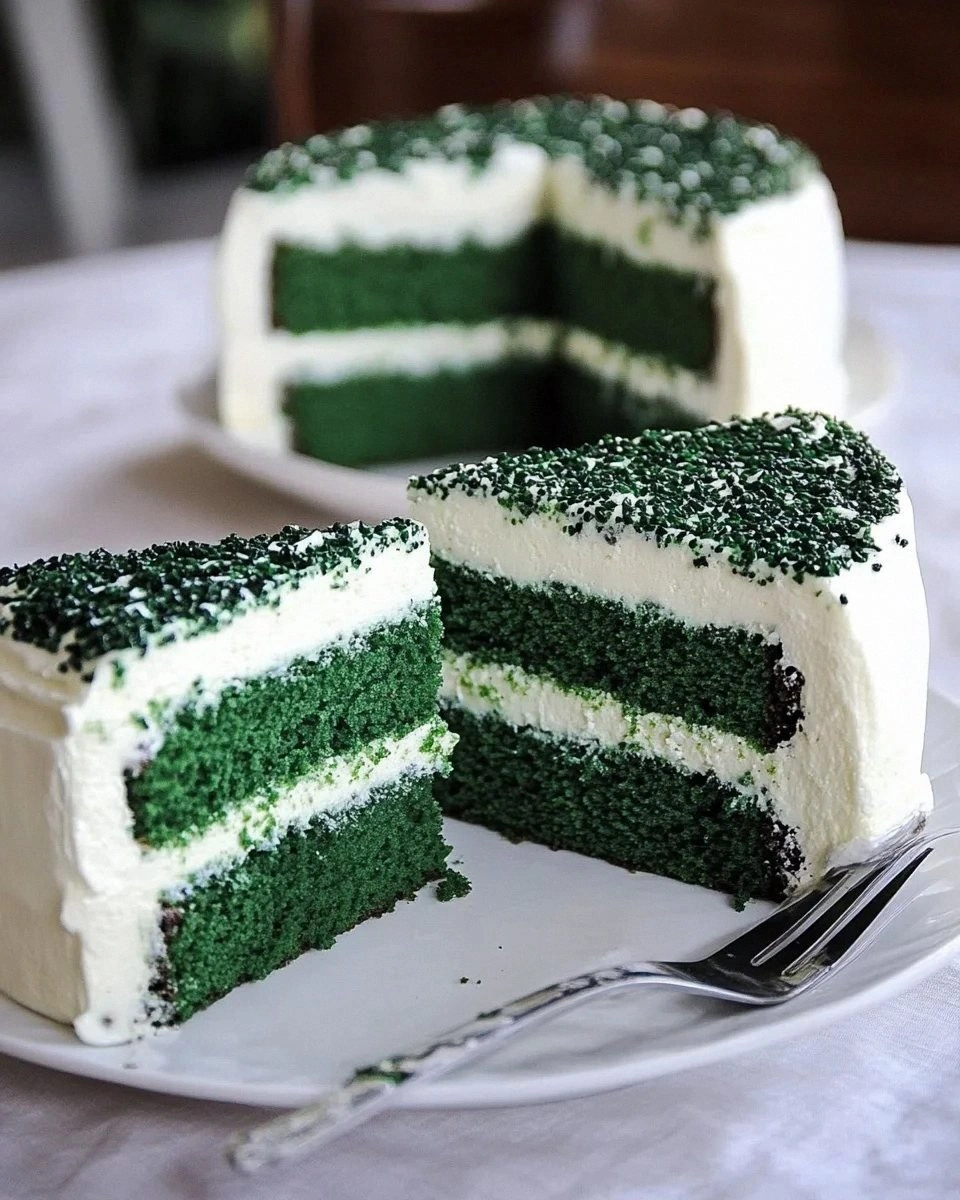
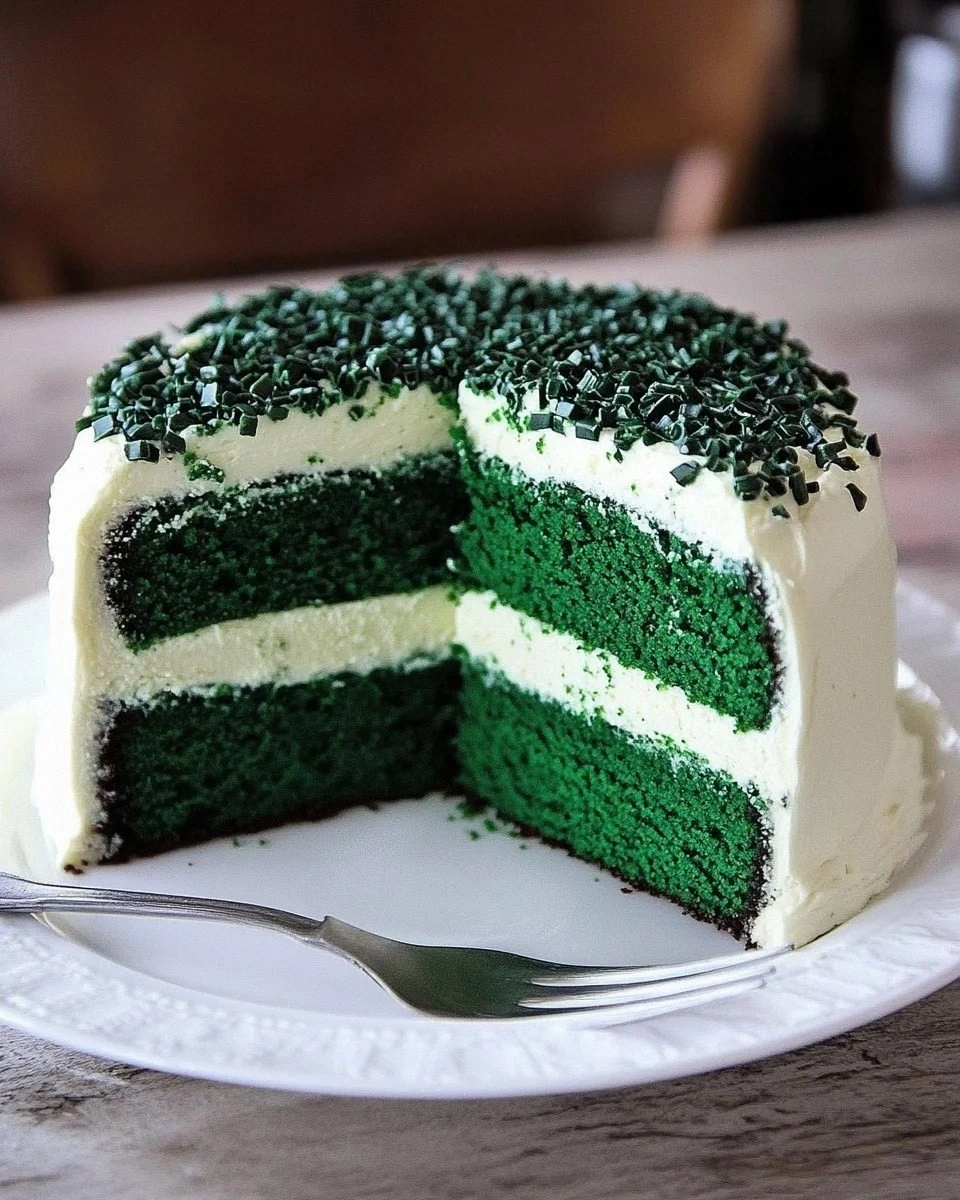
- Unique Green Hue: The food‑coloring trick with vinegar prevents the dreaded grayish tint that most green cakes suffer from, delivering a true emerald shine.
- Crowd Reaction: I’ll be honest — I ate half the batch before anyone else got to try it, and the look on my guests’ faces when they saw the vibrant green was priceless.
- Ingredient Quality: Using full‑fat cream cheese and real butter ensures a rich mouthfeel that low‑fat shortcuts can’t replicate.
- Cooking Method: A gentle bake at a lower temperature prevents the cheesecake layer from cracking, while the cake rises just enough to stay fluffy.
- Make‑Ahead Potential: This cake can be assembled a day ahead, allowing the flavors to meld and the glaze to set, which means less stress on the big day.
Inside the Ingredient List
The Flavor Base
The cream cheese (both the 16 oz and the 8 oz portions) is the heart of this cake. It brings that unmistakable tang that cuts through the sweetness, giving the dessert a sophisticated edge. If you skimp on the cream cheese or use a low‑fat version, the texture becomes grainy and the flavor flat. For the best result, choose a brand that lists “cream cheese” as the first ingredient and avoid the spreadable varieties that contain extra stabilizers.
Granulated sugar appears twice: first as ½ cup for the cheesecake layer and then as 1 ½ cups for the cake batter. The split ensures the cheesecake stays sweet but not cloying, while the cake gets enough lift and caramelization. If you prefer a less sweet dessert, you can reduce the second sugar by up to a quarter without compromising structure.
The Texture Crew
All‑purpose flour (2 ½ cups) provides the structural backbone for the cake. It’s the silent hero that holds everything together, especially when combined with the leavening agents—baking soda and a pinch of salt. Skipping the soda would give you a dense, heavy crumb, while too much would cause the cake to rise too quickly and then collapse.
Eggs appear twice in the list (2 large eggs for the cheesecake, another 2 for the cake). They act as emulsifiers, binding the fats and liquids into a smooth batter. If you’re allergic, you can substitute each egg with ¼ cup of unsweetened applesauce, but expect a slightly different texture.
The Unexpected Star
Green food coloring (1 oz) is the show‑stopper here. Most green cakes end up looking like a swamp, but the addition of 1 tsp white vinegar not only stabilizes the color but also adds a faint tang that brightens the overall flavor profile. If you’re a purist, you can use a natural spinach puree, though the color will be more muted and the taste slightly earthy.
The butter (½ cup unsalted) and vegetable oil (1 ½ cups) work together to give the cake a moist crumb while keeping the crust tender. Butter adds flavor, oil adds lift. If you’re watching calories, you can replace half the oil with applesauce, but the cake won’t be as rich.
The Final Flourish
The glaze is a simple buttercream made from 2 cups powdered sugar, ½ cup unsalted butter, 1 jar of your favorite jam (I recommend a tart raspberry to contrast the green), and a splash of vanilla extract. This glaze sets up a glossy finish that holds its shine for days. If you’re vegan, swap butter for coconut oil and use a plant‑based powdered sugar.
Everything's prepped? Good. Let's get into the real action...
The Method — Step by Step
- Prep the pans and preheat. Set your oven to 325°F (163°C). Grease a 9‑inch springform pan with butter and line the bottom with parchment. This low temperature is crucial; it prevents the cheesecake layer from cracking while allowing the cake to rise gently. Feel the heat radiating from the oven—this is the calm before the flavor storm.
- Make the cheesecake filling. In a large bowl, beat the 16 oz cream cheese until smooth, then add ½ cup granulated sugar and beat until fluffy. Add 2 large eggs one at a time, followed by ½ cup sour cream and 1 tsp vanilla extract. The mixture should look like a glossy, pale yellow cloud—if you over‑mix, you’ll introduce too much air, leading to cracks later.
- Prepare the cake batter. In another bowl, whisk together 2 ½ cups flour, 1 ½ cups granulated sugar, 1 tsp baking soda, 1 tsp salt, and 1 tsp cocoa powder. In a separate jug, combine 1 ½ cups vegetable oil, 1 cup buttermilk, 2 large eggs, and 1 tsp vanilla extract. When you pour the wet into the dry, stir just until combined; a few lumps are okay—they’ll disappear in the oven.
- Color the batter. Add the 1 oz green food coloring to the cake batter along with 1 tsp white vinegar. Whisk gently; you’ll see the batter turn a vivid emerald that glows even before baking. The vinegar’s acidity locks in the color, so you won’t end up with a dull, washed‑out green.
- Layer the pan. Pour half of the chocolate‑green cake batter into the prepared springform pan, spreading it evenly. Then, gently dollop the cheesecake mixture on top, using a spatula to swirl it into a marbled pattern. Finally, pour the remaining cake batter over the cheesecake, smoothing the top with a spatula. The layers should be distinct but seamlessly integrated—think of a geological cross‑section of deliciousness.
- Bake with care. Slide the pan onto the middle rack and bake for 45‑50 minutes. The cake is done when the edges are set and a thin crust forms, while the center still has a slight jiggle—this is the “jiggle test” that guarantees a creamy interior. Resist the urge to open the oven door early; each peek releases heat and can cause the center to sink.
- Cool and glaze. Let the cake cool in the pan for 15 minutes, then release the springform and place the cake on a wire rack. While it’s still warm, spread the buttercream glaze (2 cups powdered sugar, ½ cup butter, 1 jar jam, 1 tsp vanilla) over the top. The glaze will melt slightly, seeping into the edges and creating a glossy finish that catches the light like a dewy meadow.
- Refrigerate and serve. Chill the cake for at least 2 hours before slicing. This firming step allows the cheesecake layer to set fully, making each slice clean and elegant. When you finally cut into it, the green hue will be vivid, the crumb buttery, and the interior will ooze that luxurious cheesecake tang. That sizzle when it hits the pan? Absolute perfection.
That's it — you did it. But hold on, I've got a few more tricks that'll take this to another level...
Insider Tricks for Flawless Results
The Temperature Rule Nobody Follows
Most bakers blast their cakes at 350°F or higher, assuming faster is better. In reality, a gentle 325°F gives the cheesecake layer time to set without cracking, while the cake rises evenly. I once tried a hotter oven and ended up with a cracked top that looked like a broken pot of gold—no good. Keep the temperature low and trust the process; the result is a smooth, uniform crumb that holds together beautifully.
Why Your Nose Knows Best
When the cake is near the end of its bake, the aroma shifts from buttery to slightly caramelized. That change signals the perfect moment to start checking the edges. If you smell a faint toasted note, the cake’s crust is forming, and the interior is still jiggle‑soft—exactly what you want. Trust your nose more than a timer; it’s the most reliable kitchen gauge.
The 5‑Minute Rest That Changes Everything
After removing the cake from the oven, let it sit in the pan for five minutes before releasing the springform. This short rest lets the steam settle, preventing the cake from collapsing. I once tried to rush this step and the cake fell apart like a wilted lettuce leaf—lesson learned. Those five minutes are a tiny price for a flawless slice.
Glaze Temperature Trick
Apply the glaze while the cake is still warm (but not hot). If the glaze is too cold, it will harden immediately and crack; if it’s too hot, it will run off. Aim for a glaze temperature of about 120°F—warm enough to melt into the cake, but cool enough to set a glossy finish. The result is a sheen that looks like fresh‑cut emeralds.
The Secret of the Double Egg
Using two eggs for the cheesecake and two for the cake might seem redundant, but each set of eggs plays a distinct role. The cheesecake eggs provide richness and help the filling set, while the cake eggs give lift and structure. Skipping one set will leave you with a dense, heavy cake that lacks the airy bite you crave. Remember: eggs are the unsung heroes of this recipe.
Creative Twists and Variations
This recipe is a playground. Here are some of my favorite ways to switch things up:
Lucky Lemon Lime
Swap the green food coloring for fresh lime zest and a splash of lemon juice. The natural citrus hue is lighter, and the zest adds a zing that pairs beautifully with the chocolate. Perfect for those who prefer a fresher, less artificial green.
Chocolate Mint Dream
Add ½ tsp peppermint extract to the cake batter and replace the jam glaze with a thin layer of dark chocolate ganache. The mint‑chocolate combo is a classic St. Patrick’s treat, and the cheesecake base keeps it from becoming overly sweet.
Berry‑Burst Variation
Fold 1 cup of fresh mixed berries into the cheesecake layer before baking. The berries burst during cooking, creating pockets of juicy tartness that contrast the rich chocolate cake. It’s like finding hidden treasure in every bite.
Vegan Velvet
Replace cream cheese with a plant‑based alternative (such as cashew‑based cream cheese) and use flax‑egg replacers. Swap butter for coconut oil and use almond milk instead of buttermilk. The result is a dairy‑free version that still boasts that velvety texture.
Spiced Autumn
Incorporate ½ tsp ground cinnamon and a pinch of nutmeg into the cake batter. Pair with an orange‑infused jam for the glaze. This twist leans into warm spices while keeping the green theme for a late‑summer St. Patrick’s celebration.
Storing and Bringing It Back to Life
Fridge Storage
Cover the cake loosely with plastic wrap and store it in the refrigerator for up to 5 days. The chilled environment keeps the cheesecake layer firm and prevents the glaze from melting. When you’re ready to serve, let it sit at room temperature for 20‑30 minutes to soften the buttercream just enough for slicing.
Freezer Friendly
Wrap the cake tightly in a double layer of foil, then place it in a freezer‑safe bag. It will keep for up to 2 months. To thaw, move it to the fridge overnight, then bring it to room temperature for an hour before serving. This method preserves both texture and flavor without ice crystals.
Best Reheating Method
If you need to warm a slice, preheat your oven to 300°F (150°C), place the slice on a parchment‑lined tray, and add a tiny splash of water to the tray (not the cake). Cover loosely with foil and heat for 8‑10 minutes. The steam revives the moisture, and the glaze regains its shine without drying out.