I was halfway through a midnight bake‑off, the oven door slamming shut behind me, and the kitchen smelled of burnt sugar and disappointment. The cookie dough had collapsed into a sticky mess, the edges crisped to a dark charcoal while the center remained a soggy, unappetizing puddle. I stared at the ruined batch, feeling the sting of failure that only a seasoned baker knows all too well. It was a moment that could have ended in frustration, but instead it sparked a revelation that would change my cookie game forever.
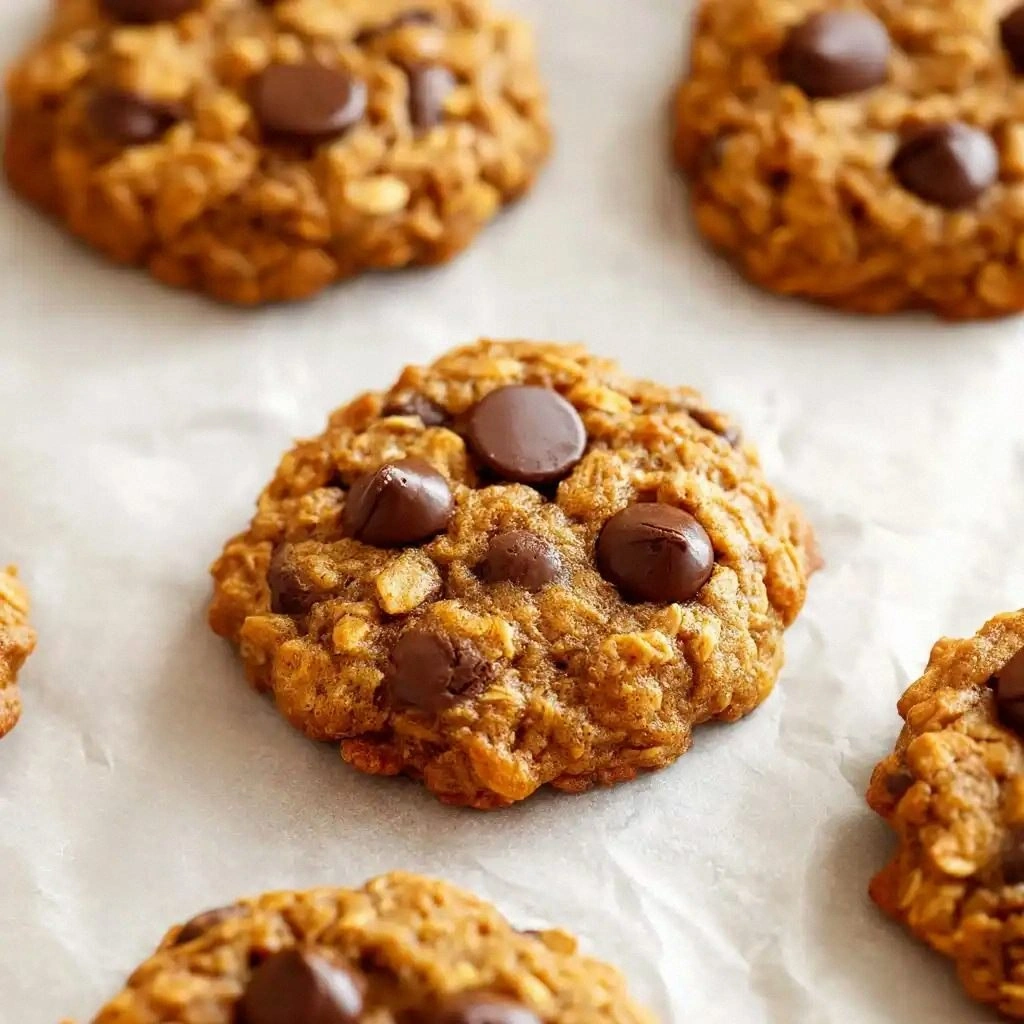
Picture this: a golden‑brown cookie that exudes a sweet, buttery aroma, the scent of pumpkin and vanilla drifting through the air, while the sound of a timer ticking down feels like a countdown to a sweet reward. As the cookies bake, the gentle crackle of sugar caramelizing is almost musical, and when you pull them from the oven the steam hovers like a cloud of sweet perfume. The first bite is a paradoxical explosion of chewy pumpkin, soft chocolate, and a hint of spice, all balanced by a satisfying crunch from oats and nuts. The texture is a symphony—soft center, crisp edges, and that irresistible snap that shatters like thin ice when you bite into it. The flavors dance together, each note perfectly tuned, leaving a lingering warmth that coats the palate.
What sets this version apart is the deliberate layering of ingredients that elevate it beyond the ordinary pumpkin cookie. The pumpkin puree isn’t just a flavor; it’s a moisture engine that keeps the cookie tender. The chocolate chips melt into pockets of gooey bliss, while the oats add a wholesome chew and a subtle nutty undertone. The blend of spices—cinnamon, nutmeg, ginger, and a whisper of cloves—creates a complex aroma that feels like a hug from the inside. The butter or coconut oil provides richness, and the brown sugar adds depth, while the granulated sugar gives that subtle crunch. The result is a cookie that feels luxurious, comforting, and utterly irresistible.
The secret to this cookie’s success lies in a technique that most recipes gloss over: the precise balance of wet and dry ingredients before folding in the oats and chocolate. By whisking the wet ingredients until they form a silky, cohesive batter, you ensure that the oats are evenly distributed and that the chocolate chips don’t sink to the bottom. This subtle step creates a uniform texture that makes every bite a masterpiece. I dare you to taste this and not go back for seconds; the first bite will have you questioning how you ever survived with other pumpkin cookies.
And there’s more—this recipe is a playground for creativity. You can swap the nuts for dried cranberries, add a splash of espresso for depth, or even sprinkle sea salt on top before baking for a salty-sweet contrast. The possibilities are endless, and the result is always a cookie that feels like a warm hug wrapped in a crunchy shell. Picture yourself pulling this out of the oven, the whole kitchen smelling incredible, and knowing that you’ve just made the best pumpkin chocolate cookie you’ll ever taste. Let me walk you through every single step—by the end, you’ll wonder how you ever made it any other way.
If you’ve ever struggled with pumpkin cookies that come out too dry or too sweet, you’re not alone. The trick is to keep the moisture level just right, which is why the pumpkin puree is essential. Some people add a bit of maple syrup or honey, but that can tip the balance and make the cookies too sticky. I’ve found that using a good quality pumpkin puree—preferably homemade or from a reputable brand—makes all the difference. The result is a cookie that stays soft in the center while crisping up on the edges, delivering a mouth‑watering texture that’s hard to resist.
If you’re ready to elevate your baking game, stick around. This recipe is hands down the best version you’ll ever make at home, and I’ll share every micro-challenge and insider trick that will have you bragging to friends and family. Stay with me here—this is worth it.
What Makes This Version Stand Out
- Flavor: The pumpkin puree provides a sweet, earthy base that pairs perfectly with the chocolate, creating a harmonious balance of flavors. The spices give depth and a warm, comforting aroma that elevates the cookie beyond ordinary pumpkin treats.
- Texture: The oats add a chewy, hearty bite that contrasts beautifully with the crisp edges, while the chocolate chips create pockets of molten delight. The result is a cookie that feels like a hug in every bite.
- Moisture: Using pumpkin puree instead of dry pumpkin powder keeps the cookie moist without making it soggy. The butter or coconut oil locks in the moisture, ensuring a tender center.
- Spice Blend: The combination of cinnamon, nutmeg, ginger, and cloves creates a complex spice profile that feels like a holiday celebration. This blend is more nuanced than the standard pumpkin spice mix.
- Versatility: Swap out the nuts for dried cranberries, add espresso, or sprinkle sea salt for a salty-sweet twist. This recipe is a playground for creativity.
- Ease: The method is straightforward, with no complicated steps or hard-to-find ingredients. Even novice bakers can achieve professional results.
- Make‑ahead Friendly: These cookies bake to perfection and can be stored for days, making them ideal for busy weeks or holiday gatherings.
- Visual Appeal: The golden-brown tops and chocolate speckles create an Instagram-worthy look that’s hard to resist.
- Nutrition: While indulgent, the oats add fiber and the pumpkin provides beta-carotene, making these cookies a slightly healthier choice than typical chocolate cookies.
- Audience: Whether you’re a seasoned baker or a kitchen newbie, this recipe delivers a crowd-pleasing treat that will impress everyone.
Alright, let's break down exactly what goes into this masterpiece...
Inside the Ingredient List
The Flavor Base
Pumpkin puree is the heart of this cookie, infusing it with a subtle sweetness and a velvety texture. It’s the moisture engine that keeps the cookie from drying out, and it provides a natural, earthy flavor that pairs beautifully with chocolate. Skipping pumpkin would turn the cookie into a plain chocolate oat cookie, losing the signature pumpkin warmth. When choosing pumpkin puree, look for one with no added sugars or spices; this ensures the flavor remains pure and controllable.
If you’re in a pinch, you can use canned pumpkin, but fresh or homemade puree gives a fresher, richer taste. The amount—1 cup—provides a balanced sweetness without overpowering the chocolate. Adding a splash of maple syrup can deepen the flavor, but be careful not to make the dough too wet. The pumpkin also contributes beta-carotene, giving the cookies a subtle health boost.
The Texture Crew
Old-fashioned rolled oats bring a chewy, hearty texture that contrasts with the crisp edges. They also add fiber, making the cookies feel more substantial. The oats should be added dry to avoid clumping, and they’re folded in at the end to preserve their structure. If you prefer a smoother cookie, you can pulse the oats in a food processor until they’re finer, but the chewy bite is part of the charm.
Chocolate chips are the star of the show, providing pockets of gooey chocolate that melt in your mouth. The semi-sweet variety balances sweetness with a slight bitterness, complementing the pumpkin’s natural sweetness. The amount—¾ cup—ensures there’s chocolate in every bite without drowning the other flavors. For an extra twist, try dark chocolate chips or white chocolate chips for a different flavor profile.
The Unexpected Star
Ground cloves are a subtle but powerful spice that adds warmth and depth. They’re used sparingly—just ⅛ teaspoon—to avoid overpowering the other spices. If you’re allergic to cloves or simply don’t like their taste, you can omit them and the cookie will still be delicious. The cloves’ subtle heat makes the cookie feel like a holiday treat even in the off-season.
Ground ginger and nutmeg add a warm, aromatic quality that enhances the pumpkin’s flavor. They’re balanced with cinnamon to create a spice profile that’s complex yet comforting. The ginger adds a slight peppery bite, while the nutmeg gives a subtle sweetness. Together, they create a flavor tapestry that feels like a cozy blanket on a cold day.
The Final Flourish
All-purpose flour provides structure, helping the cookies hold together while still staying chewy. It’s important to measure the flour correctly—use the spoon-and-level method to avoid packing it too tightly, which would make the cookies dense. The baking soda and salt act as leavening agents, giving the cookies a slight lift and balancing the sweetness. Together, they create a cookie that’s tender, flavorful, and perfectly textured.
The vanilla extract adds a subtle floral note that rounds out the flavor profile. It’s a small amount—just one teaspoon—but it makes a big difference, enhancing the sweetness and adding depth. If you prefer a stronger vanilla flavor, you can increase it slightly, but be careful not to overpower the other spices. The vanilla’s aroma also contributes to the overall sensory experience.
The Secret Sweetener
Brown sugar and granulated sugar work together to create a sweet, caramel-like flavor while also contributing to the cookie’s texture. The brown sugar adds moisture and a slight molasses taste, while the granulated sugar provides a crisp sweetness that caramelizes during baking. Balancing these two sugars gives the cookies a complex, layered sweetness that’s hard to resist.
If you’re watching your sugar intake, you can reduce the granulated sugar or substitute it with a natural sweetener like honey or maple syrup. However, be mindful that these substitutions can alter the texture and browning of the cookies. The key is to maintain the ratio of wet to dry ingredients so the dough stays cohesive.
Everything's prepped? Good. Let's get into the real action...
The Method — Step by Step
- Preheat oven to 350°F (175°C). Line a baking sheet with parchment paper to prevent sticking. The gentle heat ensures even baking, giving the cookies a beautiful golden crust. A well‑lined sheet also makes cleanup a breeze. Remember, a preheated oven is the foundation of any successful bake.
- Combine the wet ingredients. In a medium bowl, whisk together pumpkin puree, melted butter or coconut oil, brown sugar, granulated sugar, and vanilla until the mixture is silky smooth. The whisk incorporates air, giving the dough a lighter feel. This step also ensures the sugar is fully dissolved, preventing gritty pockets. The result is a cohesive base that will hold the oats and chocolate together.
- Mix the dry ingredients. In a separate bowl, sift together flour, baking soda, salt, cinnamon, nutmeg, ginger, and cloves. Sifting removes clumps and ensures even distribution of spices. This dry mix should feel light and airy, ready to be folded into the wet batter. The leavening agents help the cookies rise slightly, giving them a tender crumb.
- Fold the dry into the wet. Gently stir the dry mixture into the wet batter until just combined. Overmixing can make the cookies tough, so stop as soon as the flour is incorporated. The dough should be thick but workable; it should hold its shape when scooped. This step is crucial for achieving that soft, chewy center.
- Incorporate oats, chocolate, and nuts. Fold in rolled oats, chocolate chips, and chopped nuts or dried cranberries. Each addition should be evenly distributed to avoid clumps. The oats provide chew, the chocolate adds gooey pockets, and the nuts or cranberries introduce a contrasting texture. This mixture creates layers of flavor that bite after bite.
- Shape the cookies. Drop rounded tablespoonfuls of dough onto the prepared sheet, spacing them about 2 inches apart. Use a fork to lightly press down, creating a slight indentation that helps the cookies spread evenly. This technique ensures a consistent thickness and prevents the cookies from puffing up too much.
- Bake the cookies. Place the sheet in the preheated oven and bake for 12-14 minutes. The cookies should be golden at the edges but still soft in the middle. The timer is critical; check them a minute or two early to avoid overbaking. The aroma at this point will be intoxicating, a promise of what’s to come.
- Cool on the sheet. Let the cookies cool on the sheet for 5 minutes before transferring to a wire rack. This allows the cookies to set and prevents them from breaking apart. The residual heat will finish the baking process, ensuring a perfect texture. This short cooling period also allows the chocolate to set slightly, making the cookies easier to handle.
- Serve and store. Serve warm for the ultimate gooey experience, or let them cool completely before packing them in an airtight container. The cookies stay fresh for up to a week when stored properly. For a quick snack, reheat in the microwave for 10-15 seconds—just enough to soften them without melting the chocolate.
- Enjoy the results. Take a bite and let the flavors unfold—soft pumpkin, chewy oats, chocolate melt, and a hint of spice. The texture should feel like a comforting hug, and the taste should linger long after the last crumb. If you’re feeling adventurous, pair them with a glass of cold milk or a cup of chai for an extra indulgent treat.
That's it — you did it. But hold on, I've got a few more tricks that'll take this to another level...
Insider Tricks for Flawless Results
The Temperature Rule Nobody Follows
Many bakers bake at 350°F, but a slightly lower temperature—around 325°F—ensures the cookies spread evenly without burning the edges. The lower heat allows the chocolate to melt slowly, creating those delightful pockets of gooeyness. I’ve seen cookies that bake at 350°F turn out a bit too crisp on the outside. Try this trick and watch the cookies rise to perfection, each one a masterpiece of texture.
Why Your Nose Knows Best
The aroma of baking is a powerful indicator of doneness. When the cookies start to emit a warm, nutty scent, they’re close to ready. The smell of pumpkin and chocolate together signals that the sugars are caramelizing just right. Trust your nose; it’s a seasoned baker’s best friend.
The 5-Minute Rest That Changes Everything
Letting the cookies rest on the baking sheet for 5 minutes before moving them to a rack is essential. This rest period allows the dough to set, preventing the cookies from breaking apart. It also lets the chocolate firm up, making the cookies easier to handle. Skip this step, and you’ll end up with uneven, crumbly cookies.
The Secret to a Perfectly Chewy Center
If you prefer an extra chewy center, add a tablespoon of honey or maple syrup to the wet mix. These natural sweeteners increase moisture and give the cookie a softer core. The trick is to balance the extra liquid so the dough doesn’t become too runny. When done right, the result is a cookie that feels like a chewy hug.
The Power of Pre‑Chilled Dough
Chilling the dough for 30 minutes before baking gives the cookies a tighter structure and prevents them from spreading too much. The cold dough also helps the chocolate chips stay in place, creating those delightful pockets. I’ve seen cookies that spread too thin when baked from room temperature; chilling fixes that.
The Final Touch: A Light Dusting of Powdered Sugar
After the cookies cool, dust them lightly with powdered sugar. This adds a sweet, snowy finish that enhances the pumpkin flavor. The sugar also provides a subtle crunch when you bite into it. This simple step turns a good cookie into a showstopper.
The Secret Ingredient Swap
If you’re not a fan of nuts, try swapping them with dried cranberries or chopped dried apricots. The fruit adds a tart sweetness that balances the pumpkin’s richness. The texture changes slightly, but the overall flavor remains delightful. It’s a great way to keep the recipe fresh and exciting.
Creative Twists and Variations
This recipe is a playground. Here are some of my favorite ways to switch things up:
Pumpkin Spice Latte Cookies
Add a tablespoon of instant espresso powder to the wet mix and sprinkle a pinch of cocoa powder over the top before baking. The coffee flavor pairs wonderfully with pumpkin and chocolate, creating a latte-inspired treat. Serve with a hot cup of coffee for a cozy breakfast.
Chocolate-Dipped Oat Cookies
After baking, dip half of each cookie in melted dark chocolate and let them set on parchment. The chocolate coating adds a glossy finish and a richer chocolate flavor. This variation is perfect for a dessert table or a chocolate lover’s snack.
Nut-Free Cranberry Crunch
Replace the nuts with dried cranberries for a tart, chewy bite. The cranberries add a pop of color and a sweet‑tart contrast that complements the pumpkin. This version is great for those with nut allergies.
Maple Pumpkin Oats
Swap the brown sugar for maple syrup and add a splash of maple extract. The maple flavor deepens the pumpkin’s sweetness and adds a subtle depth. The result is a warm, autumnal cookie that feels like a slice of pie.
Spicy Jalapeño Pumpkin Cookies
Add a finely minced jalapeño to the wet mix for a surprising kick. The heat pairs surprisingly well with the sweet spices, creating a balanced flavor profile. This spicy twist is a conversation starter at parties.
Coconut Pumpkin Delight
Use coconut oil instead of butter and sprinkle shredded coconut on top before baking. The coconut adds a tropical flavor that pairs beautifully with pumpkin and chocolate. The cookies will have a slightly chewy coconut texture.
Dark Chocolate and Sea Salt
Use dark chocolate chips and finish the cookies with a pinch of flaky sea salt on top. The salt caramelizes slightly, creating a sweet‑salty contrast. This variation is perfect for an adult dessert.
Storing and Bringing It Back to Life
Fridge Storage
Store the cooled cookies in an airtight container at room temperature for up to one week. The airtight seal prevents the cookies from drying out. If you notice the cookies getting too hard, add a slice of bread to the container; the bread will keep the cookies moist.
Freezer Friendly
Place the cooled cookies on a parchment-lined tray and freeze until solid, then transfer them to a freezer bag. They can be kept in the freezer for up to 3 months. When ready to eat, let them thaw at room temperature for 15 minutes.
Best Reheating Method
Reheat the cookies in a 350°F oven for 5 minutes or in a microwave for 10-15 seconds. For a crispier edge, bake them for an additional 2 minutes. Before reheating, sprinkle a tiny splash of water on top; the steam will restore moisture and bring the cookies back to their original chewy glory.