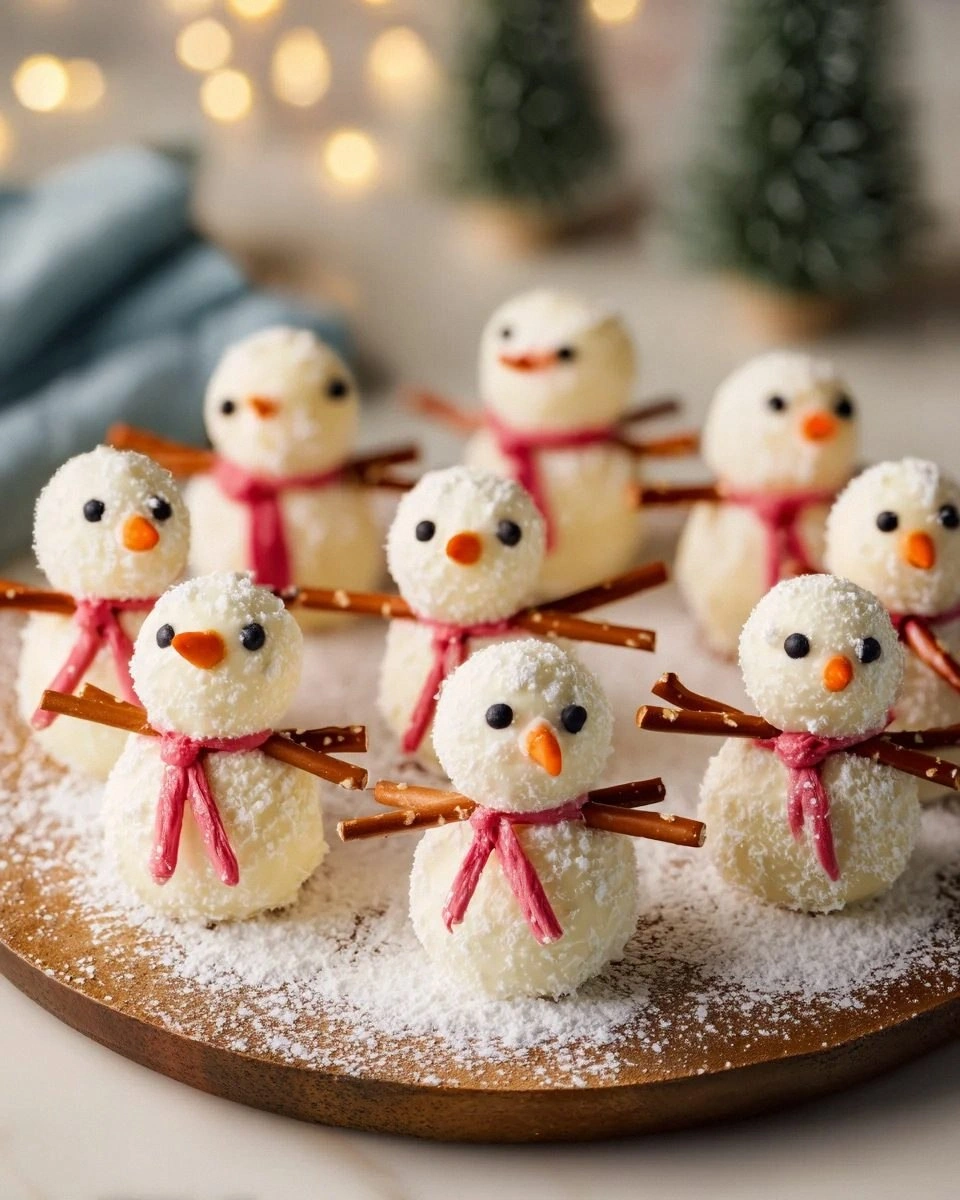
Picture this: it's 11 p.m. on a Tuesday, I'm standing in my kitchen in my ugliest Christmas sweater, and I've just melted an entire bag of white chocolate chips into a gloopy disaster. The recipe I was following online said "just microwave for 30 seconds" — but they forgot to mention that white chocolate is basically the diva of the chocolate world. One minute I'm dreaming of adorable snowman-shaped treats, the next I'm staring at a bowl of what looks like gluey mashed potatoes. But here's where the magic happened: instead of tossing the whole mess, I started experimenting. What emerged three hours later were the most adorable, delicious, and downright impressive snowman truffles my friends still talk about every December. These aren't just cute — they're the kind of dessert that makes people stop mid-conversation, close their eyes, and make that involuntary "mmm" sound.
I've made these snowman truffles for office parties, family gatherings, and even as last-minute gifts for neighbors. They've saved me from showing up empty-handed to potlucks and turned me into the unofficial dessert hero of my cul-de-sac. The best part? They're deceptively simple once you know the tricks — and I'm sharing every single one of them with you today. No more grainy chocolate, no more falling-apart truffles, no more Pinterest fails that end up on the naughty list.
What makes these snowman truffles different from every other recipe cluttering the internet? They actually taste as good as they look. We're talking silky-smooth centers that melt like snow on your tongue, perfectly tempered chocolate shells that snap satisfyingly under your teeth, and decorations that stay put instead of sliding off like a bad toupee. Plus, I'll show you how to make them ahead of time so you're not stuck in the kitchen while everyone else is sipping eggnog and arguing over board games.
Let me walk you through every single step — by the end, you'll wonder how you ever made it any other way. Trust me, once you nail this technique, you'll be the person everyone begs to bring "those adorable snowman thingies" to every holiday gathering. And the secret ingredient that keeps them from tasting sickeningly sweet? That revelation comes in step four — stay with me here, because this is worth it.
What Makes This Version Stand Out
Silky Centers: These aren't those dense, heavy truffles that sit in your stomach like holiday fruitcake. We're creating airy, melt-in-your-mouth centers that practically evaporate on your tongue, leaving behind pure chocolate bliss. The secret lies in the ratio of cream to chocolate — most recipes get this completely wrong. Here's what actually works.
Sturdy Structure: Nothing's more heartbreaking than watching your carefully crafted snowmen collapse into blobby puddles. My technique creates truffles that hold their shape even when your nephew grabs three at once (we've all been there). The chocolate coating sets firm enough to stack in containers but still bites through easily.
Make-Ahead Magic: These beauties can be prepped three weeks ahead and frozen, or kept fresh in the fridge for a full week. That means you can spread out the work across multiple days instead of pulling an all-nighter before your cookie exchange. Picture yourself calmly sipping coffee while everyone else frantically bakes.
Customizable Characters: Once you master the base recipe, you can create an entire winter wonderland. We're talking snowmen, snow-women, snow-babies — even snow-pets if you're feeling adventurous. The decorating technique I'll show you works with any theme, not just Christmas. Valentine's snowmen with pink scarves? Absolutely.
Kid-Friendly Assembly: Unlike those complicated gingerbread houses that end with tears and candy everywhere, decorating these truffles is actually fun for kids. The chocolate sets quickly, so little ones see instant results. Plus, the decorating process keeps them busy while you're finishing other holiday prep.
Professional Polish: These look like they came from an upscale chocolatier, but they cost a fraction of boutique prices. Your guests will assume you took a pastry class or secretly apprenticed with a Swiss chocolatier. I won't tell if you don't.
Universal Appeal: I've served these to chocolate snobs, picky toddlers, and that one uncle who claims he "doesn't eat sweets" — they all devour them. The white chocolate base appeals to milk chocolate lovers, while the dark chocolate details satisfy the sophisticated palates.
Inside the Ingredient List
The Chocolate Foundation
White chocolate gets a bad rap, but hear me out — we're not using those waxy chips from the baking aisle that taste like sweetened candle wax. You want real white chocolate with cocoa butter listed as the first ingredient, not palm oil or mystery "white chips." I splurge on Callebaut or Ghirardelli because they melt smoothly and taste like vanilla ice cream in chocolate form. The difference is night and day — good white chocolate tastes like sweet cream and vanilla, while the cheap stuff tastes like regret and artificial flavoring.
Dark chocolate for the details needs to be at least 60% cacao, but don't go higher than 70% or your snowmen will look like they've been through a coal storm. The bitter chocolate creates perfect contrast to the sweet white chocolate base, preventing these from becoming sugar bombs that make your teeth ache. Plus, dark chocolate sets firmer than milk chocolate, so your snowmen's features won't smudge when you package them up.
The Texture Crew
Heavy cream is what transforms chocolate from a solid bar into silky truffle centers. Don't substitute half-and-half or milk — they don't have enough fat to create that luscious, ganache-like consistency. The cream should be fresh and full-fat; this isn't the place for calorie-cutting. When heated properly, it melts chocolate gently without scorching, creating that perfect fondant texture that makes people close their eyes in happiness.
Unsalted butter might seem unnecessary, but it adds richness and helps the truffles set properly in the fridge. Just a tablespoon makes the difference between good truffles and transcendent ones. Make sure it's softened but not melted — we're going for creamy, not greasy. European-style butter with higher fat content works best if you can find it.
The Unexpected Star
Here's where I lose some people — a pinch of sea salt. Not table salt, not kosher salt, but flaky sea salt like Maldon. It sounds counterintuitive in a sweet treat, but salt actually makes chocolate taste more chocolatey by suppressing bitterness and enhancing sweetness. It's like turning up the volume on every other flavor. Just a tiny pinch in the ganache makes the vanilla pop and keeps the white chocolate from tasting cloying.
Pure vanilla extract is non-negotiable. Skip the imitation stuff that tastes like cheap perfume — we're creating snowman truffles, not snowman regrets. Real vanilla adds depth and warmth that complements the white chocolate beautifully. Madagascar vanilla gives classic flavor, while Tahitian vanilla adds floral notes that make these taste extra special.
The Final Flourish
Orange zest for the carrot noses might seem like a tiny detail, but it adds bright citrus notes that cut through all that chocolate richness. Use a microplane to get fine zest that incorporates smoothly into the modeling chocolate. Orange extract works in a pinch, but fresh zest tastes brighter and more natural. Plus, the tiny flecks look like real carrot texture.
Powdered sugar for dusting needs to be ultra-fine with no lumps. Sift it through a fine-mesh strainer to create that perfect snowy finish. Regular granulated sugar won't work — it stays grainy and dissolves into sticky spots. If you want extra sparkle, mix in a tablespoon of cornstarch with the powdered sugar; it prevents clumping and keeps your snowmen looking fresh for days.

The Method — Step by Step
- Start by finely chopping your white chocolate into uniform pieces about the size of peas. This isn't busy work — chocolate melts evenly when all pieces are the same size, preventing those stubborn chunks that refuse to melt. Using a serrated knife makes this job easier; the teeth grip the chocolate so it doesn't go shooting across your cutting board like escapees from chocolate prison. You'll need about two cups of chopped chocolate for a batch that makes 24 snowmen, which sounds like a lot until you see how quickly they disappear.
- Pour the heavy cream into a small saucepan and heat it over medium-low heat until you see tiny bubbles forming around the edges — this takes about three minutes, but don't walk away. The moment it starts to simmer, remove it from heat; boiling cream creates a skin on top that ruins the smooth texture we're after. If you accidentally let it boil, just skim off the skin and proceed — we've all been there, and your truffles will still taste amazing. The cream should be hot enough to melt chocolate but cool enough that you can stick your finger in for a second without yelping.
- Here's the game-changer: pour the hot cream over the chopped chocolate and let it sit undisturbed for exactly two minutes. Don't stir yet — this waiting period allows the chocolate to melt gently from the outside in, creating a smooth emulsion. Most recipes get this wrong by having you stir immediately, which cools the cream too fast and leaves you with grainy lumps. Set a timer and resist the urge to peek; this is where patience pays off in truffle texture.
- Now grab a whisk and start stirring from the center out, making small circles that gradually get larger. The chocolate will transform from separated chunks into glossy ganache right before your eyes — it's pure magic. If you've got kids around, this is the moment to call them over; watching chocolate and cream become ganache never gets old. The mixture should be smooth and shiny, like liquid velvet that coats the back of a spoon. If you see any stubborn lumps, just keep stirring — they'll usually melt into submission.
- Add the softened butter and vanilla extract, then whisk until completely incorporated. The butter might look like it's not mixing in at first, but keep going — it will emulsify into the ganache, making it even richer and silkier. This is also when you add that pinch of sea salt; sprinkle it over the surface so it dissolves evenly rather than dropping in one salty bomb. The ganache should be thick enough to mound on a spoon but still pourable — think yogurt consistency rather than pudding.
- Press plastic wrap directly onto the surface of the ganache to prevent a skin from forming, then refrigerate for exactly 45 minutes. Too short and the truffles won't hold their shape; too long and the ganache becomes rock-hard and impossible to scoop. This is the perfect time to clean up your kitchen and prepare your decorating station. Set out all your snowman accessories — mini chocolate chips for buttons, orange zest for noses, tiny licorice pieces for hats — because once the ganache is ready, you'll want to work quickly.
- Scoop the chilled ganache into balls using a small cookie scoop or two spoons, working quickly so the chocolate doesn't warm up too much from your hands. Roll each portion between your palms to form smooth spheres — don't worry about perfection here; slightly irregular shapes look more natural for snowmen anyway. If the ganache starts sticking to your hands, dust them lightly with powdered sugar or wear food-safe gloves. Place the rolled truffles on a parchment-lined baking sheet and refrigerate while you prepare the coating chocolate.
- Tempering the white chocolate coating might sound intimidating, but here's the foolproof method that never fails. Chop another two cups of white chocolate and melt two-thirds of it in the microwave in 20-second bursts, stirring between each burst. When it's almost melted, add the remaining third and stir until completely smooth — this "seeds" the chocolate with properly crystallized cocoa butter, ensuring it sets shiny and snap-able rather than dull and soft. The chocolate should be fluid but not hot; if it feels warm to the touch, let it cool for a minute before dipping.
- Now comes the fun part: dipping your truffle centers. Drop one truffle into the melted chocolate, then use a fork to lift it out, tapping the fork against the bowl's edge to let excess chocolate drip off. The chocolate should coat the truffle in a thin, even layer — too thick and it overwhelms the delicate ganache, too thin and you'll see the filling through the shell. Place each dipped truffle on a fresh piece of parchment, then immediately decorate while the chocolate is still wet. Work with one truffle at a time so the decorations stick properly.
- Create your snowman features using mini chocolate chips for buttons, orange zest formed into tiny carrot shapes for noses, and black licorice cut into thin strips for mouths. The key is working quickly while the chocolate coating is still tacky — once it sets, nothing sticks. I like to pre-make all my decorations and keep them in small bowls so I'm not frantically cutting licorice while chocolate hardens. Each snowman gets three buttons down the front, two eyes, and a carrot nose — simple but instantly recognizable.
That's it — you did it. But hold on, I've got a few more tricks that'll take this to another level...
Insider Tricks for Flawless Results
The Temperature Rule Nobody Follows
Room temperature is your secret weapon when making truffles, but most people get it wrong. Your kitchen should be around 68-70°F — too warm and your chocolate won't set properly, too cool and it sets before you can decorate. I learned this the hard way during a December cold snap when my kitchen hit 62°F and my snowmen looked like they'd been through a blizzard. If your house runs cold, set up a space heater nearby or work near (but not too close to) a warm oven. The chocolate should stay fluid for about five minutes after melting, giving you plenty of time to dip and decorate.
Why Your Nose Knows Best
Here's a weird trick that works every time: smell your chocolate before using it. Good white chocolate should smell like sweet cream and vanilla, not plastic or artificial vanilla. If it smells off, it will taste off — chocolate absorbs odors from its environment like a sponge. Store your chocolate wrapped tightly away from strong-smelling foods like onions or coffee. I once made truffles with chocolate stored next to curry powder; the results were... interesting. Not in a good way.
The 5-Minute Rest That Changes Everything
After dipping each truffle, let it rest for exactly five minutes before moving it to the fridge. This allows the chocolate coating to crystallize properly, creating that satisfying snap when you bite into it. Rush this step and you'll get soft, fingerprint-prone snowmen that look like they've been handled by kindergarteners. I set a timer and use those five minutes to clean up or prep the next batch. The chocolate should lose its glossy sheen and look slightly matte when it's ready for refrigeration.
The Secret to Smooth Rolling
Warm hands are the enemy of perfect truffles, but cold hands make rolling impossible. The sweet spot? Slightly cool hands that aren't clammy. Run your hands under cool water for 30 seconds, then dry thoroughly before rolling. Some people wear food-safe gloves, but I find they make the chocolate sweat. If your palms run hot, work in shorter bursts and keep a bowl of ice water nearby for quick hand-cooling breaks. Your truffles will be perfectly round instead of lumpy and misshapen.
Storage That Actually Works
Here's the thing about homemade chocolates: they don't have preservatives, so they need proper storage. But don't just throw them in any old container — chocolate absorbs odors and moisture like crazy. Store them in an airtight container with a sheet of parchment between layers, and add a packet of food-safe silica gel (those little packets that come with shoes) to absorb excess moisture. They'll stay fresh for a week at room temperature or a month in the fridge. Just bring them to room temperature before serving — cold chocolate dulls flavors.
Creative Twists and Variations
This recipe is a playground. Here are some of my favorite ways to switch things up:
The Snowman Family Portrait
Create different sizes by using multiple scoop sizes — large for dad snowmen, medium for mom, tiny for babies. Mix up the expressions too: some happy, some surprised, some with winking eyes made from half a chocolate chip. Arrange them on a platter like they're posing for a family photo. Kids go absolutely nuts for this, and it makes a stunning centerpiece for holiday dessert tables.
The Gourmet Upgrade
Infuse your cream with flavors before making the ganache — steep a cinnamon stick and star anise for Mexican hot chocolate snowmen, or add a tablespoon of espresso powder for mocha versions. You can also stir in a tablespoon of your favorite liqueur (Baileys, Kahlua, or Frangelico) after the cream cools slightly. The alcohol burns off, leaving just the flavor. These adult versions disappear faster than the regular ones at office parties.
The Winter Wonderland Scene
Instead of individual snowmen, create a whole scene on a large platter. Use shredded coconut as snow, pretzel sticks as trees, and blue-tinted white chocolate as ice. Pipe extra chocolate into penguin shapes or tiny sleds. This becomes an edible centerpiece that doubles as entertainment — kids love helping arrange the scene, and adults can't resist photographing it before devouring everything.
The Flavor-Coated Friends
Roll your finished truffles in different coatings before the chocolate sets: crushed candy canes for peppermint snowmen, toasted coconut for texture, or colored sugar for a sparkly effect. You can also dip just the bottom in dark chocolate so they have "dirty" snowman bases. These variations make each truffle a surprise, and they're perfect for gift boxes where you want variety.
The Character Collection
Turn your snowmen into other winter characters — add marshmallow hats for snow-women, licorice scarves for snow-skaters, or pretzel stick arms for snow-climbers. With different decorations, you can create Olaf lookalikes, penguins, or even tiny polar bears. The base recipe stays the same; only the decorations change. These themed versions are huge hits at birthday parties and school events.
The Dietary Adaptations
For dairy-free friends, substitute full-fat coconut cream for the heavy cream and use vegan white chocolate. The coconut adds a subtle tropical flavor that pairs beautifully with the white chocolate. For gluten-free needs, you're already set — this recipe is naturally gluten-free. Just check that any decorations (like pretzels or cookies) are certified gluten-free if you're serving celiac guests.
Storing and Bringing It Back to Life
Fridge Storage
Store your finished snowman truffles in an airtight container in the fridge for up to one week. Layer them between sheets of parchment paper to prevent sticking, and keep them away from strong-smelling foods like onions or garlic. The cold preserves their shape and prevents the chocolate from blooming (that white film that sometimes appears on chocolate). Just remember to bring them to room temperature before serving — cold chocolate tastes flat and waxy.
Freezer Friendly
These truffles freeze beautifully for up to three months. Flash-freeze them first by placing the tray of decorated snowmen in the freezer for two hours, then transfer to a freezer-safe container with parchment between layers. This prevents them from sticking together. When you're ready to serve, thaw them overnight in the fridge, then let them come to room temperature for 30 minutes. They'll taste as fresh as the day you made them.
Best Reheating Method
Good news — these don't need reheating! But if your chocolate has bloomed or they need refreshing, here's the trick: place them in a barely-warm oven (just the pilot light or lowest setting) for 2-3 minutes. This brings back the shine without melting the decorations. You can also use a hair dryer on low heat, held 12 inches away, to gently warm the surface. Just don't overdo it or your snowmen will turn into puddles.