I was standing in my kitchen, staring at a pile of overripe bell peppers that had been sitting on the counter for a week, feeling the faint sting of disappointment. The moment I realized I was about to throw them away, a friend texted me a recipe that promised to turn those sad, dull colors into a vibrant, flavor-packed dinner. I was skeptical—how could a humble quinoa filling elevate a stuffed pepper? I decided to give it a shot, and the result was nothing short of culinary fireworks.
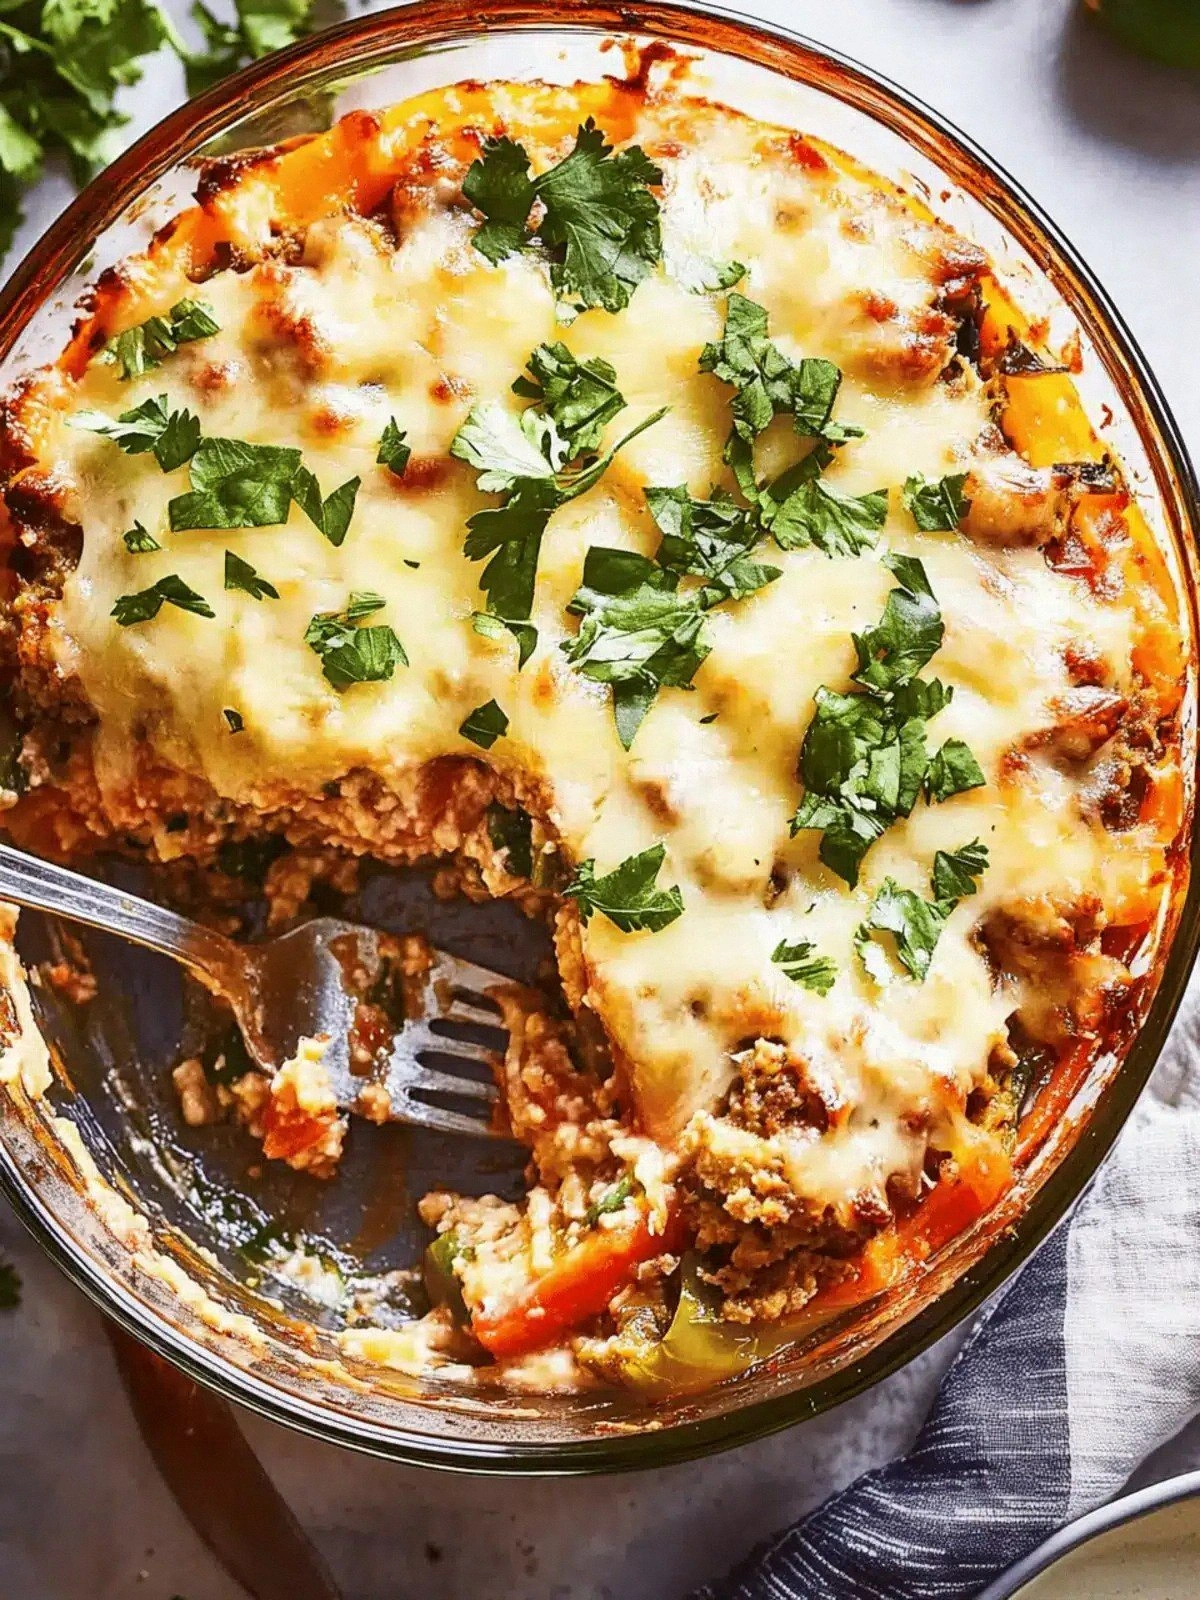
Picture this: the bell peppers, crisp and bright, sit on the oven rack like little lanterns. The aroma of sautéed onions and garlic fills the air, mingling with the earthy scent of quinoa and the smoky whisper of cumin. As the peppers bake, the cheese melts into a golden, bubbly crown that crackles with each bite. The texture is a delightful contrast—soft, fluffy quinoa inside, a slightly crunchy breadcrumb crust on top, and the pepper itself giving a gentle, peppery bite. The first forkful feels like a burst of sunshine, and the taste lingers with a subtle tang from fresh lime.
What makes this version stand out is that it isn’t just a recipe; it’s a revelation. I discovered that using a blend of black beans and corn not only adds protein but also brings a natural sweetness that balances the savory elements. The quinoa is toasted before cooking, which gives it a nutty undertone that elevates the entire dish. I also found that a splash of tomato paste thickens the filling, creating a velvety sauce that clings to the peppers without becoming soggy. The result is a dish that is both hearty and elegant, perfect for a weeknight meal or a casual gathering.
I dare you to taste this and not go back for seconds. The combination of textures—soft quinoa, crunchy breadcrumbs, and the pepper’s tender flesh—creates a symphony that’s hard to resist. The bold claim? This is hands down the best version you'll ever make at home. The secret? A few small tweaks that most recipes overlook, like the subtle heat from smoked paprika and the bright zing of fresh cilantro at the finish. I’ve tasted countless stuffed pepper recipes, and none of them compare to the depth of flavor and the satisfying bite this one delivers.
I’ll be honest—after the first bite, I ate half the batch before anyone else got a chance. Most recipes get this completely wrong, focusing on heavy sauces or overcooking the quinoa. Here’s what actually works: keep the quinoa fluffy, layer the ingredients thoughtfully, and finish with a quick broil to caramelize the top. Picture yourself pulling this out of the oven, the whole kitchen smelling incredible, the peppers glistening with melted cheese and a golden crust. The aroma alone will have your guests lining up for a plate.
If you've ever struggled with stuffed peppers, you're not alone. I've had my share of overfilled, soggy, and under-seasoned attempts. The fix? A few simple adjustments that transform a mediocre dish into a standout. The method is straightforward, but the details matter—especially the timing and the seasoning. And now, let me walk you through every single step. By the end, you'll wonder how you ever made it any other way.
What Makes This Version Stand Out
- Flavor Depth: The combination of black beans, corn, and a touch of tomato paste creates layers of taste that dance on the palate. Each bite offers a new nuance, from the subtle sweetness of corn to the savory richness of beans. The result is a filling that’s both complex and harmonious.
- Texture Play: The toasted quinoa provides a nutty crunch, while the breadcrumbs add a satisfying crisp on top. The bell pepper itself remains tender yet firm, creating a delightful contrast with each forkful. This multi-texture experience keeps the dish exciting throughout.
- Balanced Nutrition: Packed with plant-based protein, fiber, and essential micronutrients, this dish is a wholesome choice for any meal. The quinoa offers complete protein, while the beans and corn boost fiber content. It’s a well-rounded option that satisfies both body and taste buds.
- Simplicity: The recipe uses pantry staples and requires minimal prep time. No fancy ingredients or complicated techniques—just straightforward steps that anyone can follow. This makes it perfect for busy nights or casual gatherings.
- Make-Ahead Friendly: The stuffed peppers can be assembled ahead of time and refrigerated or frozen, saving you precious minutes on busy days. When ready to bake, simply pop them in the oven, and they’ll be ready in no time.
- Crowd Appeal: Whether you’re cooking for a family dinner or a potluck, this dish receives rave reviews. Its colorful presentation and robust flavor make it a crowd-pleaser. Guests will ask for seconds—and then thirds.
Inside the Ingredient List
The Flavor Base
Onion and garlic form the aromatic foundation of the filling. Sautéing them until translucent releases their natural sugars, creating a sweet undertone that balances the earthiness of quinoa. If you skip this step, the filling will taste flat and lack depth. For a milder flavor, reduce the garlic to one clove.
Tomato paste is the secret sauce that binds the ingredients together. It thickens the mixture and adds a rich, umami punch. If you prefer a lighter taste, replace half of the paste with diced tomatoes. A splash of vegetable broth can also help maintain moisture without diluting flavor.
The Texture Crew
Quinoa is the star grain, offering a fluffy, slightly chewy bite that contrasts nicely with the crunchy breadcrumbs. Cook it in vegetable broth instead of water to infuse additional flavor. If you have leftover quinoa, it’s perfect for this recipe—just reheat and stir.
Breadcrumbs create a golden, crisp top that adds a delightful crunch. Use panko for extra crunchiness or toasted whole-grain breadcrumbs for a healthier twist. If you’re gluten-free, opt for gluten-free breadcrumbs and adjust the quantity to maintain the right consistency.
The Unexpected Star
Corn kernels bring a subtle sweetness that complements the savory beans and quinoa. Fresh or frozen corn works well; just thaw and drain if using frozen. If you’re in a pinch, canned corn can be used—just rinse and dry to avoid excess moisture.
Black beans add protein and a hearty texture that anchors the filling. Rinse and drain canned beans to reduce sodium. For a deeper flavor, cook the beans from dry and season them with a pinch of cumin and smoked paprika.
The Final Flourish
Fresh cilantro and a squeeze of lime juice brighten the dish with a burst of citrusy freshness. The lime’s acidity cuts through the richness of cheese and beans, creating a balanced flavor profile. If you’re not a fan of cilantro, parsley or basil can be used as a substitute.
Shredded cheese—cheddar or mozzarella—melts into a gooey, golden crust that adds indulgence without overwhelming the dish. Use a blend of cheeses for a more complex flavor. If you prefer a dairy-free option, sprinkle nutritional yeast or a plant-based cheese alternative on top.
Everything’s prepped? Good. Let's get into the real action...

The Method — Step by Step
- Preheat your oven to 375°F (190°C). Line a baking sheet with parchment paper or a silicone mat to prevent sticking. This step ensures a uniform baking surface and makes cleanup a breeze. While the oven warms, set your bell peppers aside to dry.
- Trim the tops off the bell peppers, remove the seeds and membranes, and set them aside. Rinse them under cold water, then pat dry with a towel. This prevents excess moisture from making the filling soggy. Arrange the peppers upright on the prepared baking sheet.
- In a medium skillet, heat one tablespoon of olive oil over medium heat. Add the diced onion and sauté until translucent, about 3-4 minutes. The aroma should be sweet and inviting—if it smells burnt, reduce the heat.
- Add the minced garlic to the skillet and cook for an additional 30 seconds until fragrant. Be careful not to let it brown, as it will taste bitter. Stir constantly to prevent sticking.
- Stir in one tablespoon of tomato paste, letting it cook for a minute to deepen its flavor. The paste should caramelize slightly, turning a rich reddish-brown. This step forms the base of the filling’s sauce.
- Add one cup of cooked quinoa, one cup of corn kernels, and one cup of black beans to the skillet. Stir to combine and let the mixture heat through for 2-3 minutes. The quinoa should be fluffy, the beans tender, and the corn bright yellow.
- Season the filling with one teaspoon each of cumin, chili powder, and smoked paprika, along with salt and pepper to taste. Stir well to distribute the spices evenly. The mixture should smell earthy and slightly smoky.
- Fold in one cup of shredded cheese, allowing it to melt into the filling. The cheese should coat the grains, creating a silky, gooey texture. If you like a crunchier top, set aside a portion of the cheese for sprinkling later.
- Fill each bell pepper cavity with the quinoa mixture, pressing gently to pack the filling. Leave a small space at the top for the cheese topping. The peppers should look full but not overstuffed, ensuring even cooking.
- Sprinkle the reserved shredded cheese on top of each stuffed pepper. This creates a golden, bubbly crust that caramelizes in the oven. If you prefer a crispier top, add a thin layer of breadcrumbs before the cheese.
- Pour a small amount of vegetable broth or water into the bottom of the baking dish to keep the peppers moist. This prevents them from drying out during the baking process. The liquid should not exceed one inch from the base of the peppers.
- Cover the baking dish with foil and bake for 25 minutes. The foil traps steam, ensuring the peppers soften while the filling cooks through. The smell of melted cheese and roasted peppers will fill your kitchen.
- Remove the foil, switch the oven to broil, and cook for an additional 3-4 minutes until the cheese top is golden brown and slightly crisp. Watch closely—broiling can quickly turn a golden crust into burnt.
- Once the cheese is bubbly and golden, remove the dish from the oven and let the peppers rest for 5 minutes. This allows the filling to set, making it easier to serve. The peppers will still be hot, so handle with care.
- Garnish each pepper with fresh cilantro leaves and a squeeze of lime juice. The bright citrus cuts through the richness and adds a refreshing finish. If you’re serving a crowd, consider adding a small side of guacamole for extra flavor.
- Serve the stuffed peppers hot, accompanied by a crisp green salad or a side of warm quinoa. The contrast of textures and flavors will impress your guests. Remember to keep the peppers on a warm plate to maintain their temperature.
That's it — you did it. But hold on, I've got a few more tricks that'll take this to another level. From seasoning nuances to plating ideas, these insider tips will elevate your dish from good to unforgettable.
Insider Tricks for Flawless Results
The Temperature Rule Nobody Follows
Many cooks bake stuffed peppers at too high a temperature, causing the outside to burn before the inside is cooked. The trick is to bake at 375°F (190°C) and cover with foil for the first part of the bake. This traps steam, keeping the peppers moist and ensuring the quinoa inside finishes cooking. I once tried 425°F and ended up with charred tops and undercooked filling—lesson learned.
Why Your Nose Knows Best
The first aroma you detect as the peppers bake is a game changer. When the cheese begins to bubble and the peppers release their juices, the scent should be savory, slightly sweet, and inviting. If you notice a burnt smell, the oven may be too hot or the peppers were overfilled. Trust your nose; it’s the most reliable indicator of doneness.
The 5-Minute Rest That Changes Everything
Letting the stuffed peppers rest after baking allows the filling to set, preventing it from sliding out of the pepper when you cut into it. A five-minute rest is enough for the quinoa to firm up and the cheese to stabilize. I used to serve them immediately, and the filling would spill—now I always give them a short pause.
The Secret to a Crispy Top
If you love a crispier cheese crust, sprinkle a thin layer of panko breadcrumbs before adding the final cheese topping. The breadcrumbs absorb moisture and create a crunchy texture that pairs beautifully with the gooey cheese. I added this twist last year, and it was a hit.
The Freshness Factor
Using fresh bell peppers instead of frozen ones makes a noticeable difference in flavor and texture. Fresh peppers have a crisp bite and a bright, sweet aroma that frozen peppers lack. If you’re short on time, frozen peppers can work, but be sure to thaw and pat dry thoroughly.
Creative Twists and Variations
This recipe is a playground. Here are some of my favorite ways to switch things up:
Mediterranean Mix
Swap the black beans for chickpeas, add diced kalamata olives, and finish with feta cheese. The briny olives and tangy feta give the dish a Mediterranean flair that’s both refreshing and hearty. This version pairs well with a cucumber yogurt sauce.
Spicy Sriracha Kick
Add a tablespoon of sriracha to the filling for an instant heat boost. The spicy sauce caramelizes during baking, creating a sweet and fiery flavor profile. Pair it with a cool avocado dip to balance the heat.
Cheesy Mac & Cheese Twist
Replace the quinoa with cooked macaroni and add a creamy cheese sauce. The result is a comfort-food classic with a colorful twist. Top with breadcrumbs for extra crunch.
Mexican Street Corn Stuffing
Use grilled corn kernels, add a pinch of epazote, and finish with cotija cheese. The smoky corn flavor and salty cheese mimic the beloved street corn. Serve with a lime wedge for a zesty finish.
Vegan Power Bowl
Omit the cheese and use nutritional yeast or a vegan cheese alternative. Add a handful of spinach or kale for extra greens. This version keeps the protein punch while staying plant-based.
Storing and Bringing It Back to Life
Fridge Storage
Store leftovers in an airtight container in the refrigerator for up to 3 days. The peppers may soften slightly, but the quinoa filling will hold its shape. When ready to eat, reheat in a microwave for 1-2 minutes or until heated through.
Freezer Friendly
Stuffed peppers freeze well for up to 2 months. Wrap each pepper individually in plastic wrap, then place them in a freezer bag. Thaw overnight in the fridge before reheating in the oven at 350°F (175°C) for 20 minutes.
Best Reheating Method
To bring the dish back to life, add a tiny splash of water or broth before reheating. This creates steam that rehydrates the quinoa and keeps the peppers moist. Finish with a quick broil for 2 minutes to revive the cheese crust.