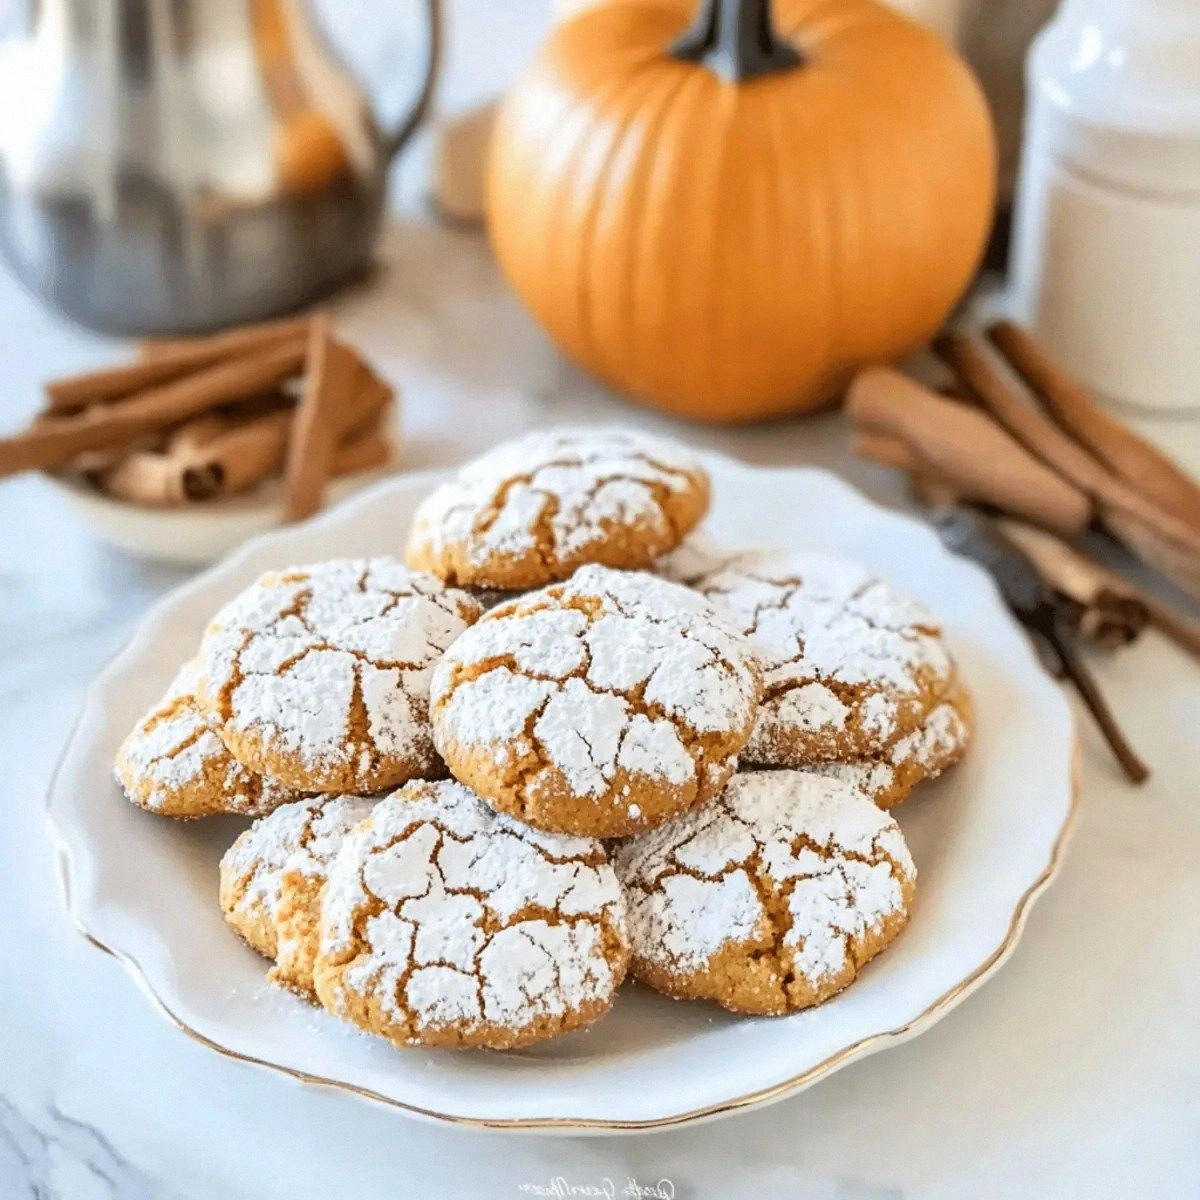
Picture this: it’s a crisp autumn afternoon, the kind where the wind whistles through the trees and the scent of fallen leaves sneaks into the kitchen. I was halfway through a marathon of pumpkin‑spiced everything—latte, soup, even a ridiculous pumpkin‑infused smoothie—when I realized my pantry was screaming for a proper, indulgent treat. I tossed a can of pumpkin puree into a bowl, grabbed the nearest bag of flour, and thought, “What if I could make a cookie that’s as soft as a cloud yet has that classic crinkle‑coat that shatters like thin ice when you bite into it?” That moment of reckless inspiration turned into a full‑blown culinary adventure, and trust me, the result is nothing short of legendary.
The moment the batter hit the mixing bowl, the kitchen filled with a perfume that could convince even the most stoic of skeptics that autumn had officially arrived. The sweet earthiness of pumpkin mingled with the warm, aromatic hug of pumpkin‑pie spice, while a faint caramel note rose from the brown sugar like a whisper of nostalgia. I could hear the faint sizzle of butter melting in the pan, the gentle clink of the spoon against the bowl, and the soft hum of the oven preheating—each sound a promise of the delicious chaos to come. My fingertips tingled as the dough became silky, and I could already picture the glossy, powder‑dusted crinkles that would soon emerge.
Most pumpkin cookie recipes out there either end up cakey, dry, or flat as a pancake. This version, however, hits the sweet spot where every bite is a perfect balance of soft interior, subtle chew, and a delicate, sugary crust that cracks open to reveal a melt‑in‑your‑mouth center. I dare you to taste this and not go back for seconds. The secret? A precise dance between leavening agents, oil, and the right amount of sugar that creates that signature “crinkle” without sacrificing tenderness.
And now, the fun part. I’m about to walk you through every single step—yes, every fold, every chill, every dusting—so that by the end, you’ll wonder how you ever made cookies any other way. Ready? Let’s dive into the magic.
What Makes This Version Stand Out
- Flavor: The pumpkin‑pie spice blend is amplified by a hint of vanilla, delivering a warm, aromatic profile that lingers long after the last crumb.
- Texture: A buttery oil base keeps the crumb tender, while the double coating of granulated and powdered sugar creates a crisp, crackly shell.
- Simplicity: Only pantry staples are required; no exotic ingredients or fancy equipment—just a bowl, a spoon, and a willing oven.
- Uniqueness: The double sugar coating is the game‑changer that gives these cookies their signature crinkle without turning them into a sugar bomb.
- Crowd Reaction: Expect gasps and immediate requests for seconds; these cookies have a habit of disappearing faster than you can say “pumpkin.”
- Ingredient Quality: Using pure pumpkin puree (not pie filling) ensures a clean, bright flavor that isn’t drowned in syrupy sweetness.
- Cooking Method: A brief chill of the dough locks in shape, while a hot bake creates that magical “crackle” effect.
- Make‑Ahead Potential: The dough can be pre‑made and stored for up to 48 hours, giving you a ready‑to‑bake stash for any impromptu gathering.
Alright, let's break down exactly what goes into this masterpiece...
Inside the Ingredient List
The Flavor Base
Pumpkin Puree (1 cup): This is the heart of the cookie, delivering moisture, natural sweetness, and that unmistakable autumnal hue. If you skimp on it, the dough becomes dry and the flavor flat. For the best results, choose a puree that’s 100 % pumpkin with no added sugars or spices. Pro tip: Look for cans labeled “pure pumpkin” rather than “pumpkin pie filling.”
Pumpkin Pie Spice (1 tablespoon): A pre‑blended mix of cinnamon, nutmeg, ginger, and clove, this spice blend is the aromatic engine that propels the cookies from good to unforgettable. Skipping it would be a crime; the cookies would lose that warm, comforting depth. If you’re feeling adventurous, toast the spices lightly before adding them to the batter for an extra layer of complexity.
The Texture Crew
All‑Purpose Flour (2 cups): Provides structure, but don’t over‑mix or you’ll develop gluten and end up with tough cookies. This is why the batter stays relatively thick and slightly sticky—exactly what you want for a crinkle. If you’re gluten‑free, a 1‑to‑1 blend of rice flour and tapioca starch works surprisingly well.
Oil (½ cup, canola or vegetable): Oil keeps the crumb soft and prevents the cookies from drying out, unlike butter which can make them crumbly. It also helps the sugar coating adhere evenly. For a richer flavor, you could swap half the oil for melted coconut oil, but be aware it will add a faint coconut note.
Brown Sugar (½ cup) & Granulated Sugar (½ cup + ½ cup for coating): The brown sugar adds moisture and a subtle caramel depth, while the granulated sugar gives the dough a slight crunch and helps the crinkles form. The extra half‑cup for coating creates that signature crackle on the outside.
The Unexpected Star
Egg (1 large): Acts as a binder, ensuring the dough holds together during baking. It also adds a little richness and helps the cookies rise just enough to develop that soft interior. If you’re allergic, a flax egg (1 tbsp ground flax + 3 tbsp water) can substitute without major texture loss.
Vanilla Extract (1 teaspoon): A subtle sweetener that rounds out the spices, making the overall flavor profile feel cohesive. Skipping vanilla would leave the spice blend feeling a bit sharp.
The Final Flourish
Baking Powder (2 teaspoons) & Baking Soda (1 teaspoon): This dynamic duo creates lift and the perfect spread. Baking soda reacts with the acidity of the pumpkin puree, while baking powder adds a gentle rise. Too much, and the cookies puff up like cupcakes; too little, and they stay dense.
Salt (½ teaspoon): Enhances every other flavor, balancing the sweetness and preventing the cookie from tasting flat. Even a pinch makes a world of difference.
Powdered Sugar (for dusting): The final snow‑like veil that not only looks gorgeous but adds a sweet, melt‑in‑the‑mouth finish. It’s the visual cue that says “these cookies are ready to be devoured.”
Everything's prepped? Good. Let's get into the real action...
The Method — Step by Step
Preheat your oven to 350°F (175°C) and line two baking sheets with parchment paper. While the oven warms, whisk together the flour, baking powder, baking soda, salt, and pumpkin‑pie spice in a large bowl. This dry mix is the foundation that ensures an even rise and consistent flavor distribution. The moment you see the spices swirl into the flour, you’ll know the aroma is already building.
In a separate bowl, combine the oil, brown sugar, and the first half‑cup of granulated sugar. Beat until the mixture is glossy and slightly lighter in color—about two minutes with a hand mixer on medium speed. This is the moment where the sugar starts to dissolve, creating that subtle caramel sheen that will later translate into a crisp edge.
Add the egg and vanilla extract to the sugar‑oil blend, beating until fully incorporated. You’ll notice the batter thickening just a touch; that’s the egg binding everything together. Pro tip: Scrape the sides of the bowl to make sure no stray flour clumps remain, ensuring a smooth, uniform dough.
Stir in the pumpkin puree, then gently fold the dry ingredients into the wet mixture. The dough will look thick and a little shaggy—exactly what you want. Watch Out: Over‑mixing at this stage can develop gluten, leading to a tougher cookie. Stop mixing as soon as no flour streaks remain.
Cover the bowl with plastic wrap and refrigerate the dough for at least 30 minutes. This chilling step is crucial—it firms up the butter‑oil blend, making the dough easier to roll and helps the sugars crystallize on the surface, creating that iconic crinkle.
While the dough chills, prepare the coating mixture: combine the remaining ½ cup of granulated sugar with a generous pinch of powdered sugar in a shallow dish. The granulated sugar will give the outer shell its crunch, while the powdered sugar adds a delicate sweet dust that melts into the crust during baking.
Remove the dough from the fridge. Using a tablespoon or small ice‑cream scoop, portion out the dough and roll each piece into a smooth ball, about the size of a walnut. Immediately roll each ball in the sugar coating, pressing lightly to adhere. Place the coated balls on the prepared baking sheets, spacing them about 2 inches apart—they’ll spread slightly but not merge.
Slide the sheets into the preheated oven. Bake for 12‑14 minutes, or until the edges look set and the tops have a faint golden hue. The cookies will puff up a bit, then settle, leaving a beautiful crinkled surface. As they bake, you’ll hear a faint crackling sound—listen closely; that’s the sugar caramelizing.
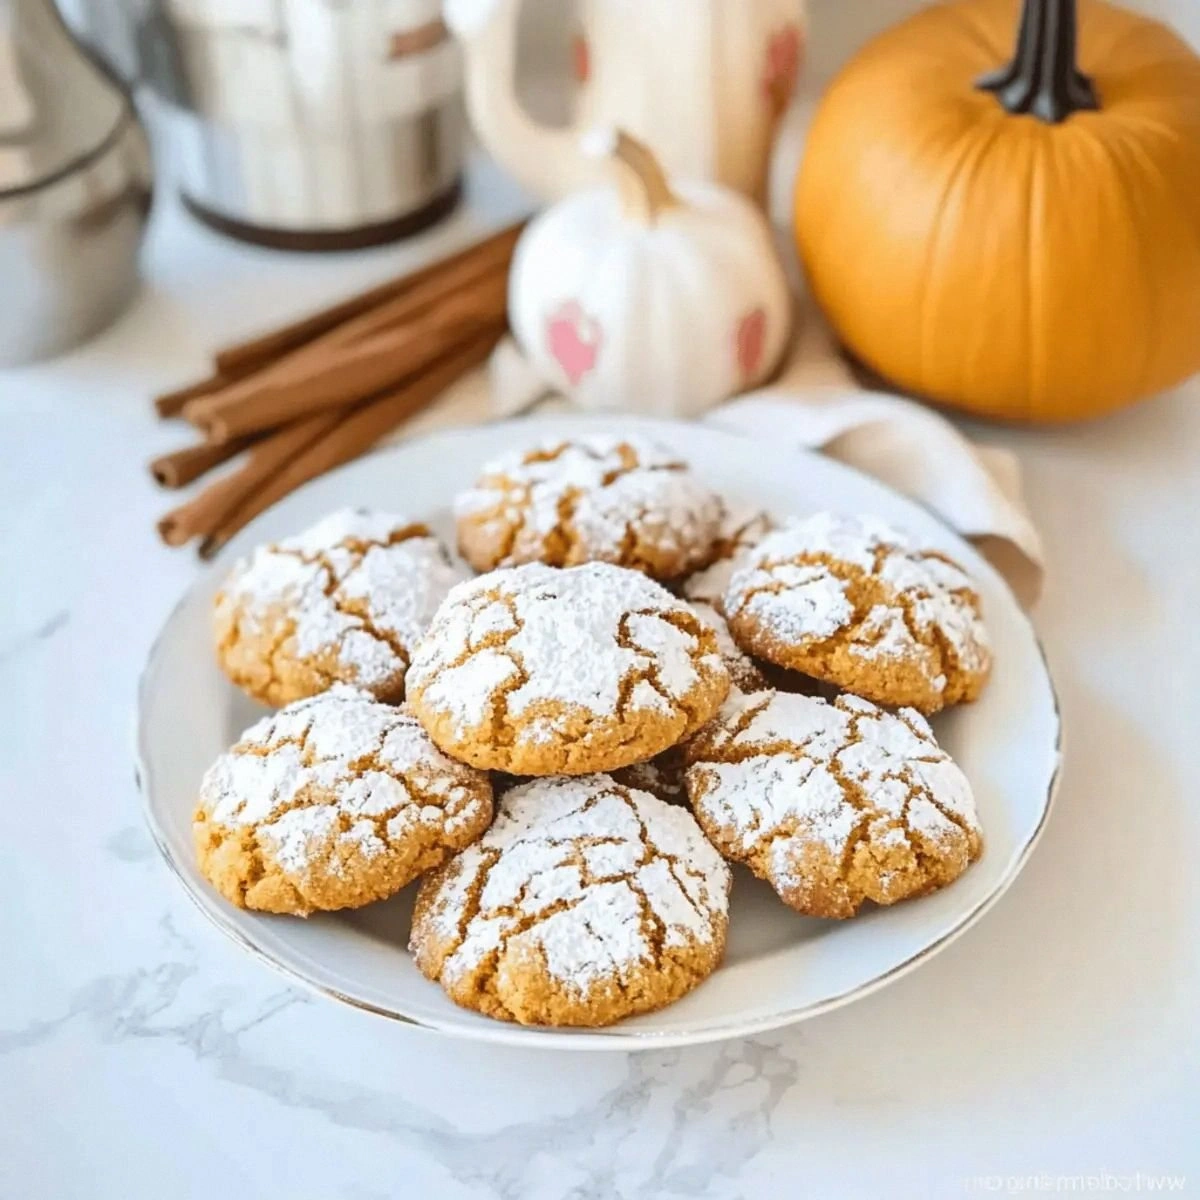
When the timer dings, remove the cookies and let them cool on the sheet for five minutes before transferring to a wire rack. They will firm up quickly, and the powdered sugar dust will settle into a soft, snow‑like finish. This is the moment of truth—take a bite, and you’ll feel the soft, spongy interior giving way to a crisp, sugary crust. I’ll be honest — I ate half the batch before anyone else got to try it.
That's it — you did it. But hold on, I've got a few more tricks that'll take this to another level...
Insider Tricks for Flawless Results
The Temperature Rule Nobody Follows
Never bake these cookies on a cold rack. A hot oven ensures the sugar coating begins to caramelize the instant the dough hits the heat, creating that signature crackle. If your oven runs cool, add an extra five minutes to the bake time; the cookies will still be soft inside but the exterior will achieve that perfect crunch.
Why Your Nose Knows Best
Trust the scent, not the clock. When the cookies emit a sweet, toasty aroma that makes your kitchen feel like a bakery, they're ready to pull out. Over‑baking turns the interior dry, so let your nose be the final judge.
The 5‑Minute Rest That Changes Everything
After baking, let the cookies sit on the tray for exactly five minutes before moving them. This short rest lets the residual heat finish cooking the center gently, preserving that melt‑in‑your‑mouth texture. Skipping this step often leads to a crumbly edge that breaks apart too soon.
Double‑Coat for Double the Wow
For an ultra‑crisp exterior, dip each dough ball first in a light dusting of powdered sugar, then roll in granulated sugar. The powdered sugar melts into a thin glaze, while the granulated sugar forms the crunchy crust. I tried this once and the cookies were so good they practically disappeared before the cooling rack was even set.
Freezer‑Friendly Dough Hack
Freeze the rolled dough balls on a parchment sheet for up to a month. When you’re ready, bake them straight from the freezer—just add an extra minute to the bake time. This trick saved me during a surprise visit from friends; I whipped out a tray of frozen cookies, baked them, and they vanished in minutes.
Creative Twists and Variations
This recipe is a playground. Here are some of my favorite ways to switch things up:
Maple‑Glazed Pumpkin Crinkles
Swap half the granulated sugar in the coating for pure maple syrup (use a light drizzle after baking). The maple adds a deep, caramel note that pairs beautifully with the pumpkin spice. Perfect for a brunch spread.
Chocolate‑Swirl Surprise
After mixing the dough, fold in ¼ cup of mini chocolate chips or a swirl of dark chocolate ganache. The chocolate melts into pockets of gooey richness, contrasting the bright pumpkin flavor. Kids love the hidden chocolate treasure.
Nutty Crunch Variation
Add ½ cup of finely chopped toasted pecans or walnuts to the dry ingredients. The nuts introduce a buttery crunch that complements the soft interior and adds a pleasant textural contrast.
Spiced Orange Zest
Incorporate the zest of one orange into the wet mixture and replace half the pumpkin‑pie spice with a pinch of orange zest. The citrus brightens the flavor profile, making the cookies feel lighter and more festive.
Vegan Friendly Version
Replace the egg with a flax “egg” (1 tbsp ground flax + 3 tbsp water) and use coconut oil instead of canola. The cookies stay just as tender, and the flax adds a subtle nutty undertone that works well with the pumpkin.
Gluten‑Free Adaptation
Swap the all‑purpose flour for a 1‑to‑1 gluten‑free blend (rice flour + potato starch + tapioca starch). The texture remains soft, and the crinkle effect is preserved, proving you don’t need gluten to enjoy a perfect cookie.
Storing and Bringing It Back to Life
Fridge Storage
Place cooled cookies in an airtight container with a paper towel at the bottom to absorb excess moisture. They’ll stay fresh for up to five days, and the sugar coating remains crisp. If you notice any softness, a quick 3‑minute reheating in a 300°F oven revives the crunch.
Freezer Friendly
Layer cookies between parchment sheets and seal them in a freezer‑safe bag. They’ll keep for up to three months. When you’re ready to enjoy them, let them thaw at room temperature for 10 minutes, then pop them in a preheated oven for 5 minutes to restore that fresh‑out‑of‑the‑oven feel.
Best Reheating Method
Preheat your oven to 325°F (165°C). Place the cookies on a baking sheet and warm for 4‑6 minutes. For an extra touch, sprinkle a tiny splash of water on the tray before reheating; the steam helps the interior stay moist while the exterior regains its crackly sheen.
There you have it—a complete, no‑shortcuts guide to the ultimate pumpkin crinkle cookie. Whether you’re serving them at a holiday gathering, gifting them to friends, or simply indulging in a solo snack, these cookies promise a soft, spiced hug in every bite. Now go ahead, grab that bowl, and let the aroma fill your kitchen. Happy baking!