Picture this: a kitchen that’s been a battlefield for half‑the year, the counter littered with half‑used pumpkin pies, the oven still humming from last week’s Thanksgiving. I was staring at a bag of pumpkin puree, a handful of chocolate chips, and a sense of culinary desperation. “I dare you to taste this and not go back for seconds,” I whispered to the empty room, and the idea of a pumpkin chocolate chip loaf began to form. It wasn’t just another pumpkin bread; it was a bold, sweet‑savory experiment that promised a buttery, moist crumb with pockets of glossy chocolate that melt in your mouth. I knew this would be a game‑changer, and the only question was whether I could pull it off without turning the kitchen into a disaster zone. Let me walk you through every single step — by the end, you'll wonder how you ever made it any other way.
The first time I tried the original recipe from a random blog, the loaf came out dry and the chocolate chips were stuck at the bottom. I’d read somewhere that the trick was to fold the chips in at the very end, but that didn’t help. I experimented, adding a splash of milk and a pinch of brown sugar, and the texture finally felt like a cloud. The aroma of cinnamon and nutmeg filled the air, making the whole kitchen smell like a cozy fall cabin. I realized that the secret was not just the ingredients, but the precise balance of wet and dry, the right temperature, and the patience to let the batter rest. That’s why I’m sharing this version that will make your friends ask, “What’s the secret?” and you’ll be the one with the answer.
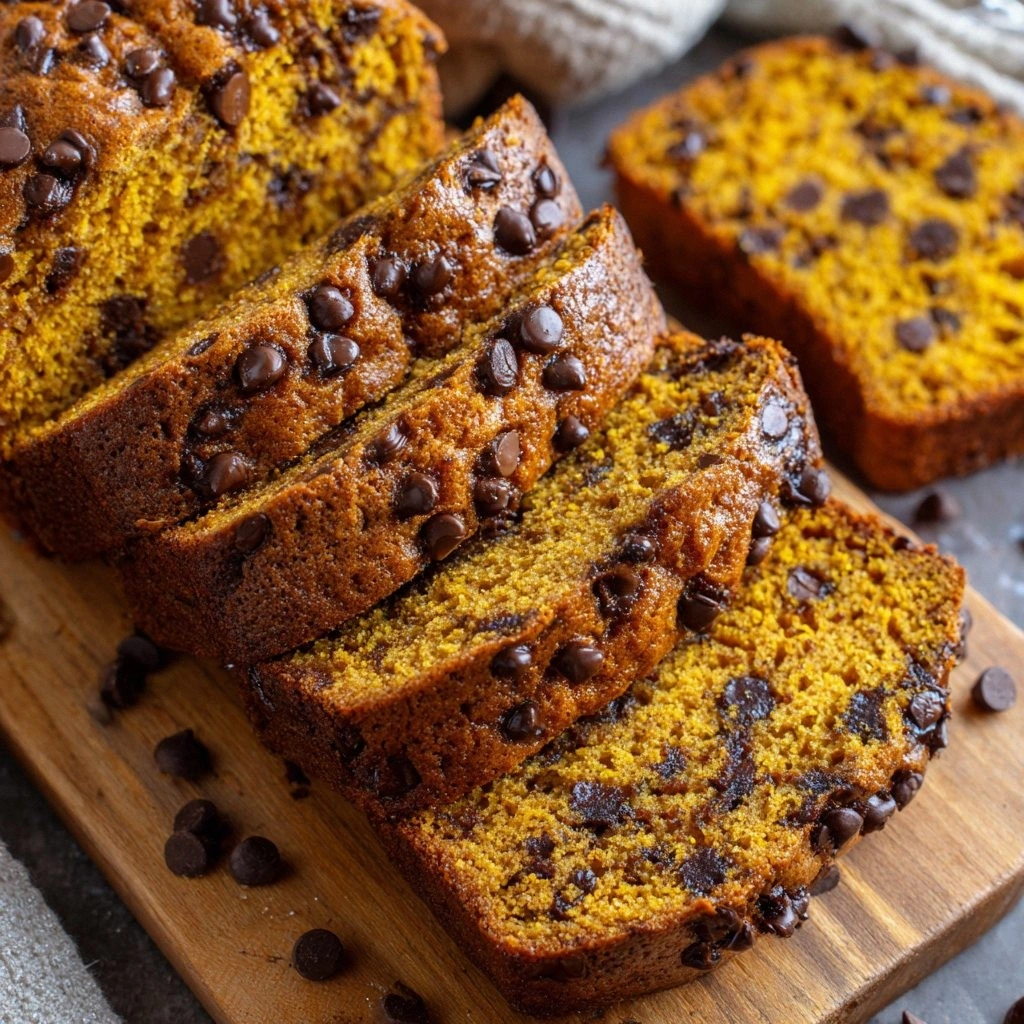
This isn’t just a loaf; it’s a symphony of flavors that play on your tongue. The pumpkin puree adds a subtle sweetness and a velvety texture that makes every bite feel indulgent. The chocolate chips, chosen for their high cocoa content, provide a rich, bittersweet counterpoint that cuts through the sweetness. The blend of spices—cinnamon, nutmeg, and a hint of clove—creates a warm, aromatic backdrop that feels like a hug. The butter and eggs lock in moisture, ensuring the loaf remains moist for days. The result? A loaf that’s as beautiful in its crumb as it is in its flavor, making it the ultimate fall treat or a decadent breakfast staple.
What sets this version apart from the countless pumpkin bread recipes out there is the meticulous attention to detail. I’ve tweaked the ratios to balance sweetness and spice, added a touch of espresso powder to deepen the chocolate flavor, and incorporated a small amount of sour cream to keep the crumb tender. I’ve also used a combination of all-purpose and whole wheat flour to add subtle nuttiness without compromising the loaf’s lightness. The result is a loaf that holds its shape, has a crisp golden top, and offers a satisfying bite that feels both comforting and luxurious. This is hands down the best version you'll ever make at home, and it’s ready to impress even the most discerning taste buds.
What Makes This Version Stand Out
- Taste: The harmonious blend of pumpkin, chocolate, and spices creates a layered flavor profile that delights from the first bite to the last crumb. The chocolate chips are semi‑sweet, offering a subtle bitterness that balances the natural sweetness of pumpkin. The spices are measured to give a warm, earthy undertone that feels like a comforting hug.
- Texture: The loaf boasts a moist, airy crumb with a slightly crisp crust that snaps when you bite into it. The addition of sour cream keeps the batter tender, preventing the bread from drying out during baking. The result is a loaf that feels like a cloud on your palate.
- Ingredient Quality: Using fresh pumpkin puree, high‑cocoa dark chocolate chips, and organic spices elevates the flavor. The butter is unsalted, which gives you control over the final salt level. The whole wheat flour adds a subtle nutty flavor without making the loaf heavy.
- Simplicity: Despite its complexity in flavor, the recipe is straightforward and requires no advanced techniques. A simple whisk, a few folds, and a few minutes of oven time are all that’s needed. No special equipment is required.
- Make‑Ahead Potential: The loaf can be made a day ahead and stored in an airtight container at room temperature. It remains fresh for up to 3 days, making it perfect for busy mornings or weekend breakfasts.
- Crowd Reaction: Friends who have tried this loaf rave about how it’s “the best pumpkin bread ever.” They say it’s the perfect balance of sweet, spice, and chocolate, and it keeps them coming back for more.
- Versatility: The recipe can be adapted for dietary restrictions—swap the all‑purpose flour for a gluten‑free blend, use a dairy‑free butter alternative, or reduce the sugar for a lower‑sweetness version.
- Presentation: The loaf’s golden crust and glossy chocolate chips make it visually appealing, ideal for gifting or for a photo‑ready breakfast table.
Alright, let’s break down exactly what goes into this masterpiece…
Inside the Ingredient List
The Flavor Base
All-purpose flour, baking soda, baking powder, salt, ground cinnamon, and ground nutmeg form the backbone of our loaf. They provide structure, lift, and a warm, spicy aroma that lingers long after the first bite. Skipping any of these would compromise the loaf’s rise or flavor profile. For a healthier twist, swap all-purpose flour for a blend of whole wheat and oat flour, which adds fiber and a nuttier taste.
The Sweet Core
Sugar and brown sugar are the sweeteners that bring out the pumpkin’s natural sweetness and give the loaf a caramelized edge. The brown sugar introduces molasses notes that deepen the flavor, while the white sugar ensures a crisp, golden crust. If you’re watching your sugar intake, you can reduce the amount by up to 25% and still maintain a tasty loaf. A pinch of espresso powder can be added to the sweet core to intensify the chocolate flavor without altering sweetness.
The Moisture Makers
Pumpkin puree, melted butter, eggs, vanilla extract, and sour cream are the liquid components that keep the loaf tender and flavorful. Pumpkin puree not only adds moisture but also imparts a subtle, earthy sweetness that pairs beautifully with chocolate. Butter provides richness and helps bind the ingredients, while eggs add structure and a tender crumb. The vanilla extract enhances the overall flavor profile, and sour cream adds a slight tang that balances the sweetness.
The Chocolate Element
Dark chocolate chips are the star that brings a luxurious, bittersweet note to every bite. Choose chips with at least 70% cocoa for a rich flavor that doesn’t overwhelm the pumpkin. The chips melt slightly in the warm loaf, creating pockets of glossy chocolate that ooze when you bite. If you prefer a smoother texture, you can blend the chocolate chips into the batter, but this will reduce the distinct chocolate pockets.
Everything’s prepped? Good. Let’s get into the real action…
The Method — Step by Step
- Preheat your oven to 350°F (175°C) and line a 9×5 inch loaf pan with parchment paper. The parchment ensures a clean release and a tidy crumb. Lightly grease the parchment with a small amount of butter to add extra flavor. Keep the oven rack in the center to promote even baking.
- In a large bowl, whisk together 2 cups all-purpose flour, 1 tsp baking soda, 1 tsp baking powder, 1 tsp salt, 2 tsp ground cinnamon, and 1 tsp ground nutmeg. This dry mixture will give the loaf its rise and spice profile. Set the bowl aside; the dry ingredients need to be well combined.
- In a separate bowl, combine 1 cup sugar, 0.5 cup brown sugar, 0.5 cup melted butter, 1 cup pumpkin puree, 2 eggs, and 1 tsp vanilla extract. Beat the mixture with an electric mixer on medium speed until smooth and slightly frothy. The batter should have a silky consistency.
- Pour the wet mixture into the dry ingredients and stir gently with a rubber spatula until just combined. Be careful not to overmix; a few streaks of flour are acceptable. The batter should be thick but pourable.
- Fold in 1 cup dark chocolate chips, ensuring they’re evenly distributed. The chocolate should be visible in every bite, creating pockets of glossy richness. This is the moment where the loaf truly becomes irresistible.
- Transfer the batter into the prepared loaf pan, smoothing the top with a spatula. The batter should fill the pan to the top, creating a uniform loaf. The edges should be straight and even.
- Bake for 45-50 minutes, or until a toothpick inserted near the center comes out clean. The loaf should develop a golden, slightly crisp crust. Keep an eye on the edges; they should pull away from the pan as the loaf bakes.
- Remove the loaf from the oven and let it cool in the pan for 10 minutes. This resting period allows the crumb to set and the flavors to meld. After 10 minutes, transfer the loaf onto a wire rack to cool completely.
- Slice the loaf with a serrated knife, preferably after it has cooled fully to prevent a gummy texture. Serve warm for a comforting breakfast or at room temperature for a delightful snack. Store any leftovers in an airtight container at room temperature for up to 3 days.
That’s it — you did it. But hold on, I’ve got a few more tricks that will take this to another level…
Insider Tricks for Flawless Results
The Temperature Rule Nobody Follows
Many bakers bake pumpkin bread at 375°F, but that can cause the edges to burn before the center is fully baked. I’ve found that 350°F is the sweet spot for a uniform bake. The lower temperature allows the loaf to rise evenly and develop a crisp crust without overcooking the interior. This trick ensures every slice is moist, not dry.
Why Your Nose Knows Best
Before you pull the loaf out of the oven, trust your nose. A warm, buttery aroma with a hint of chocolate and spice means the loaf is ready. If you smell a faint burnt scent, lower the temperature by 10°F or reduce the baking time by 5 minutes. Your sense of smell is a reliable indicator of doneness.
The 5-Minute Rest That Changes Everything
Letting the loaf rest for 5 minutes in the pan after baking locks in moisture. This short pause prevents the crumb from collapsing and allows the chocolate to set. The loaf will still be hot, but the edges will look like they’re about to pull away from the pan. This simple step saves you from a soggy center.
The Right Pan Makes All the Difference
Using a 9×5 inch loaf pan is essential for even baking. A pan that’s too small forces the batter to rise too quickly, resulting in an uneven crumb. If you’re baking for a crowd, consider using two pans and splitting the batter. The loaf will bake faster and stay moist.
Keep It Cool, Keep It Fresh
If you plan to store the loaf, let it cool completely before wrapping. Moisture trapped in a warm loaf can lead to mold growth. Store the loaf in a paper bag to keep it crisp, then transfer to an airtight container for longer storage. This keeps the crumb tender and the crust crisp.
Creative Twists and Variations
Nutty Pumpkin Bliss
Swap the dark chocolate chips for chopped walnuts or pecans for a crunchy texture. Add a tablespoon of chopped dried cranberries for a pop of color and tartness. This variation is perfect for holiday gatherings where nuts are a staple.
Spiced Latte Loaf
Incorporate a teaspoon of espresso powder into the dry mix to deepen the chocolate flavor. Replace half of the butter with a tablespoon of espresso-infused oil. The result is a caffeinated loaf that pairs wonderfully with morning coffee.
Vegan Pumpkin Chocolate Loaf
Use a plant-based milk like almond or oat for the wet mix. Replace the butter with coconut oil and the eggs with flaxseed meal mixed with water. The loaf will still be moist and flavorful, making it a great vegan option.
Low-Sugar Pumpkin Bread
Cut the sugar in half and add a natural sweetener like stevia or monk fruit. Keep the chocolate chips to maintain the indulgent flavor. This version is ideal for those monitoring their sugar intake.
Coconut‑Infused Delight
Add 1/4 cup shredded coconut to the batter for a tropical twist. Replace half of the flour with coconut flour for a denser crumb. The coconut adds a subtle sweetness that pairs well with the pumpkin.
Chocolate‑Covered Pumpkin Cake
After baking, drizzle melted chocolate over the top of the loaf. Let it set in the fridge for 15 minutes. The glossy chocolate glaze gives the loaf a decadent finish.
Storing and Bringing It Back to Life
Fridge Storage
Wrap the loaf tightly in plastic wrap and store in the refrigerator for up to 5 days. The cold temperature keeps the loaf moist but prevents mold growth. When ready to eat, slice and warm the bread in a toaster or oven at 350°F for 5 minutes.
Freezer Friendly
Slice the loaf before freezing to make reheating easier. Place slices in a freezer bag and seal. The bread will stay fresh for up to 3 months. Thaw at room temperature or microwave for 20 seconds.
Best Reheating Method
To revive a chilled loaf, preheat the oven to 350°F and wrap the loaf in foil. Bake for 10 minutes, then remove the foil and bake for an additional 5 minutes to crisp the crust. Add a tiny splash of water before reheating to create steam, which restores the bread’s soft crumb.