
A comforting, creamy casserole that turns humble potatoes into a show‑stopping side dish.

When I was a child, the aroma of bubbling cheese and the gentle steam of a freshly baked casserole would drift from my grandmother’s kitchen every Sunday. I remember sitting at the kitchen table, legs swinging, as she ladled thick, velvety sour‑cream sauce over layers of sliced potatoes, each slice glistening like a promise of comfort. The first bite was always a revelation – the potatoes were tender yet held their shape, the cheese melted into a golden crust, and the sour cream added a subtle tang that lifted the whole dish.
This particular recipe hails from the heartland of American comfort food, where casseroles are not just meals but family traditions. While many potato casseroles rely on heavy cream or butter, I opted for sour cream to bring a brighter, slightly acidic note that balances the richness of cheddar. The result is a dish that feels indulgent yet approachable, perfect for both a casual weeknight dinner and a festive holiday spread.
In this guide, I’ll walk you through every step, from selecting the right potatoes to achieving that perfect golden crust. You’ll learn how to layer flavors, how to tweak the recipe for dietary preferences, and why each ingredient plays a crucial role in the final texture and taste. By the end, you’ll have a fool‑proof method that yields a casserole so comforting you’ll want to make it every week.
So grab your apron, preheat the oven, and let’s bring this classic dish to life together. I can’t wait for you to taste the creamy, cheesy goodness that has become a staple in my kitchen.
🌟 Why This Recipe Will Captivate You
This casserole blends simplicity with sophisticated flavor, making it a go‑to recipe for any occasion.
- ✨ Irresistible Creaminess: The sour‑cream and cheese sauce coats every potato slice, delivering a silky mouthfeel that feels luxurious without being overly heavy.
- ✨ Balanced Tang: The slight acidity of sour cream cuts through the richness, preventing the dish from feeling cloying and keeping the palate refreshed.
- ✨ Easy One‑Dish Meal: With just a handful of ingredients and minimal prep, you can create a crowd‑pleasing side that requires no extra sauces or garnishes.
- ✨ Versatile Pairings: Works beautifully alongside roasted meats, grilled fish, or as a hearty vegetarian centerpiece when paired with a crisp salad.
- ✨ Make‑Ahead Friendly: Assemble the casserole a day ahead, refrigerate, and bake when you’re ready – perfect for busy schedules.
- ✨ Kid‑Approved: The mild cheese flavor and soft texture appeal to children, making it a family favorite that even picky eaters love.
🥗 The Ingredients
📝 Complete Ingredient List
For the Potato Layer:
For the Cheese & Sour Cream Sauce:
For the Topping:
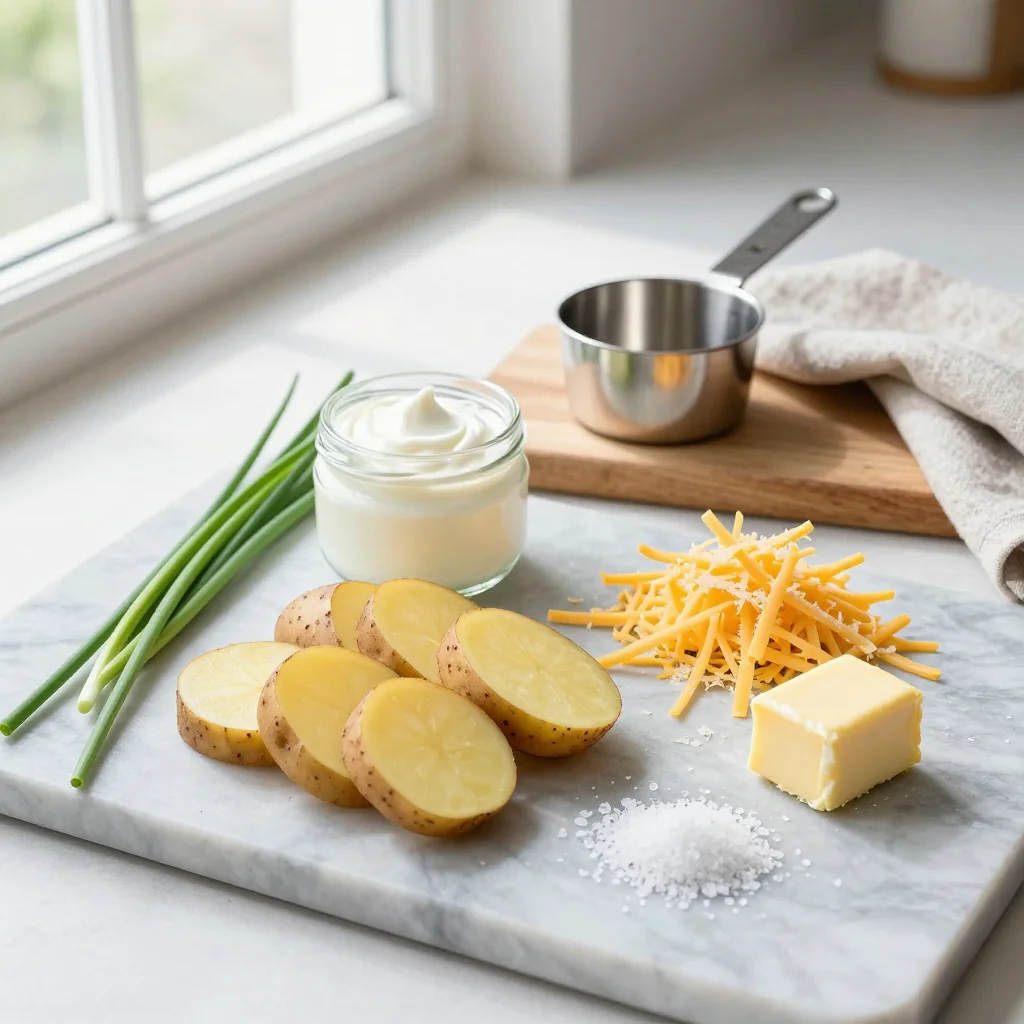
🔍 Focus on Key Ingredients
Yukon Gold Potatoes
Yukon Gold potatoes offer a buttery flavor and a creamy texture that stands up well to baking. Their thin skins add a subtle earthiness while the flesh absorbs the sour‑cream sauce without becoming mushy. When slicing, aim for uniform 1/8‑inch rounds to ensure even cooking.
Sharp Cheddar Cheese
Sharp cheddar provides a robust, slightly tangy flavor that complements the sour cream’s acidity. Its meltability creates that coveted gooey layer, while the sharpness adds depth, preventing the dish from feeling bland.
Sour Cream
Sour cream is the star of the sauce, delivering both richness and a gentle tang that brightens the overall profile. It also helps keep the casserole moist, ensuring each potato slice remains tender even after a long bake.
🔄 Quick Substitutions
| If you don’t have... | Use instead... |
|---|---|
| Yukon Gold potatoes | Russet potatoes (slice a bit thinner) |
| Sharp cheddar | Gruyère or Monterey Jack |
| Sour cream | Greek yogurt (full‑fat) or crème fraîche |
👨🍳 Step‑by‑Step Instructions
Follow these detailed steps to create a perfectly layered, golden‑browned casserole that will become a family favorite.
📋 Phase 1: Preparation and Mise en Place
Set up your workstation, slice potatoes, and pre‑mix the sauce.
Slice the Potatoes
Wash the Yukon Gold potatoes, peel if desired, and slice them uniformly into 1/8‑inch rounds using a mandoline or a sharp chef’s knife. The thin slices will cook evenly and absorb the sauce. Place the slices in a bowl of cold water for 5 minutes to remove excess starch, then pat dry with a clean kitchen towel.
Prepare the Cheese & Sour Cream Sauce
In a large mixing bowl, whisk together sour cream, shredded cheddar, milk, garlic powder, onion powder, and a pinch of salt. The milk thins the mixture just enough to coat the potatoes without becoming runny. Taste and adjust seasoning; the sauce should be slightly salty because the cheese will intensify the flavor during baking.
🔥 Phase 2: Assembly and Baking
Layer the ingredients, top with breadcrumbs, and bake to perfection.
Layer the Potatoes
Preheat the oven to 190°C (375°F). Lightly grease a 9‑inch (23 cm) deep baking dish with butter. Begin by arranging a single layer of potato slices on the bottom, overlapping slightly. Sprinkle a pinch of salt and pepper over the layer, then drizzle a tablespoon of melted butter. Repeat layers until all potatoes are used, finishing with a final layer of potatoes.
Pour the Sauce
Evenly pour the prepared cheese‑sour‑cream sauce over the layered potatoes, ensuring every slice is coated. Use a spatula to gently spread any remaining sauce from the bowl, filling gaps between slices.
Prepare the Topping
In a small bowl, combine panko breadcrumbs, melted butter, grated Parmesan, and fresh thyme leaves. Mix until the crumbs are lightly coated. Sprinkle the breadcrumb mixture evenly over the top of the casserole, creating a golden crust that will become crisp during baking.
✨ Phase 3: Finishing and Serving
Bake, check for doneness, and present beautifully.
Bake the Casserole
Cover the dish loosely with aluminum foil and bake for 35 minutes. After 35 minutes, remove the foil and continue baking for an additional 15‑20 minutes, or until the top is golden brown and the potatoes are fork‑tender. The breadcrumb topping should be crisp and fragrant.
Check for Doneness
Insert a thin knife or a skewer into the center of the casserole; it should glide through easily with only a slight resistance. The sauce should be bubbling around the edges, indicating that the interior is hot and fully cooked.
Rest Before Serving
Allow the casserole to rest for 10 minutes after removing it from the oven. This resting period lets the sauce thicken slightly, making it easier to cut clean slices without the layers sliding apart.
Serve and Garnish
Garnish with a sprinkle of fresh chopped parsley or additional thyme leaves for a pop of color. Serve hot, paired with a crisp green salad or roasted vegetables for a complete meal.
💡 Expert Tips and Tricks
🛒 Choosing the Right Ingredients
When shopping for potatoes, look for firm, unblemished Yukon Golds with a smooth skin. Avoid any that feel soft or have green spots, as they can impart bitterness. For cheese, a sharp cheddar offers the perfect balance of flavor and meltability; avoid pre‑shredded varieties that often contain anti‑caking agents which can affect texture.
🔪 Preparation Techniques
Use a mandoline for consistent slices; it saves time and ensures uniform cooking. If you don’t have a mandoline, a sharp chef’s knife works fine—just aim for equal thickness. After slicing, a brief soak in cold water removes excess starch, leading to a lighter, less gummy casserole.
🌡️ Mastering the Cooking Process
Start baking with foil to trap steam, which helps the potatoes soften evenly. Removing the foil halfway through allows the top to brown and become crunchy. Keep an eye on the breadcrumb topping; if it darkens too quickly, lower the oven temperature by 10°C and continue baking.
🍽️ Presentation and Service
For a restaurant‑style presentation, use a shallow, wide casserole dish and cut clean, even squares before serving. Garnish with a light drizzle of melted butter infused with fresh herbs for added shine and aroma. Pair with a simple arugula salad dressed in lemon vinaigrette to cut through the richness.
🏆 Pro Tips
Elevate your casserole from home‑cooked comfort to a chef‑level masterpiece with these insider secrets.
- 🎯 Use a Double Boiler for the Sauce: Gently heating the cheese and sour cream over a double boiler prevents curdling, ensuring a perfectly smooth, velvety sauce that clings to each potato slice.
- 🎯 Incorporate a Touch of Nutmeg: Adding a pinch of freshly grated nutmeg to the sauce enhances the dairy flavors and adds a subtle warmth that deepens the overall taste profile.
- 🎯 Chill the Assembled Casserole: If you have time, assemble the dish and refrigerate for 30 minutes before baking. This firms up the butter in the topping, resulting in an extra‑crisp crust.
- 🎯 Finish with a Broil Blast: For an ultra‑crisp top, switch the oven to broil for the last 2–3 minutes. Watch closely to avoid burning; you want a golden‑brown finish, not a blackened one.
- 🎯 Use a Cast‑Iron Skillet for Transfer: Baking the casserole in a pre‑heated cast‑iron skillet creates a caramelized bottom layer, adding a delightful textural contrast.
- 🎯 Pair with a Light Acidic Sauce: A drizzle of lemon‑herb aioli or a simple chimichurri adds brightness that cuts through the richness, balancing the dish on the palate.
"A great casserole is like a warm hug on a plate – comforting, familiar, and always welcome." — Thomas Keller
🔄 Variations and Adaptations
This versatile casserole can be tweaked to suit a wide range of dietary preferences and flavor cravings.
🥬 Vegetarian / Vegan Version
Swap the dairy components for plant‑based alternatives: use a thick cashew cream blended with lemon juice in place of sour cream, and replace cheddar with a sharp vegan cheddar shreds. Ensure the cashew cream is well‑seasoned with nutritional yeast, garlic powder, and a dash of smoked paprika for depth.
- Cashew cream (1 cup) – soak raw cashews for 4 hours, blend with water, lemon juice, and seasoning.
- Vegan cheddar (1.5 cups) – available in most grocery stores or homemade from nuts.
🌶️ Flavor Variations
Experiment with global twists to keep the dish exciting.
Spicy Jalapeño Version:
Add 1 finely diced jalapeño to the sauce and sprinkle a pinch of cayenne pepper for a subtle heat that pairs beautifully with the creamy base.
Mediterranean Version:
Incorporate ½ cup of crumbled feta cheese, ¼ cup Kalamata olives, and a sprinkle of oregano. Replace the breadcrumb topping with toasted pine nuts for a nutty crunch.
Asian‑Inspired Version:
Swap cheddar for shredded mozzarella and add 1 tablespoon of soy sauce, 1 teaspoon of toasted sesame oil, and a handful of chopped scallions. Top with panko mixed with a dash of five‑spice powder.
⚠️ Dietary Adaptations
Gluten‑Free:
Use gluten‑free breadcrumbs or crushed cornflakes instead of panko. Ensure the cheese you select is certified gluten‑free.
Lactose‑Free:
Replace sour cream with lactose‑free Greek yogurt and use a lactose‑free cheese such as dairy‑free cheddar shreds.
Low‑Calorie:
Reduce butter in the topping by half, substitute half of the cheddar with reduced‑fat cheese, and use skim milk instead of whole milk. Add extra vegetables like thinly sliced zucchini to bulk up volume without many calories.
👶 Kid‑Friendly Version
Kids love the cheesy goodness, so keep the spice level mild. Add a handful of finely grated carrots or peas into the sauce for hidden veggies, and top with a sprinkle of mild cheddar instead of sharp to keep the flavor gentle.
📦 Storage and Reheating
🧊 Conservation
Refrigerator:
- Duration: Up to 4 days
- Container: Airtight glass or plastic container
- Tip: Cover loosely with foil to prevent the topping from getting soggy.
Freezer:
- Duration: Up to 3 months
- Method: Cool completely, then wrap tightly in foil and place in a freezer‑safe bag.
- Defrosting: Transfer to refrigerator overnight before reheating.
💡 For best texture, reheat from frozen in the oven rather than the microwave to preserve the crisp topping.
♨️ Reheating
🔥 Oven (Recommended):
- Preheat to 180°C (350°F).
- Cover with foil to keep moisture.
- Heat for 20 minutes.
- Remove foil, bake an additional 10 minutes to re‑crisp the topping.
⚡ Microwave (Quick):
- Place a slice on a microwave‑safe plate.
- Cover with a microwave‑safe lid.
- Heat on medium power for 2 minutes, then stir gently.
- Continue in 30‑second bursts until hot.
🍳 Skillet:
Heat a non‑stick skillet over medium heat, add a splash of milk, and gently warm a slice, covering with a lid to melt the cheese while the bottom crisps.
🍷 Perfect Pairings
🥗 Side Dishes
- Fresh Arugula Salad: Peppery arugula with lemon vinaigrette balances the richness.
- Roasted Brussels Sprouts: Their caramelized edges add a nutty contrast.
- Steamed Green Beans with Almonds: Light and crunchy, they provide texture variety.
🍷 Wine & Beverage Pairings
- Chardonnay (oaked): Its buttery notes echo the cheese while its acidity cuts through the creaminess.
- Pinot Noir: Light red fruit flavors complement the earthy potatoes.
- Non‑Alcoholic: Sparkling apple cider offers a bright, effervescent counterpoint.
🍰 To Complete the Meal
Start with a light citrus soup, follow with the casserole and sides, and finish with a simple vanilla panna cotta topped with fresh berries for a refreshing dessert that cleanses the palate.
❓ Frequently Asked Questions
Q: Can I use a different type of cheese?
A: Absolutely. Gruyère adds a nutty depth, while mozzarella gives a milder melt. If you prefer a smoky flavor, try smoked cheddar. Just keep the total cheese volume around 1.5 cups to maintain the intended richness.
Q: How do I prevent the potatoes from becoming mushy?
A: Slice the potatoes uniformly and avoid over‑soaking them. Pat them dry thoroughly and pre‑season with a little oil or melted butter. Baking covered for the first half of the time steams them gently, while the uncovered phase creates a firm crust.
Q: Is it possible to make this casserole gluten‑free?
A: Yes. Substitute the panko breadcrumbs with gluten‑free breadcrumbs or crushed cornflakes. Ensure any cheese you use is labeled gluten‑free, as some processed cheeses can contain trace gluten.
Q: What’s the best way to store leftovers?
A: Cool the casserole completely, then cover tightly with foil and store in an airtight container in the refrigerator for up to four days. For longer storage, freeze in a freezer‑safe container; reheat in the oven to retain the crisp topping.
Q: Can I add other vegetables to the dish?
A: Certainly. Thinly sliced carrots, zucchini, or even thinly sliced leeks can be layered between the potatoes. Add them in moderation so they don’t release too much moisture, which could make the casserole soggy.
Q: How do I adjust the recipe for a larger crowd?
A: Use the portion adjuster in the premium recipe card. The base recipe serves six; increase the portion count to 12, and the script will automatically recalculate each ingredient quantity for you.
🎉 Let’s Get Cooking!
This Potato Casserole with Sour Cream and Cheese is more than just a side dish; it’s a celebration of comfort, flavor, and culinary simplicity. The creamy sauce, the tender potatoes, and the crunchy breadcrumb topping create a harmonious balance that will delight every palate at your table. Whether you’re feeding a family, hosting friends, or preparing a holiday feast, this recipe delivers consistent, crowd‑pleasing results every time.
Remember, the beauty of this casserole lies in its adaptability—tweak the cheese, add a kick of spice, or make it entirely plant‑based. I encourage you to experiment, share your variations, and make this dish your own signature comfort food.
Have you tried this recipe?
Leave a comment and rating below! Share your photos on Instagram with #CasseroleComfort to be featured on our blog.
Potato Casserole with Sour Cream and Cheese
A creamy, cheesy potato bake that’s perfect for any gathering.
📝 Ingredients
Potato Layer
Cheese & Sour Cream Sauce
Topping
👨🍳 Instructions
- 1 Slice potatoes thinly, soak briefly, and pat dry.
- 2 Whisk together sour cream, cheddar, milk, garlic powder, onion powder, and salt.
- 3 Grease a 9‑inch baking dish, layer potatoes, seasoning each layer with salt, pepper, and butter.
- 4 Pour the cheese sauce evenly over the layered potatoes.
- 5 Mix panko, melted butter, Parmesan, and thyme; sprinkle over the top.
- 6 Cover with foil and bake 35 min at 190°C (375°F).
- 7 Remove foil, bake additional 15‑20 min until golden and bubbly.
- 8 Rest 10 min before slicing.
- 9 Garnish with fresh thyme and serve hot.
- 10 Enjoy with your favorite side dishes and beverages.
🥗 Nutritional Information (per serving)
*Values are approximate and based on standard ingredient brands.
📚 You Might Also Like
Cheesy Broccoli Gratin
Classic Mac and Cheese
Baked Zucchini Parmesan


💬 Comments and Reviews
Leave a Comment
No comments yet. Be the first to share your thoughts!