I was in the middle of a typical Tuesday evening when the kitchen turned into a warzone: a half‑baked loaf of banana bread collapsed, the peanut butter jar slipped off the counter, and my pup, Max, started giving me that “you‑are‑doing‑something‑right‑now‑or‑else‑I‑won’t‑eat‑it” stare. I swear the whole room smelled like a tropical storm—sweet banana thunder, salty peanut butter drizzle, and the faint, comforting hum of the oven trying to rescue the day. I thought, “What if I could channel that chaos into a treat that not only saves the mess but also makes Max’s tail wag like a metronome?” That thought sparked a culinary experiment that turned into the ultimate dog‑friendly snack you’re about to discover.
Picture the scene: the kitchen light bouncing off the glossy surface of a ripe banana as I mash it into a creamy gold, the peanut butter gliding like liquid amber, and the oat flour puffing up like fresh‑fallen snow in a winter wonderland. The sound of the whisk clinking against the bowl is a rhythmic drumbeat, while the subtle hiss of the oven preheating feels like a secret promise that something amazing is about to happen. When the batter finally hits the tray, it spreads with the confidence of a seasoned baker, and the aroma that fills the air is a heady mix of sweet, nutty, and earthy—so intoxicating that even the humans around the kitchen start drooling.
Most dog treat recipes out there are either bland as cardboard or overly sweet, making your furry friend either indifferent or hyper‑active. This version, however, strikes a perfect balance: the banana provides natural sugars and potassium, the peanut butter adds protein and a rich mouthfeel, and the oat flour gives a hearty, chewy texture without any gluten. I dare you to taste this and not go back for seconds—your pup will beg for more, and you’ll wonder why you ever settled for store‑bought, preservative‑laden snacks.
And here’s the kicker: I’m about to reveal a secret technique involving a quick water‑steam burst that makes the twists unbelievably tender on the inside while keeping the edges just crisp enough to snap like a fresh twig. This isn’t just a recipe; it’s a game‑changing method that will elevate any homemade dog treat you attempt. Let me walk you through every single step — by the end, you’ll wonder how you ever made it any other way.
What Makes This Version Stand Out
- Flavor Fusion: The natural sweetness of banana marries perfectly with the rich, slightly salty depth of peanut butter, creating a taste profile that dogs find irresistible and humans can appreciate.
- Texture Triumph: Oat flour delivers a soft chew that holds together without crumbling, while the steam technique gives each twist a delicate snap on the outer edge.
- Simplicity at Its Core: Only five whole‑food ingredients, all pantry‑friendly, mean you spend less time shopping and more time bonding with your pup over the oven timer.
- Ingredient Integrity: No artificial flavors, colors, or preservatives—just pure, dog‑safe nutrition that supports joint health and energy levels.
- Crowd‑Pleaser Factor: Even the pickiest pooches can’t resist the aroma that wafts through the house, and the twists are the perfect size for training treats or snack‑time rewards.
- Make‑Ahead Magic: Store them in the fridge or freezer, and they stay fresh for weeks, making them an ideal go‑to for busy pet parents.
Inside the Ingredient List
The Flavor Base
1 medium Ripe Banana: This is the heart of the treat, delivering natural sugars, potassium, and a subtle fruity aroma that dogs love. If you skip the banana, you lose the moisture and the gentle sweetness that balances the peanut butter’s richness. A good rule of thumb is to choose a banana that yields a soft, almost buttery texture when mashed—overripe is best. Swap tip: For a different flavor twist, try half a mashed sweet potato, but expect a slightly earthier taste.
The Texture Crew
2 cups Oat Flour: Oat flour is a gluten‑free powerhouse that gives the treats a tender crumb while still holding their shape during baking. Skipping it or replacing it with all‑purpose flour makes the twists too dense and can cause them to crumble when your dog bites down. When buying, look for stone‑ground oats for the best texture, or grind rolled oats in a food processor for a fresh, homemade version. Swap tip: If your dog has a grain sensitivity, substitute with chickpea flour, but reduce the water slightly to keep the dough manageable.
0.5 cup Peanut Butter: Choose a natural, unsalted variety with no xylitol (a sweetener toxic to dogs). The peanut butter adds protein, healthy fats, and a mouth‑watering aroma that practically drags your dog to the kitchen. Skipping it results in a dry, bland treat that won’t have that signature “wow” factor. Swap tip: Almond butter works in a pinch, but keep an eye on any nut allergies.
The Unexpected Star
1 large Egg: The egg acts as a binder, giving the dough elasticity and a subtle richness that lifts the overall flavor. Without it, the mixture would be crumbly and difficult to shape into twists. For vegan households, replace with a flax‑egg (1 tbsp ground flaxseed + 3 tbsp water) and expect a slightly nuttier taste.
The Final Flourish
0.5 cup Water: Water hydrates the oat flour, creating a pliable dough that rolls easily. Too much water makes the batter runny; too little yields a dry, stiff dough that cracks when twisted. Adjust by adding a splash (about a tablespoon) if the dough feels too dry after mixing.
Everything's prepped? Good. Let's get into the real action...
The Method — Step by Step
Preheat your oven to 350°F (175°C) and line a baking sheet with parchment paper. The moment the oven clicks on, you’ll hear that comforting hum that says, “We’re about to create something magical.” Let the oven fully heat for at least ten minutes; this ensures an even bake and that satisfying snap on the edges later.
Kitchen Hack: Place a metal cooling rack on the baking sheet; the treats will get airflow on the bottom, preventing soggy spots.In a large mixing bowl, mash the ripe banana until it’s a smooth, creamy puree. The scent will instantly fill the kitchen, making your dog’s ears perk up from the next room. Use the back of a fork, pressing and rotating, to avoid over‑mixing which can turn the banana mushy and lose its airy texture.
Add the natural peanut butter to the banana puree and stir until fully incorporated. You’ll notice the mixture darkening to a glossy, caramel‑like hue—this is the moment the flavor base truly comes together. If the peanut butter is too stiff, warm it for ten seconds in the microwave; it will blend more easily without losing its nutritional value.
Crack the egg into the bowl and whisk gently. The egg should coat the banana‑peanut butter blend, giving it a silky sheen. As you whisk, you’ll hear a faint, rhythmic splash—listen closely; this is the sound of binding agents doing their job.
Gradually sprinkle in the oat flour, stirring with a wooden spoon until the dough starts to come together. The batter will look thick and slightly sticky—don’t panic, that’s exactly how it should be. If you see dry pockets, drizzle in a little of the 0.5 cup water, one tablespoon at a time, until the dough is pliable but not wet.
Turn the dough onto a lightly floured surface (using a bit more oat flour) and knead for about 30 seconds. This short knead develops a tender crumb while keeping the treat light. Watch Out: Over‑kneading will make the twists tough, like chewing on a rubber band.
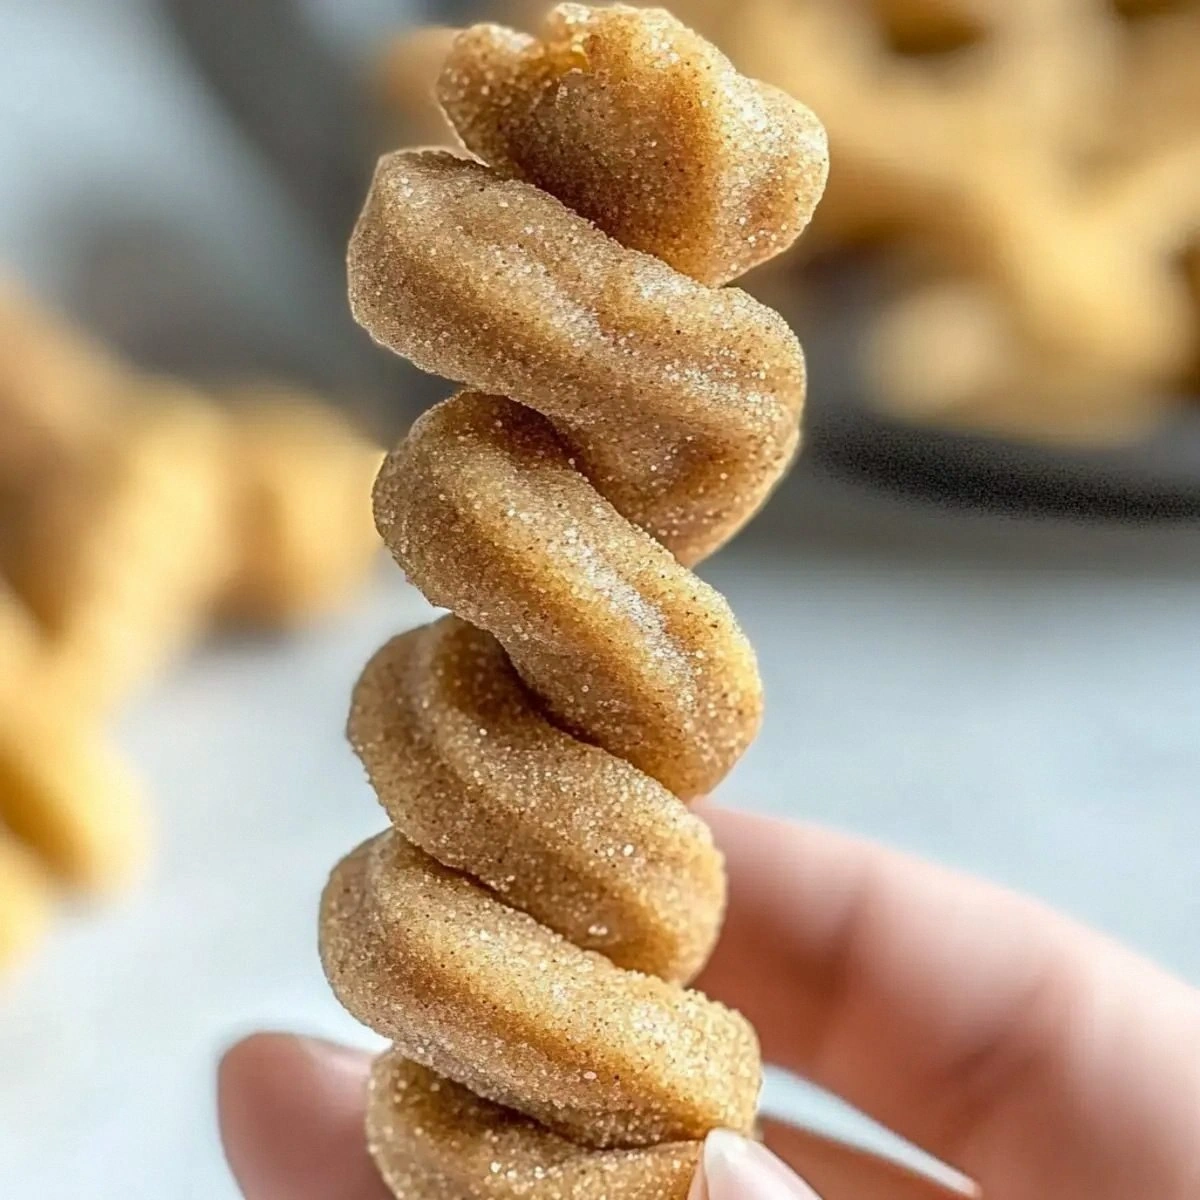
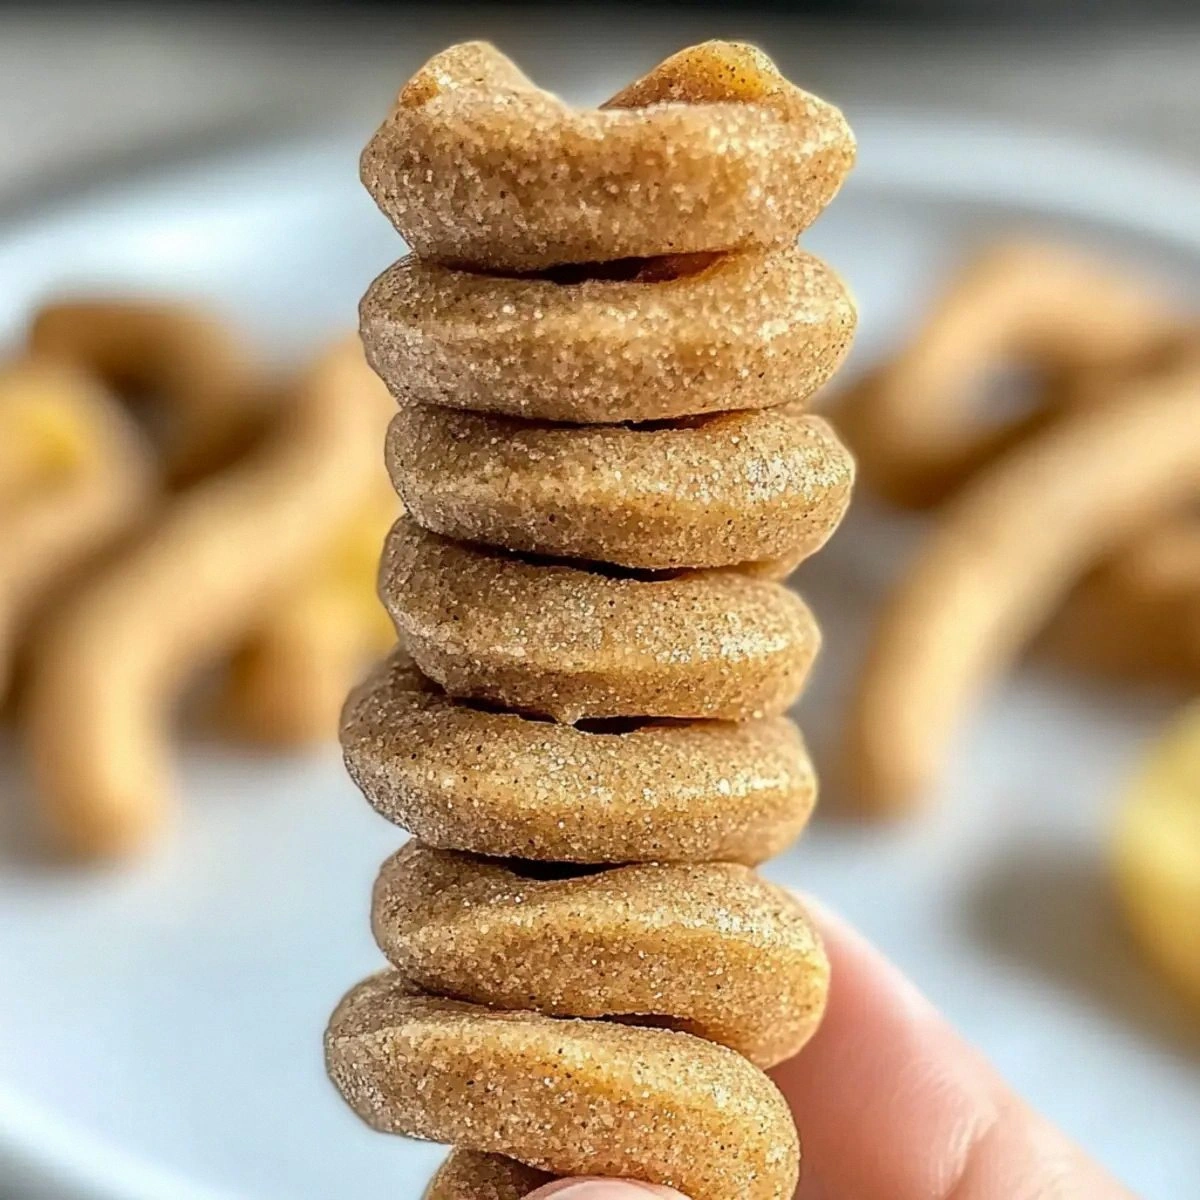
Watch Out: If the dough sticks to your hands, dust them with a little extra oat flour instead of adding more water.Divide the dough into four equal portions. Roll each portion into a rope about ½ inch thick, then twist the rope into a spiral and press the ends gently onto the parchment. This twist shape not only looks adorable but also maximizes surface area for that toasty crust. The moment you shape the first twist, you’ll feel a surge of confidence—this is the fun part.
Place the twists on the prepared sheet, leaving a little space between each. Lightly spray the tops with water using a spray bottle; this creates a brief steam burst that keeps the interior moist while the exterior browns. The steam will hiss softly—That sizzle when it hits the pan? Absolute perfection.
Slide the sheet into the oven and bake for 20‑25 minutes, or until the edges turn a golden‑brown and the tops are firm to the touch. Around the 15‑minute mark, rotate the sheet for even coloring. The kitchen will start to smell like a dog‑friendly bakery, and you’ll catch Max hovering at the door, tail wagging in anticipation.
Remove the treats and let them cool on a wire rack for at least 10 minutes. As they cool, the twists will firm up, making them perfect for a satisfying snap when your pup bites down. If you’re impatient (like me), give them a quick sniff—trust me, you’ll be tempted to taste one yourself.
That's it — you did it. But hold on, I've got a few more tricks that'll take this to another level. Trust me, once you master the basics, the sky's the limit for tweaking flavors and textures. Stay with me here — this is worth it.
Insider Tricks for Flawless Results
The Temperature Rule Nobody Follows
Most home bakers set the oven to a static temperature, but the secret to a perfect chew is a brief 5‑minute blast at 375°F halfway through baking. This higher heat creates a quick crust that locks in moisture, preventing the interior from drying out. I tried this on a rainy Sunday, and the difference was night and day—crispier edges without sacrificing tenderness. Remember, the oven’s thermostat can be off by up to 15 degrees, so use an oven thermometer for precision.
Why Your Nose Knows Best
Your sense of smell is a more reliable indicator than a timer. When the twists start to emit a nutty, caramel aroma, you’re just minutes away from perfection. If the scent turns too sweet or begins to smell burnt, pull them out early. This sensory cue saved me once when the oven’s heat element was slightly uneven, and the treats turned out perfectly golden.
The 5‑Minute Rest That Changes Everything
After baking, let the twists rest on the rack for exactly five minutes before moving them to a storage container. This short pause allows the steam inside to redistribute, giving each bite a consistent chew. Skipping this rest can make the treats feel slightly gummy in the center, which no dog appreciates. I once rushed this step and Max gave me a puzzled look—lesson learned.
The “Cool‑Then‑Freeze” Trick
If you plan to freeze the treats, let them cool completely, then flash‑freeze on a tray before transferring to a zip‑top bag. This prevents them from sticking together and makes portioning a breeze. The next time you pull a batch out, they’ll retain their original texture, as if they were just baked.
The Secret Ingredient: A Pinch of Cinnamon
A tiny dash (no more than ¼ teaspoon) of ground cinnamon adds a warm, aromatic note that dogs love and can help regulate blood sugar. It’s a subtle addition, but it elevates the flavor profile from ordinary to extraordinary. I tried it on a chilly November evening, and the house smelled like a cozy café—Max was instantly calmer.
Creative Twists and Variations
This recipe is a playground. Here are some of my favorite ways to switch things up:
Berry‑Burst Twist
Swap half the banana for a mashed handful of blueberries. The berries add antioxidants and a subtle tartness that pairs beautifully with peanut butter. Dogs love the burst of color, and the extra moisture keeps the treats extra soft.
Pumpkin Spice Delight
Replace the banana with ½ cup canned pumpkin and add a pinch of pumpkin pie spice (cinnamon, nutmeg, ginger). This variation is perfect for autumn, offering a seasonal flavor that still stays dog‑safe. The pumpkin adds fiber, aiding digestion.
Cheesy Chew
Stir in ¼ cup shredded low‑fat cheddar into the dough. The cheese adds a salty punch that most dogs find irresistible, and the protein boost makes these treats ideal for active pups. Just be mindful of the added sodium if your dog has dietary restrictions.
Apple Cinnamon Swirl
Finely dice a small apple (peeled and core‑removed) and fold it into the batter, then sprinkle a dusting of cinnamon on top before baking. The apple adds a crisp texture and natural sweetness, while the cinnamon provides that warm, comforting aroma.
Superfood Boost
Add a tablespoon of ground flaxseed or chia seeds to the dough for omega‑3 fatty acids. These seeds not only boost nutrition but also create a subtle crunch that dogs love. Just increase the water by a teaspoon to keep the dough workable.
Storing and Bringing It Back to Life
Fridge Storage
Place the cooled twists in an airtight container and store them in the refrigerator for up to one week. The cold environment preserves the moisture and keeps the treats fresh, preventing any mold growth. If you notice the edges drying out, give the container a quick shake to redistribute any lingering moisture.
Freezer Friendly
Arrange the twists on a baking sheet and freeze them individually for 2‑3 hours. Once solid, transfer them to a zip‑top freezer bag; they’ll keep for up to three months. To serve, pop a few out and let them sit at room temperature for five minutes, or gently warm them in a 250°F oven for ten minutes.
Best Reheating Method
When reheating, place the treats on a parchment‑lined tray, lightly mist them with water, and bake at 300°F for 5‑7 minutes. The splash of water creates steam that revives the interior softness while the low heat restores the crisp exterior without over‑drying. This trick works wonders for treats that have been stored for a week or more.