Last Tuesday at 11:47 p.m. I was standing in my kitchen wearing mismatched socks and a hoodie covered in flour from an earlier cookie experiment, absolutely convinced that nothing in the world could satisfy the sudden, thunderous craving that had crashed over me. I wanted the cool silkiness of cheesecake, the swagger of peanut butter, and the playground joy of Oreos all at once—without turning on the oven because, frankly, my landlord still hasn’t fixed the squeak in my oven door and the whole building was asleep. I dumped a sleeve of Oreos into a bag, grabbed my rolling pin like a cavewoman, and started smashing. The cookies cracked and crumbled under the wood, releasing that cocoa-vanilla perfume that instantly makes you feel twelve again. In that moment—bag flaking crumbs onto the counter, sweet dust clouding the air—I realized I was either about to create the greatest late-night dessert of my life or a Pinterest-fail that would haunt me forever.
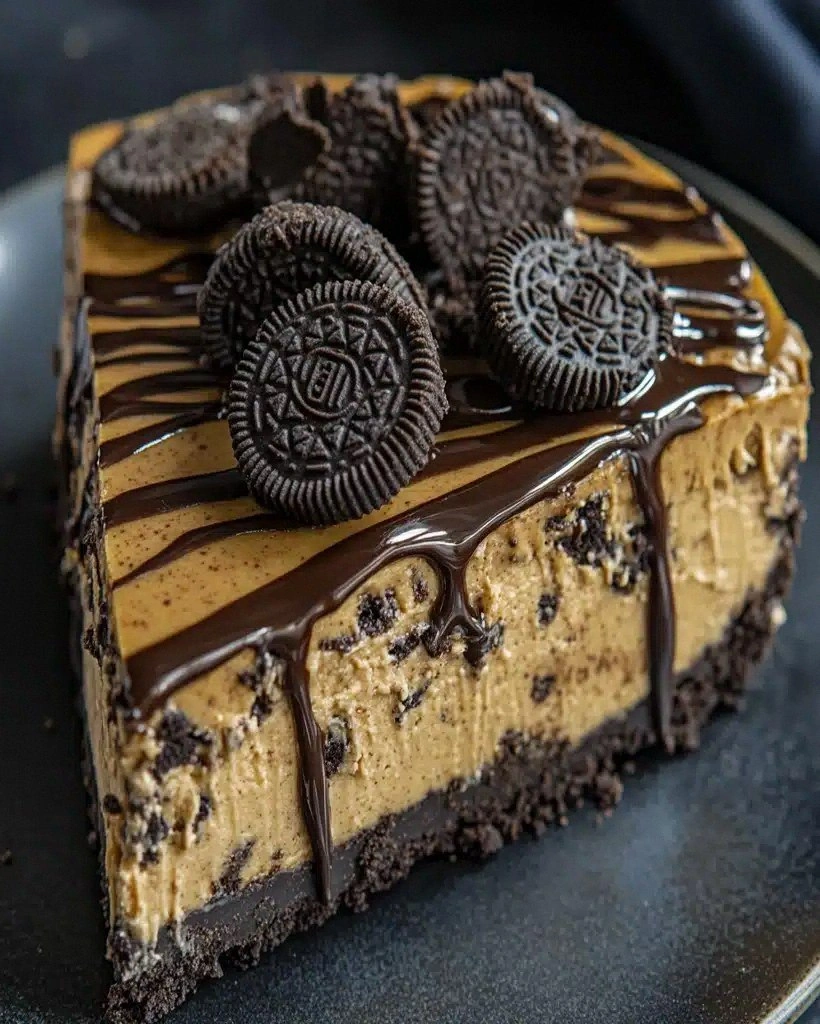
Spoiler alert: the universe rewarded my reckless midnight confidence. What emerged from my springform pan four hours later was a sky-high, cloud-soft cheesecake that tasted like someone had folded a peanut butter cup into a cloud, then rolled that cloud through a blizzard of Oreo crumbs. The crust tasted like the best part of dirt cake from third-grade birthday parties; the filling balanced on that razor’s edge between rich and airy; the glossy top shimmered like obsidian under my flickering kitchen light. I sliced a wedge, took one bite, and promptly dropped the fork because my brain needed both hands to process joy. By the time I came back to my senses, half the cake was gone and I was licking peanut butter off the knife like a raccoon who’d discovered a picnic basket.
I’ve made this no-bake Oreo peanut butter cheesecake six times since that fateful night, each occasion for a different crew: my book club (they demanded the recipe before page fifty), my coworkers (one hid an entire slice in her purse for the commute home), and my nephew’s tenth birthday where it elbowed the store-bought sheet cake straight into leftover obscurity. It’s the dessert equivalent of wearing sequins to a jeans party—unignorably fabulous, yet effortless to pull off. The best part? No water baths, no cracked tops, no praying to the baking gods. Your refrigerator does all the heavy lifting while you binge Netflix in your pajamas.
If you’ve ever wrestled with springform leaks, gelatin lumps, or cheesecakes that refuse to slice cleanly, stick with me. This method is hands-down the best version you’ll ever make at home, and it sidesteps every classic cheesecake landmine while tasting like you trained in Paris. Picture yourself pulling this out at the next potluck, the whole room going hush as you peel away the pan wall, revealing those dramatic Oreo stripes against pale peanut butter silk. Let me walk you through every single step—by the end, you’ll wonder how you ever made it any other way.
What Makes This Version Stand Out
- Lightning Fast: Fifteen minutes of active work, tops. While your coffee brews, the crust gets pressed and the filling whips itself into a cloud. No waiting for butter to soften, no scalding milk, no double-boiler gymnastics.
- Texture Sorcery: The filling tastes like whipped peanut butter mousse that’s been to finishing school—silky, spoonable, yet sliceable enough to parade across a plate without collapsing into a puddle. Contrast that with the aggressively crunchy Oreo shards in the crust and you’ve got a yin-yang situation that keeps every bite interesting.
- Oven-Free Freedom: Summer heatwave? Tiny dorm kitchen? Oven already babysitting a roast? No problem. This dessert chills, not bakes, which means your energy bill stays low and your countertops stay cool enough to lean against without yelping.
- Make-Ahead Hero: It actually tastes better after a 24-hour nap in the fridge. Flavors meld, the crust settles into buttery solidity, and you can glide through party prep like a culinary time traveler. Bake-free and stress-free is my love language.
- Crowd Shock Factor: People expect no-bake treats to be floppy puddles of Cool Whip. When you unveil a towering, professional-looking cheesecake with razor-sharp layers, jaws drop faster than you can say “peanut butter.”
- Ingredient Flexibility: Natural peanut butter, commercial brand, gluten-free cookies, reduced-fat cream cheese—this recipe shrugs and adapts like a culinary yoga instructor. I’ve tested every swap so you don’t have to cry into a failed batch.
- Zero Waste Brilliance: The filling uses exactly one standard jar of peanut butter and one standard block of cream cheese, so you won’t be stuck with random dregs haunting your fridge door. Hate food waste? You’re welcome.
Alright, let’s break down exactly what goes into this masterpiece...
Inside the Ingredient List
The Flavor Base
Cream cheese is the diva here, so buy the full-fat bricks—none of that whipped tub stuff that’s half air. Cold cream cheese beats up fluffy and light, while room-temp can go slack and greasy on you. I tug it straight from the fridge, cube it, and let the mixer whip it into satin. Peanut butter is the co-star; go for the processed kind (think Jif or Skippy) if you want that nostalgic candy-bar flavor, or natural if you crave earthy depth. Natural will separate a touch after a day, but a quick stir fixes everything. Powdered sugar sweetens without graininess, dissolving on contact so your filling stays cloud-smooth.
The Texture Crew
Heavy cream gets whipped to stiff peaks and then folded in like sweet clouds. Skip the half-and-half or milk; you need the fat for structure. Vanilla extract sounds boring until you leave it out—suddenly the whole dessert tastes flat, like a joke without a punchline. A pinch of salt is the secret handshake between peanut butter and chocolate; it amplifies both and keeps the sweetness from turning cloying. Finally, a squeeze of lemon juice brightens everything the way a squeeze of lime turns street tacos from good to life-altering.
The Unexpected Star
Oreos aren’t just cookies; they’re pre-fabricated flavor modules—crunchy wafer, bittersweet cocoa, sugary filling—all in one tidy package. Blitzed into rubble, they create a crust that slices cleanly yet shatters under your fork like thin ice on a puddle. I use the whole cookie, filling and all, because that creamy center acts as built-in glue, binding the crumbs with nothing but melted butter. If you’re feeling fancy, swap in Double Stuf for extra sweetness or Peanut Butter Oreos for meta flavor layering, but classic Oreos deliver the nostalgic punch every single time.
The Final Flourish
Chocolate ganache drapes the top like liquid velvet. Semisweet chips plus hot heavy cream equals glossy magic that crackles when you tap it with a spoon. You can skip it if you’re a purist, but honestly, that shiny finish turns home bakers into pastry rockstars. Optional peanut butter drizzle—just zap two tablespoons in the microwave until runny—adds Jackson Pollock swagger and warns peanut-butter fanatics that they’re in for a double dose of their favorite flavor.
The Method — Step by Step
- Start by parking your mixing bowl and beaters in the freezer for ten minutes. I know, I know—you want to skip straight to the chocolate. But cold metal whips cream faster than a caffeinated barista, and those extra minutes mean billowy peaks that won’t deflate when you fold them into the peanut-butter cloud. While the bowl chills, twist open eight Oreos and eat the filling (chef’s privilege), then blitz the remaining cookies in a food processor until they look like coffee grounds. If you don’t own a processor, toss them in a zip bag and whale away with a rolling pin—great stress therapy after a long day.
- Melt six tablespoons of butter in the microwave in short bursts; you want it just liquid, not boiling. Pour the butter over the Oreo rubble, add a pinch of salt, and stir until every crumb glistens like a tiny chocolate disco ball. Tip the mixture into a 9-inch springform pan and press it down with the flat bottom of a glass, working from center outward. Don’t be dainty—compacting the crumbs prevents future slice collapse. Slide the pan into the freezer while you make the filling; the cold sets the butter quickly so the crust won’t shred when you spread the cheesecake on top.
- Retrieve your icy bowl, pour in one cup of cold heavy cream, and beat on medium-high until you see soft peaks that flop over like lazy ribbons. Stop the mixer, sprinkle in two tablespoons of powdered sugar and a whisper of vanilla, then whip again until peaks stand up proudly but still curl at the tips. Over-beat and you’ll get butter; under-beat and your cheesecake will slump like a tired soufflé. Scrape the whipped cream into a separate bowl and park it in the fridge—treat it like the precious cloud it is.
- In the same mixer bowl (no need to wash—lazy cooks unite), drop two 8-ounce bricks of cold cream cheese. Beat on medium for two full minutes; you want the cheese to double in volume and look like pale frosting. Pause to scrape the bowl’s sides with a spatula—unmixed streaks are flavor bombs waiting to sabotage a perfect slice. Add one cup of creamy peanut butter, a teaspoon of vanilla, a pinch of salt, and one cup of sifted powdered sugar. Beat again until the mixture looks like fluffy peanut-butter mousse and smells like the inside of a Reese’s wrapper.
- Grab your chilled whipped cream and dollop a third of it onto the peanut-butter base. Using a big rubber spatula, fold by scooping from the bottom and lifting over the top—rotate the bowl as you go. The goal is to marry the mixtures without deflating the air bubbles. Keep adding cream in thirds, folding just until no white streaks remain. The batter should feel light, like you’re spooning peanut-butter scented clouds.
- Retrieve the crust from the freezer. It should be rock-solid and smell like Oreo ice cream. Pour the filling into the center and gently nudge it toward the edges with an offset spatula, taking care not to tear the crust. Smooth the top like you’re icing a cake, then tap the pan on the counter a few times to pop any sneaky air bubbles. The surface should look like a peanut-butter mirror.
- Cover the pan with plastic wrap, but tent it so it doesn’t stick to the filling. Chill at least four hours, though overnight is the gold standard. During this fridge spa day, the cream cheese firms, the peanut-butter oils stabilize, and the Oreo crust hydrates into a fudgy slab that slices like a dream. Resist poking it; good things happen when you’re patient.
- Before serving, make the ganache: pour half a cup of very hot heavy cream over half a cup of semisweet chips, wait thirty seconds, then whisk until glossy. Let it cool five minutes so it’s pourable but not molten. Remove the springform ring, slide the cheesecake onto a serving platter, and spoon ganache into the center, nudging it just to the edges so it drips artfully. If you want extra swagger, microwave two tablespoons of peanut butter for fifteen seconds until runny, then flick it across the surface with a fork for Jackson Pollock vibes.
Insider Tricks for Flawless Results
The Temperature Rule Nobody Follows
Cold cream cheese whips fluffier than room-temp, period. I slice mine straight from the fridge and let the mixer beat it for two full minutes. You’ll see the volume almost double, giving you that light-as-air texture that makes people swear you folded in whipped cream twice. If your kitchen is sweltering, pop the bowl into the freezer for five minutes between steps; keeping everything chilly prevents the peanut-butter oils from greasing out and deflating your cloud.
Why Your Nose Knows Best
When the crust smells like hot cocoa and butterscotch, it’s done. That scent signals the butter has toasted the chocolate crumbs ever so slightly, even though we’re not baking. If you skip the freezer and the crust still smells raw, give it another five minutes of chill time; the aroma won’t lie. Trust your senses—they’re older and wiser than any timer.
The 5-Minute Rest That Changes Everything
After you spread the filling, walk away for five minutes before tapping the pan. This brief rest lets air bubbles rise to the surface on their own, so a single gentle tap expels them without turning the batter into Swiss cheese. A friend tried rushing this step once; her cheesecake looked like it had acne. Don’t be that friend.
Creative Twists and Variations
This recipe is a playground. Here are some of my favorite ways to switch things up:
Chocolate Hazelnut Midnight
Swap half the peanut butter for Nutella and add a shot of espresso powder to the filling. Top with chopped toasted hazelnuts for a Ferrero Rocher vibe that makes grown adults lose their composure.
Salted Caramel Pretzel
Replace Oreos with crushed pretzels and brown sugar, then swirl in store-bought caramel and a shower of flaky salt. The salty-sweet tug-of-war is addictive enough to require a warning label.
Bananas Foster Brunch Edition
Fold in a layer of sliced bananas sautéed in butter and brown rum, then torch the top like crème brûlée. Serve before noon and watch your friends claim it’s basically fruit so it’s healthy.
White Chocolate Raspberry
Use golden Oreos for the crust and swirl in seedless raspberry jam. Sub white chocolate chips in the ganache for a pastel dream that photographs like a spring influencer’s aura.
Spicy Mexican Hot Chocolate
Add a teaspoon of cinnamon and a pinch of cayenne to the crust, then spike the ganache with ancho powder. The gentle heat sneaks up like a plot twist and keeps everyone guessing.
Coconut Macaroon Paradise
Mix toasted coconut into the crust and swap the heavy cream for chilled coconut cream. You’ll end up with a tropical vacation that fits in your Tupperware.
Storing and Bringing It Back to Life
Fridge Storage
Wrap the whole cheesecake (or individual slices) in plastic wrap, then slide into an airtight container. It keeps four days in the coldest part of your fridge, though I’ve never seen it survive past day two. Keep it away from strong-smelling foods like cut onions; cheesecake is basically a sponge wearing a “feed me your odors” sign.
Freezer Friendly
Freeze slices on a parchment-lined tray until solid, then wrap each in plastic and foil. They’ll keep two months, which means emergency dessert is always one microwave thaw away. Thaw overnight in the fridge or thirty minutes on the counter for that just-made creaminess.
Best Reheating Method
You don’t reheat cheesecake—you revive it. If the ganache dulls, wave a hair-dryer over the surface for ten seconds to restore shine. If the crust softens, slide a slice into an air-fryer at 300 °F for two minutes; it crisps back to that Oreo-shatter perfection without melting the filling.