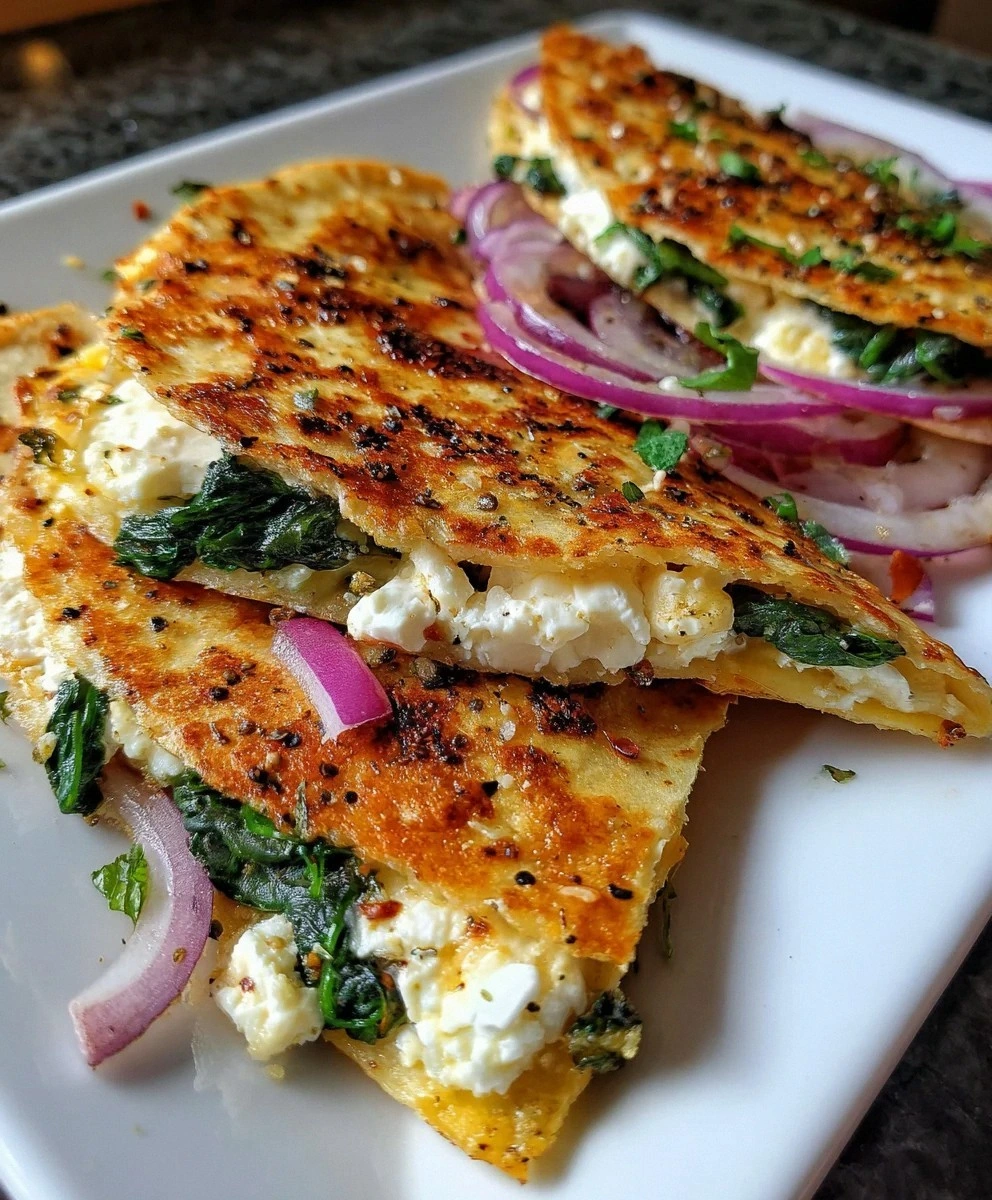
I burnt my first batch of these Mediterranean quesadillas so badly the smoke alarm started singing opera. There I stood, waving a dish towel like a maniac, while my roommate poked her head in and asked if I was trying to summon the fire department for dinner. But here's the thing — even those charcoal-fringed disasters tasted incredible. The feta had melted into creamy pockets, the spinach had that perfect wilt, and the oregano whispered of Greek islands I'd never visited. That's when I knew I was onto something special.
Fast forward through three weeks of obsessive testing, and I've cracked the code. These quesadillas are what happens when your Greek salad decides to elope with your favorite comfort food. They deliver the crispy, golden crunch you crave from traditional quesadillas, but surprise you with bright Mediterranean flavors that make your taste buds do a happy dance. The combination of earthy spinach, tangy feta, and melty mozzarella creates this perfect balance that had my neighbor knocking on my door asking what smelled so amazing.
Picture this: It's Tuesday night, you're starving, and you've got twenty minutes before hangry-you makes an appearance. These quesadillas come together faster than delivery, taste better than most restaurant appetizers, and use ingredients you probably already have lurking in your fridge. Plus, they're the kind of meal that makes you look like a culinary genius when friends drop by unexpectedly. I dare you to taste this and not go back for seconds — actually, I triple-dog dare you.
Let me walk you through every single step — by the end, you'll wonder how you ever made it any other way.
What Makes This Version Stand Out
- Flavor Explosion: Most quesadillas rely on heavy, greasy cheese that sits in your stomach like a brick. This version brightens everything up with feta's tangy punch and oregano's Mediterranean soul. The red pepper flakes add just enough heat to make things interesting without overwhelming the delicate spinach.
- Texture Perfection: The key lies in the cheese combination — feta provides salty, creamy pockets while mozzarella creates those Instagram-worthy cheese pulls. The spinach wilts just enough to meld with the cheeses without becoming mushy, and the red onion adds a gentle crunch that keeps each bite exciting.
- Weeknight Warrior: From fridge to plate in under 30 minutes, this recipe respects your time. While the onions sauté, you prep everything else. By the time you've assembled the quesadillas, your pan is hot and ready. Perfect for those "what's for dinner" moments when your brain is already halfway to bedtime.
- Unexpected Elegance: These aren't your college dorm quesadillas. The Mediterranean twist elevates them to dinner-party worthy while maintaining all the comfort-food nostalgia. Serve them at your next gathering and watch guests try to guess your secret ingredient.
- Ingredient Flexibility: Fresh out of fresh spinach? Frozen works beautifully. Not a feta fan? Goat cheese swoops in like a creamy superhero. The recipe adapts to whatever's in your kitchen, making it your new go-to for cleaning out the fridge.
- Make-Ahead Magic: Prep the filling on Sunday, and you've got lunch sorted for days. These quesadillas reheat like a dream in a dry skillet, maintaining their crispy edges and melty centers. Future-you will thank present-you for this foresight.
- Guaranteed Crowd Pleaser: I've served these to picky kids, health-conscious adults, and that friend who claims to hate vegetables. They all asked for the recipe. The familiar format of a quesadilla makes Mediterranean flavors approachable for even the most skeptical eaters.
Inside the Ingredient List
The Flavor Foundation
Fresh spinach forms the backbone of these quesadillas, bringing not just nutrients but an earthy depth that plays beautifully against the bright feta. When selecting spinach, look for leaves that are crisp and deep green — avoid anything yellowing or slimy. If you're using frozen spinach (which I often do in winter), make sure to squeeze out every last drop of moisture. Nothing ruins a quesadilla quite like soggy spinach water turning your tortilla into a sad, limp mess.
Red onion deserves more love than it gets. When thinly sliced and gently sautéed, it transforms from sharp and aggressive to sweet and almost jammy. The purple hue adds gorgeous color specks throughout your filling, making these quesadillas as beautiful as they are delicious. If you're really not an onion person, green onions offer a milder alternative, or you can skip them entirely — though I promise they mellow beautifully in the cooking process.
The Texture Crew
Feta cheese is the diva of this operation, and it knows it. Crumbled into small pieces, it melts partially while maintaining some of its structure, creating these incredible creamy pockets throughout each bite. When buying feta, look for blocks packed in brine rather than pre-crumbled — the flavor difference is night and day. If you can't find feta, goat cheese makes an acceptable substitute, though it will melt more completely and create a different texture profile.
Mozzarella might seem like an odd addition to Mediterranean flavors, but hear me out. It provides that essential cheese pull that makes quesadillas so satisfying, while its mild flavor lets the feta shine. Use fresh mozzarella if you're feeling fancy, but the regular shredded stuff works perfectly fine. For my dairy-free friends, there are some surprisingly good plant-based mozzarella alternatives that actually melt properly now.
The Supporting Cast
Garlic is the flavor amplifier that makes everything else taste more like itself. Fresh minced garlic sautéed for just 30 seconds becomes sweet and aromatic, infusing the oil and coating every spinach leaf with garlicky goodness. In a pinch, garlic powder works, but use about half the amount since it's more concentrated. Nobody wants to bite into a quesadilla and get punched in the face by raw garlic heat.
Dried oregano is your Mediterranean passport — just a pinch transports these quesadillas from Tex-Mex territory to a Greek taverna. Rub it between your palms before adding to release its essential oils. The aroma should be immediately recognizable and slightly floral. If your oregano has been sitting in your spice cabinet since the Obama administration, it's time for a fresh bottle.
The Final Flourish
Whole wheat tortillas add a nutty complexity that regular tortillas can't match, plus they hold up better to the moisture from the filling. Look for ones that are pliable but not too thick — you want them to crisp up nicely without becoming cardboard. Regular flour tortillas work in a pinch, and corn tortillas will give you a different flavor profile entirely. The key is getting them warm and flexible before assembly so they don't crack when folded.
Good olive oil makes all the difference here. Since we're using it both for sautéing and to brush the outside of the quesadillas, choose one with a flavor you actually enjoy. It doesn't need to be your expensive finishing oil, but it shouldn't taste like motor oil either. The oil helps create those gorgeous golden-brown spots that make quesadillas so visually appealing.
Everything's prepped? Good. Let's get into the real action...
The Method — Step by Step
- Heat your largest skillet over medium heat and add one tablespoon of olive oil. When the oil shimmers and slides easily across the pan, toss in your sliced red onion. Listen for that satisfying sizzle — that's the sound of flavor development happening. Stir occasionally for about 3-4 minutes until the onions start to turn translucent and the edges begin to caramelize. Your kitchen should start smelling like an Italian grandmother's kitchen, and that's exactly what we want.
- Clear a small space in the center of your pan and add the minced garlic directly onto the bare surface. Let it cook for just 30 seconds — watch it closely because garlic goes from perfect to bitter and burnt faster than you can say "opa!" Once it becomes fragrant and just starts to turn golden, stir it into the onions. The smell should make you want to grab some crusty bread and call it a day, but resist — we're just getting started.
- Add your spinach to the pan in batches if necessary, tossing with tongs to coat everything in that garlicky onion oil. The spinach will wilt dramatically — what looked like a mountain will shrink down to a modest pile. This is normal and good. Season with a pinch of salt, some black pepper, the oregano, and red pepper flakes if using. Cook for 2-3 minutes until the spinach is completely wilted but still bright green. Nobody wants army-green spinach in their quesadilla.
- Remove the pan from heat and let the mixture cool for about 5 minutes. This is crucial — hot filling will melt the cheese immediately and make assembly a gooey nightmare. While it cools, crumble your feta into small, pea-sized pieces and have your mozzarella ready. The cooling time is perfect for grating cheese if you're using a block of mozzarella instead of pre-shredded.
- Transfer the cooled spinach mixture to a bowl and gently fold in both cheeses. The feta should start to soften slightly from the residual heat, creating little pockets of creamy goodness throughout. Taste the filling and adjust seasoning — it should be flavorful enough to eat on its own as a dip. If it tastes flat, add a pinch more salt. If it needs brightness, a squeeze of lemon juice works wonders.
- Clean your skillet and return it to medium heat. While it heats, assemble your first quesadilla: lay a tortilla flat on your cutting board and spread about 1/3 cup of the filling over half the tortilla, leaving a small border around the edge. The filling should be about 1/4 inch thick — too much and it'll burst out during cooking, too little and you'll have a sad, empty quesadilla.
- Fold the tortilla over to create a half-moon shape and press gently to seal. Brush the outside with a thin layer of olive oil — this is what creates those gorgeous golden-brown spots. If you're making multiple quesadillas, you can assemble them all now, but don't let them sit too long or the tortillas will absorb moisture and become soggy.
- Carefully transfer the quesadilla to your hot skillet. It should sizzle immediately — if it doesn't, your pan isn't hot enough yet. Cook for 2-3 minutes until the bottom is golden brown and crispy. Don't walk away from the stove here — quesadillas can go from perfect to burnt in under a minute. Peek underneath by lifting with a spatula; when it's ready, it should release easily from the pan.
- Flip carefully using a large spatula (or two if needed) and cook the second side for another 2-3 minutes. The cheese inside should be completely melted and the tortilla should be crisp and golden. If you're unsure, press gently on the top — it should feel firm and the cheese should be oozing slightly from the edges. That's the moment of truth when you know you've achieved quesadilla nirvana.
- Transfer to a cutting board and let rest for 2 minutes before cutting. I know you're tempted to dig in immediately, but this rest time lets the cheese set slightly so it doesn't all come oozing out when you cut it. Use a sharp knife or pizza cutter to slice into wedges. The sound of the knife cutting through that crispy exterior? Pure satisfaction. Serve immediately while the cheese is still molten and amazing.
That's it — you did it. But hold on, I've got a few more tricks that'll take this to another level...
Insider Tricks for Flawless Results
The Temperature Rule Nobody Follows
Here's the thing about quesadillas: medium heat is your friend, not your enemy. I know you're hungry and tempted to crank that burner to high, but resist the urge. High heat burns the outside while leaving the inside cold and the cheese unmelted. Medium heat gives the cheese time to melt completely while the tortilla achieves that perfect golden crisp. If your quesadilla is taking forever to brown, be patient — good things come to those who wait (and keep the heat steady).
Why Your Nose Knows Best
Trust your senses when cooking these quesadillas. When the garlic hits the pan, it should smell fragrant and inviting, not harsh and bitter. If it starts smelling acrid, you've gone too far and need to start over. The same goes for the final cooking — when the quesadilla is nearly done, your kitchen should smell like toasty bread and melted cheese, not burning tortillas. Your nose is a better timer than you think.
The 5-Minute Rest That Changes Everything
I know I mentioned resting the filling, but this deserves its own moment. Letting the cooked spinach mixture rest for 5 minutes before adding the cheese prevents the feta from turning into complete mush and the mozzarella from pre-melting. This step creates distinct pockets of cheese rather than one homogenous mass. Plus, it prevents you from burning your fingers when assembling — trust me on this one, learned the hard way.
The Pressing Technique That Works
When assembling your quesadilla, press the filling down slightly with the back of a spoon before folding. This compacts everything and prevents air pockets that can cause the tortilla to puff up strangely during cooking. It also helps the cheese distribute evenly so every bite has the perfect ratio of spinach to cheese. Think of it like making a sandwich — you want everything packed in there nicely, not loosely scattered about.
The Cheese Ratio Secret
Here's my confession: I ate half the batch before anyone else got to it because I got the cheese ratio wrong on the first attempt. Too much feta makes the quesadilla overwhelmingly salty and the filling grainy. Too much mozzarella and you lose that distinctive Mediterranean flavor. The magic ratio is about 60% mozzarella to 40% feta by volume. This gives you the creamy melt you want while letting the feta's tangy personality shine through without stealing the show.
Creative Twists and Variations
This recipe is a playground. Here are some of my favorite ways to switch things up:
The Greek Village Version
Add some chopped Kalamata olives and sun-dried tomatoes to the filling for a more robust Mediterranean flavor. The olives bring briny depth while the sun-dried tomatoes add sweet-tart notes that complement the feta beautifully. Just be mindful of salt levels — the olives are quite salty on their own. This version pairs perfectly with a side of tzatziki for dipping.
The Protein Powerhouse
Stir in some chopped cooked chicken or crumbled cooked sausage to make these a complete meal. Rotisserie chicken works wonderfully, or try some spicy Italian sausage for a fusion twist. The protein adds staying power and transforms these from appetizer to main course. My personal favorite is adding some crumbled cooked lamb — it takes the Greek theme to new heights.
The Veggie Lover's Dream
Add some chopped artichoke hearts or roasted red peppers to the filling for extra vegetable goodness. The artichokes bring a meaty texture while the roasted peppers add sweetness and color. Make sure to drain them well and pat dry with paper towels to avoid adding excess moisture to the filling.
The Spice Seeker's Delight
Bump up the heat by adding some chopped fresh jalapeños or a dash of cayenne pepper to the filling. You could also use pepper jack cheese instead of mozzarella for an extra kick. If you're really feeling adventurous, add some chopped pepperoncini for a tangy-spicy combination that'll wake up your taste buds.
The Breakfast Champion
Crack an egg directly onto the tortilla before adding the filling, then fold and cook as usual. The egg creates a barrier that keeps the tortilla from getting soggy while adding protein and richness. Cook the first side for 3-4 minutes to ensure the egg sets properly before flipping. This version is my go-to for weekend brunches.
The Kid-Friendly Take
If your little ones balk at "green stuff" in their food, try using baby spinach and chopping it very finely after cooking. You can also reduce the feta by half and add extra mozzarella for a milder flavor. The key is calling them "pizza quesadillas" instead of "spinach quesadillas" — sometimes marketing is everything in parenting.
Storing and Bringing It Back to Life
Fridge Storage
Let any leftover quesadillas cool completely before storing in an airtight container in the refrigerator. They'll keep for up to 4 days, though they're best within the first 2 days when the tortillas are still relatively crisp. Place a piece of parchment paper between layers to prevent them from sticking together. The filling can be stored separately for up to 5 days and used for other purposes — it's fantastic stirred into scrambled eggs or as a sandwich spread.
Freezer Friendly
These quesadillas freeze beautifully for up to 2 months. Wrap each one individually in plastic wrap, then place in a freezer bag. To reheat from frozen, unwrap and place in a dry skillet over low heat, covering with a lid to help the cheese melt. It'll take about 6-8 minutes per side. You can also reheat from frozen in a 375°F oven for 15-20 minutes, flipping halfway through. The key is low and slow to prevent burning the outside while the inside is still cold.
Best Reheating Method
Skip the microwave — it makes the tortillas rubbery and sad. Instead, use a dry skillet over medium-low heat for 2-3 minutes per side. Add a tiny splash of water to the pan and cover with a lid for the first minute to create steam that helps re-crisp the tortilla. The quesadilla will taste almost as good as fresh, with crispy edges and melty cheese. If you're reheating multiple quesadillas, a 350°F oven works well — just place them on a wire rack set over a baking sheet for 8-10 minutes.