Love this? Pin it for later! 📌
Mornings in our house used to be a frantic dance of finding matching socks, reminding the kids to brush their teeth, and somehow getting everyone fed before the school bell rang. That all changed the day I discovered the magic of make-ahead breakfast quesadillas. Now, instead of slaving over a hot stove at 6 AM, I simply reach into the freezer, pop these golden, crispy pockets of breakfast goodness into the toaster oven, and within minutes we're all sitting down to a protein-packed meal that keeps everyone satisfied until lunch.
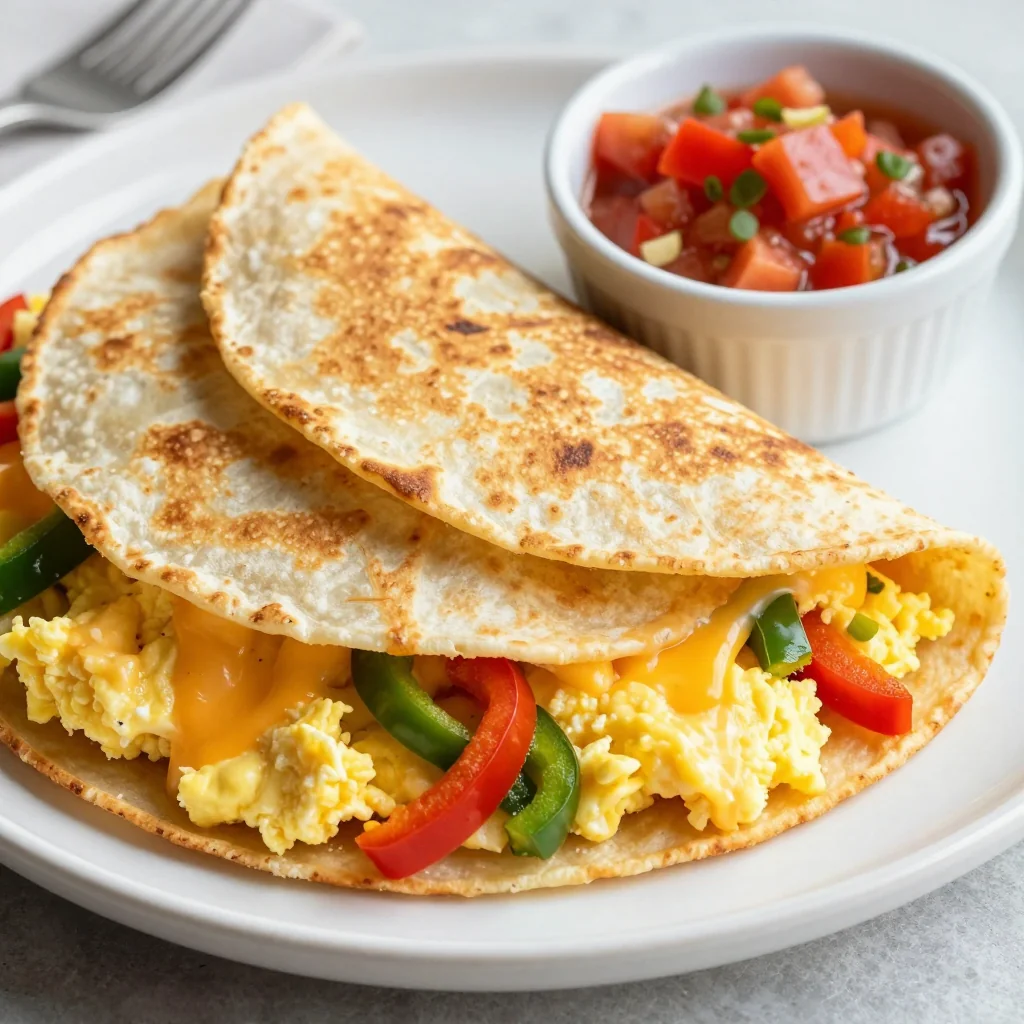
What started as a desperate attempt to reclaim my sanity during busy weekday mornings has evolved into our family's favorite breakfast tradition. These quesadillas are everything you could want in a portable breakfast: crispy on the outside, loaded with fluffy scrambled eggs, melty cheese, and your choice of breakfast meats or vegetables. The best part? They freeze beautifully, reheat like a dream, and taste just as delicious on day 30 as they do on day one.
Whether you're a busy parent juggling school drop-offs, a college student rushing to early morning classes, or a professional trying to meal prep for the week ahead, these breakfast quesadillas will revolutionize your morning routine. They're customizable, budget-friendly, and infinitely adaptable to whatever ingredients you have on hand. Plus, they're hands-down better (and cheaper) than any fast-food breakfast sandwich you'll find.
Why This Recipe Works
- Perfect Freezer Texture: The combination of flour tortillas and strategic ingredient layering prevents sogginess, ensuring crispy results even after freezing and reheating.
- Balanced Nutrition: Each quesadilla delivers 18g of protein, complex carbohydrates, and healthy fats to keep you energized throughout the morning.
- 30-Day Freezer Life: Properly wrapped quesadillas maintain optimal flavor and texture for up to one month in the freezer.
- Customizable for All Diets: Easily adapted for vegetarian, gluten-free, or dairy-free lifestyles without compromising taste or texture.
- Kid-Approved Flavors: Even picky eaters love these quesadillas, making them perfect for school lunches or teenage midnight snacks.
- Economical Meal Prep: Costs less than $1.50 per serving compared to $5+ for drive-thru breakfast sandwiches.
- One-Pan Assembly: Streamlined cooking process means you can prep a month's worth of breakfasts in under 90 minutes.
Ingredients You'll Need
Quality ingredients make all the difference in these breakfast quesadillas. After testing dozens of combinations, I've discovered the perfect balance of flavors and textures that hold up beautifully to freezing and reheating.
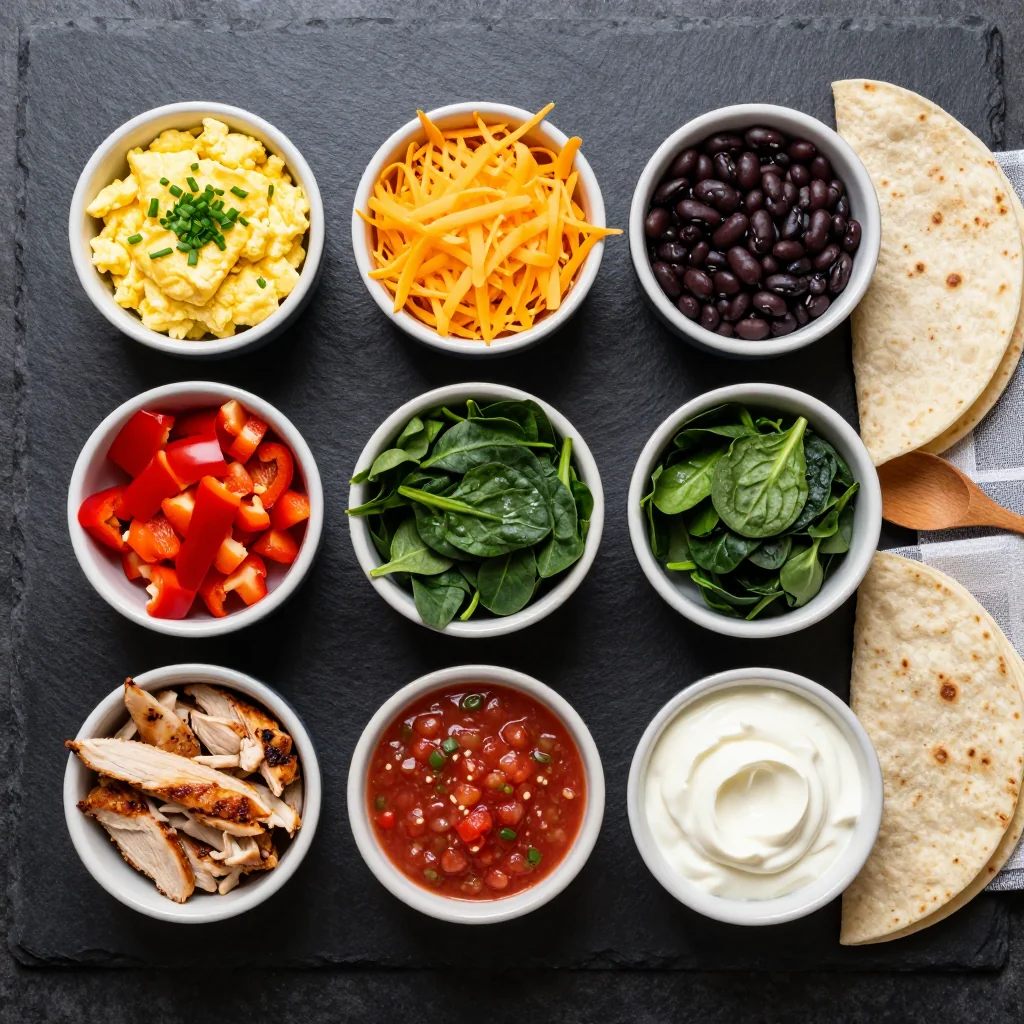
Large Flour Tortillas (10-inch): The foundation of any great quesadilla. Look for fresh, pliable tortillas without tears or cracks. I've found that the "burrito-size" tortillas work perfectly for folding and create the ideal bread-to-filling ratio. If you're gluten-free, Mission makes excellent gluten-free tortillas that freeze and reheat well.
Extra-Large Eggs: The star protein of our breakfast quesadillas. I always use cage-free eggs for their richer yolks and superior flavor. If you're watching cholesterol, you can substitute with egg whites or a plant-based egg alternative like JUST Egg, though you may need to adjust cooking times slightly.
Sharp Cheddar Cheese: This is where the magic happens. Sharp cheddar provides that incredible melty, gooey texture while delivering a punch of flavor that stands up to freezing. I recommend buying a block and grating it yourself – pre-shredded cheese contains anti-caking agents that can make your quesadillas greasy. For the best results, use a combination of sharp cheddar and Monterey Jack for the ultimate melt factor.
Cooked Breakfast Sausage: I prefer using turkey sausage for its leaner profile and milder flavor that appeals to kids, but pork sausage works beautifully if you prefer a richer taste. Cook and crumble the sausage the day before for even faster assembly. Vegetarian? Substitute with seasoned black beans or plant-based sausage crumbles.
Bell Peppers and Onions: These vegetables add sweetness, crunch, and essential nutrients. I use a mix of red and green bell peppers for color and flavor variety. Dice them small (about ¼-inch pieces) so they distribute evenly and don't create gaps in your quesadilla. Frozen pepper and onion blends work in a pinch and actually hold up better to freezing than fresh.
Fresh Spinach: Wilting a handful of spinach into your eggs is an easy way to sneak in extra nutrients without compromising taste. Baby spinach works best as it has a milder flavor and more tender texture. If you're prepping for picky eaters, you can substitute with finely grated zucchini or simply leave the greens out entirely.
Seasonings: Don't underestimate the power of proper seasoning. A simple blend of garlic powder, onion powder, smoked paprika, and a pinch of cayenne elevates these from basic to restaurant-quality. I also add a splash of hot sauce to the eggs for a subtle kick that even my kids enjoy.
How to Make Make-Ahead Breakfast Quesesadillas for Portable Meal Prep
Prep Your Ingredients
Start by cooking your breakfast sausage in a large skillet over medium heat, breaking it into small crumbles as it cooks. This takes about 8-10 minutes. While the sausage cooks, dice your bell peppers and onions into ¼-inch pieces. Once the sausage is browned and cooked through, transfer it to a paper towel-lined plate to drain excess grease. In the same skillet (don't wipe it out – those browned bits add flavor!), sauté your diced peppers and onions for 4-5 minutes until they're softened but still have a bit of crunch. This step is crucial – overcooked vegetables will release too much moisture and make your quesadillas soggy.
Create the Perfect Scrambled Eggs
In a large bowl, whisk together 8 large eggs with ¼ cup milk (whole milk works best for richness, but any variety works), ½ teaspoon salt, ¼ teaspoon black pepper, ¼ teaspoon garlic powder, and a pinch of cayenne pepper if desired. The key to freezer-friendly scrambled eggs is cooking them slightly firmer than you normally would. Heat 1 tablespoon of butter in a large non-stick skillet over medium-low heat. Pour in the egg mixture and let it sit undisturbed for 30 seconds, then gently push the cooked edges toward the center with a silicone spatula. Continue this process, creating large curds, until the eggs are about 90% set but still slightly glossy. They'll finish cooking during reheating, so slightly undercooked is perfect here.
Assemble Your Quesadilla Station
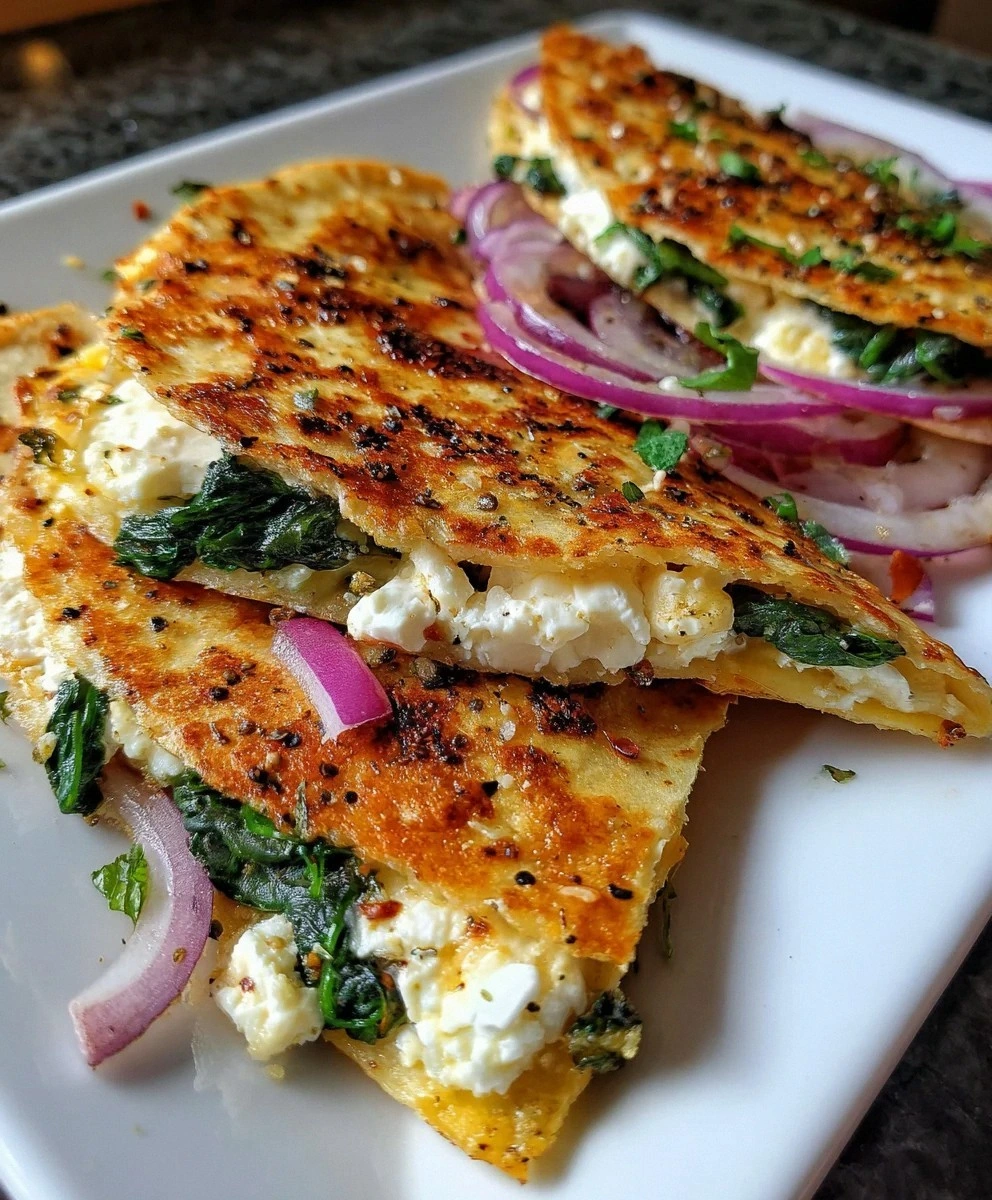
Set up an assembly line to streamline the process. Place your flour tortillas on a clean work surface. On one half of each tortilla, layer 2 tablespoons of shredded cheese (this creates a barrier that prevents the tortilla from getting soggy), followed by ⅓ cup of scrambled eggs, 2 tablespoons of cooked sausage, 1 tablespoon of the pepper and onion mixture, and a sprinkle of fresh spinach if using. Top with another 2 tablespoons of cheese – this top layer of cheese acts like glue, holding everything together. Be careful not to overfill; you should be able to fold the tortilla in half without ingredients spilling out.
Cook to Golden Perfection
Heat a large skillet or griddle over medium heat. You don't need any oil if using a non-stick pan, but a light spray of cooking spray can help achieve extra crispiness. Place the folded quesadilla in the hot pan and cook for 2-3 minutes until the bottom is golden brown and crispy. Using a large spatula, carefully flip the quesadilla and cook the second side for another 2-3 minutes. The cheese should be completely melted, and the tortilla should have beautiful golden-brown spots. Transfer to a cutting board and let rest for 2 minutes – this allows the cheese to set slightly, making them easier to cut and wrap.
Cool and Portion
This step is crucial for freezer success! Let your quesadillas cool completely on a wire rack for at least 30 minutes. This prevents condensation from forming inside your storage containers, which would lead to soggy quesadillas. Once cool, use a sharp pizza cutter or large knife to cut each quesadilla in half. I find halves are the perfect portable portion, but you can also leave them whole for heartier appetites. If you're prepping for young children, consider cutting them into thirds or even quarters for little hands.
Wrap for Freezer Storage
Here's where proper wrapping technique makes or breaks your make-ahead breakfast success. Tear off a sheet of plastic wrap about 12 inches long. Place one quesadilla half in the center, fold the plastic wrap over it, then fold in the sides to create a tight package. Wrap it again in a second layer of plastic wrap – this double-wrapping technique prevents freezer burn and keeps your quesadillas tasting fresh. For the ultimate protection, place the wrapped quesadillas in a large zip-top freezer bag, squeezing out as much air as possible before sealing.
Label and Organize
Don't skip this step! Use a permanent marker to label your freezer bags with the contents, date made, and reheating instructions. I also like to note any variations – like "vegetarian" or "extra spicy" – so family members can grab their preferred option. Store the quesadillas flat in your freezer until completely frozen, then you can stand them upright to save space. Pro tip: Keep a running inventory on your freezer door so you always know what you have on hand.
Master the Reheating Process
For best results, reheat your frozen quesadillas in a toaster oven or conventional oven at 375°F for 12-15 minutes, flipping halfway through. This method preserves the crispy texture better than microwaving. However, if you're truly pressed for time, you can microwave them on high for 60-90 seconds, then finish them in a hot skillet for 30 seconds per side to restore crispiness. For camping or office lunches, wrap them in foil and reheat on a grill or in a toaster oven. The key is ensuring the internal temperature reaches 165°F for food safety.
Expert Tips
Prevent Soggy Quesadillas
Pat cooked vegetables dry with paper towels before assembling. Excess moisture is the enemy of crispy quesadillas, especially when freezing.
Speed Up Assembly
Use a cookie scoop to portion eggs and a small ice cream scoop for cheese. This ensures consistent sizing and faster assembly when making large batches.
Perfect Reheating Temperature
Invest in an instant-read thermometer. Quesadillas are perfectly reheated when the internal temperature reaches 165°F, ensuring food safety without overcooking.
Prevent Freezer Burn
Press a piece of parchment paper directly against the surface of each quesadilla before wrapping. This creates an additional moisture barrier.
Color-Coded Varieties
Use different colored toothpicks to mark varieties before freezing. Red for spicy, green for vegetarian, plain for kids – makes grab-and-go easy!
Batch Cooking Strategy
Double the recipe and dedicate one Sunday afternoon per month to meal prep. You'll have 30+ breakfasts ready for the entire month ahead.
Variations to Try
Southwest Veggie Delight
Replace sausage with black beans, corn, and diced green chiles. Add cumin and chili powder to the eggs, and use pepper jack cheese for an extra kick. Top with fresh cilantro before serving.
VegetarianMediterranean Morning
Use feta cheese instead of cheddar, add chopped spinach, sun-dried tomatoes, and crumbled turkey sausage seasoned with oregano and basil. Serve with a side of tzatziki for dipping.
MediterraneanEverything Bagel Style
Mix everything bagel seasoning into cream cheese and spread on the tortilla before adding eggs. Include smoked salmon pieces and use a blend of cream cheese and mozzarella for authentic bagel flavor.
GourmetApple & Cheddar Sweet-Savory
Add thinly sliced Granny Smith apples and use white cheddar cheese. A sprinkle of cinnamon in the eggs and a drizzle of honey before serving creates an unexpectedly delicious sweet-savory combination.
UniqueSpicy Chorizo & Potato
Replace regular sausage with Mexican chorizo and add diced, pre-cooked potatoes. Use a blend of cheddar and Oaxaca cheese, and include pickled jalapeños for extra heat.
SpicyKeto-Friendly Low-Carb
Use low-carb tortillas or cheese wraps, load up on extra eggs and breakfast meats, add avocado slices, and use full-fat cheeses. Skip the bell peppers to reduce carbs further.
KetoStorage Tips
Freezer Storage
Properly wrapped quesadillas stay fresh for up to 3 months. Use within 30 days for optimal flavor and texture.
Refrigerator Storage
Refrigerated quesadillas last 3-4 days. Wrap individually and store in an airtight container for best results.
Reheating Safety
Always reheat to an internal temperature of 165°F. Use a food thermometer to ensure food safety.
For optimal freezer storage, I recommend using the "flash freeze" method: place cooled quesadilla halves on a baking sheet lined with parchment paper, making sure they don't touch. Freeze for 2 hours, then wrap individually. This prevents them from sticking together and allows you to grab single servings as needed.
When storing in the refrigerator, place a piece of parchment paper between each quesadilla to prevent them from becoming soggy. If you're prepping for the week ahead, consider storing components separately – keep cooked eggs, sausage, and vegetables in separate containers, then assemble fresh quesadillas throughout the week for maximum crispiness.
Frequently Asked Questions

Make-Ahead Breakfast Quesadillas for Portable Meal Prep
Ingredients
Instructions
- Cook the sausage: In a large skillet over medium heat, cook breakfast sausage until browned and cooked through, about 8-10 minutes, breaking into small crumbles. Transfer to paper towel-lined plate.
- Sauté vegetables: In the same skillet, cook diced peppers and onions for 4-5 minutes until softened but still slightly crisp. Remove from heat.
- Prepare eggs: Whisk eggs with milk, salt, pepper, garlic powder, and cayenne. Melt butter in skillet over medium-low heat. Cook eggs gently, creating soft curds, until 90% set.
- Assemble quesadillas: On one half of each tortilla, layer cheese, eggs, sausage, vegetables, spinach (if using), and more cheese. Fold over to create half-moon shape.
- Cook quesadillas: Heat skillet over medium heat. Cook each quesadilla for 2-3 minutes per side until golden brown and cheese is melted.
- Cool and wrap: Let quesadillas cool completely on wire rack. Cut in half, wrap individually in plastic wrap, then place in freezer bags.
- Freeze and store: Freeze flat for up to 3 months. Reheat from frozen at 375°F for 12-15 minutes, or microwave for 60-90 seconds then crisp in skillet.
Recipe Notes
For best results, shred your own cheese rather than using pre-shredded. Double-wrap quesadillas for freezer storage to prevent freezer burn. Let quesadillas rest 2 minutes after reheating for easier eating.