When the kitchen alarm rang at 2 a.m. and my neighbor’s pizza delivery left a greasy trail across my countertops, I swore I’d never cook a chicken thigh again. That night, I stared at a bag of bone‑in, skin‑on thighs and felt a sudden, almost mischievous urge to turn a disaster into a masterpiece. I pulled out every jar I owned—honey, Dijon mustard, apple cider vinegar—and imagined a sauce that would sing louder than the siren. The scent of garlic sizzling in olive oil filled the air, and the sound of the skillet crackling was like a drumbeat calling me to experiment. I was about to rewrite the rules of chicken dinner, and I knew I had to share the secret sauce that would change the way we think about comfort food.
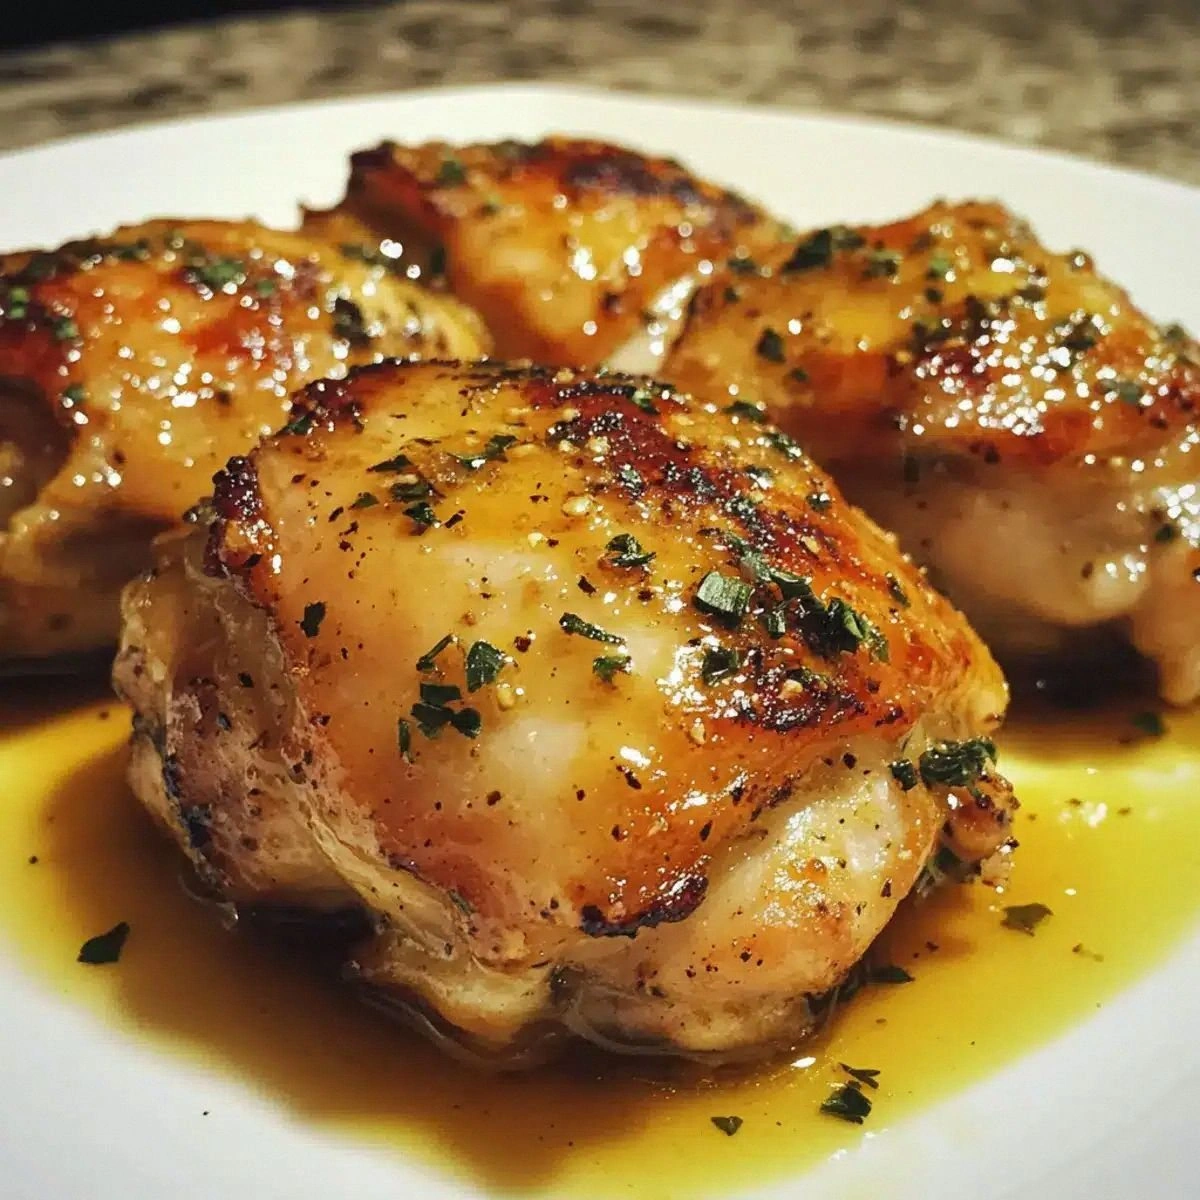
Picture this: a thick, glossy honey‑mustard glaze clinging to the thighs, a caramelized crust that shatters like thin ice when you bite into it, and a smoky, herbaceous undertone that lingers long after the last bite. The first sizzle when the chicken hits the pan is a promise of crispness, and the aroma of smoked paprika and fresh thyme wafts up like a warm hug. My taste buds danced in anticipation, and I dared myself to taste the sauce before I even finished cooking. If you’ve ever wondered what a perfectly balanced sweet‑savory glaze feels like, this is the answer. I’m not just offering a recipe; I’m offering a culinary dare—taste it and feel the seconds you’ll inevitably crave.
Most chicken recipes rely on simple salt and pepper, but this version layers flavor like a well‑crafted symphony. The honey adds a natural sweetness that caramelizes beautifully, the Dijon mustard provides a sharp bite that cuts through the richness, and the apple cider vinegar balances everything with a subtle acidity. The smoked paprika gives a gentle heat that lingers without overpowering, while the fresh herbs bring a bright, aromatic finish. Together, they create a sauce that coats the meat like velvet, leaving every bite succulent and unforgettable. I’ve tested this countless times, and each time I find myself reaching for the next piece before the plate is empty.
There’s a hidden technique that sets this dish apart: the use of a small amount of olive oil to sear the thighs before the glaze is added. This step locks in juices, giving the skin a crisp, golden finish that contrasts with the glossy sauce. I’ll walk you through every single step, from seasoning the chicken to the final flambé, so you’ll wonder how you ever cooked it any other way. By the end of this post, you’ll have a foolproof method that guarantees juicy, tender thighs with a glaze that will have your friends begging for the recipe. Ready? Let’s dive into the details and make your kitchen the place where culinary magic happens.
What Makes This Version Stand Out
- Flavor Depth: The honey and Dijon mustard work together to create a balanced sweet‑savory profile that isn’t overly sweet or too tangy. The glaze coats the chicken like a velvet blanket, ensuring every bite is infused with richness.
- Crispy Texture: Searing the thighs in olive oil before glazing locks in moisture and produces a skin that cracks with a satisfying crunch, a contrast that elevates the dish’s mouthfeel.
- Ingredient Simplicity: With only nine pantry staples, this recipe is quick to assemble and requires minimal prep time, making it ideal for weeknight dinners.
- Visual Appeal: The glossy glaze gives the thighs a mouth‑watering sheen, while the caramelized edges create a dramatic presentation that looks as good as it tastes.
- Crowd‑Pleaser: Whether you’re cooking for a family or a group of friends, the combination of sweet, savory, and smoky flavors ensures everyone will be asking for seconds.
- Make‑Ahead Friendly: The glaze can be prepared in advance and stored in the refrigerator, allowing you to assemble the dish quickly when you’re ready to cook.
- Versatile Pairings: This dish pairs beautifully with roasted vegetables, mashed potatoes, or a simple green salad, making it adaptable to any meal plan.
- Health‑Conscious Twist: Using skin‑on thighs keeps the flavor profile intact while still offering a leaner protein source compared to other cuts.
Alright, let’s break down exactly what goes into this masterpiece…
Inside the Ingredient List
The Flavor Base
Honey, the sweet heart of this dish, caramelizes when heated, forming a syrupy coating that locks in moisture. A quarter cup is enough to coat each thigh evenly without overpowering the other flavors. If you’re looking for a different sweet note, try a splash of maple syrup or a drizzle of molasses for a deeper, richer undertone. The honey’s natural sugars also help the skin crisp up to a golden brown.
Dijon mustard, with its sharp, peppery bite, balances the sweetness of honey and adds depth to the glaze. It also provides a slight tang that cuts through the richness of the chicken skin. If you don’t have Dijon, whole‑grain mustard works well, though it will introduce a more rustic texture. Keep the mustard at room temperature before mixing; this helps it emulsify smoothly with the other liquids.
The Texture Crew
Olive oil is the key to achieving a crispy, caramelized skin. Two tablespoons are enough to coat the thighs and create a barrier that prevents the meat from drying out. If you prefer a more neutral flavor, use canola or grapeseed oil; however, extra virgin olive oil adds a subtle fruity note that complements the glaze.
Garlic, minced finely, releases its aromatic oils during cooking, infusing the sauce with a savory backbone. Three cloves provide a robust flavor without overwhelming the sweetness of the honey. If you’re sensitive to garlic, reduce to two cloves or use roasted garlic for a milder, sweeter taste.
The Unexpected Star
Apple cider vinegar adds a bright acidity that brightens the glaze and balances the richness of the honey and chicken. Two tablespoons are enough to cut through the sweetness while providing a subtle tang. For a milder acidity, substitute with white wine vinegar or lemon juice, but adjust the amount to taste.
The Final Flourish
Smoked paprika and fresh thyme (or rosemary) bring a smoky, herby finish that elevates the dish from simple to unforgettable. One teaspoon of smoked paprika is the sweet spot—enough to impart a gentle heat without overpowering the glaze. A tablespoon of fresh thyme or rosemary adds aromatic freshness; if you’re out of fresh herbs, dried herbs can work, but use only half the amount to avoid bitterness.
Everything’s prepped? Good. Let’s get into the real action…
The Method — Step by Step
- Begin by patting the chicken thighs dry with paper towels; removing excess moisture ensures a crisp skin. Season each thigh generously with salt and pepper, then let them rest for 10 minutes to allow the seasoning to penetrate. While the chicken rests, mix honey, Dijon mustard, apple cider vinegar, smoked paprika, and fresh thyme in a small bowl until the glaze is smooth. This will be the star sauce that brings everything together.
- Heat a large skillet over medium‑high heat and pour in the olive oil. Once the oil shimmers, place the thighs skin‑side down. Sear for 5–6 minutes, or until the skin turns a deep amber and releases a satisfying crackle. Flip the thighs, and let them cook for another 4 minutes on the flesh side. The goal is to lock in juices while achieving a caramelized exterior.
- Add minced garlic to the pan and let it sauté for 30 seconds, just until fragrant. Be careful not to burn the garlic, as bitterness will ruin the glaze. The aroma of garlic will mingle with the sizzling oil, creating a savory base that the glaze will build upon.
- Pour the prepared glaze over the thighs, making sure each piece is coated evenly. Reduce the heat to medium, and let the sauce simmer for 3–4 minutes, turning the thighs occasionally so the glaze bakes onto the skin. The glaze should thicken and become glossy, coating the chicken like a shiny coat of armor.
- At this point, the glaze should be thick enough that it coats the back of a spoon, but not so thick that it clumps. The chicken should be nearly cooked through; you can check doneness with a meat thermometer—165°F (74°C) is the target. If the thighs need a bit more time, let them simmer for an additional minute or two.
- Once the glaze has caramelized to your liking, remove the pan from heat. Let the thighs rest for 5 minutes; this allows the juices to redistribute, keeping the meat moist and tender. The glaze will thicken slightly as it cools, creating a richer coating.
- Serve the thighs hot, spooning extra glaze over the top. Pair them with roasted root vegetables or a simple green salad for a balanced meal. The sweet, smoky glaze will complement almost any side, from creamy mashed potatoes to crisp steamed broccoli.
- If you’re preparing for a crowd, keep the finished dish warm in a low‑heat oven (200°F / 90°C) while you finish cooking the last batch. This keeps the glaze sticky and the skin crispy, ensuring every plate looks as good as it tastes.
That’s it — you did it. But hold on, I’ve got a few more tricks that’ll take this to another level.
Insider Tricks for Flawless Results
The Temperature Rule Nobody Follows
Cooking thighs at the right temperature is critical. Many people overcook them, resulting in dry meat. The trick is to start on high heat to sear the skin, then lower the heat to medium for the glaze. This two‑stage approach ensures the skin stays crisp while the inside remains juicy.
Why Your Nose Knows Best
The moment the glaze starts to caramelize, you’ll notice a sweet, nutty aroma that signals the sauce is ready. If you’re unsure, dip your nose close to the pan; a slight honey scent means the glaze is thickening properly. Trusting your nose saves you from burning the glaze.
The 5‑Minute Rest That Changes Everything
After you remove the thighs from the pan, let them rest on a cutting board for five minutes. This short pause lets the juices redistribute, preventing them from spilling out onto the plate. The result is a moist, tender bite that feels like a hug.
Use a Meat Thermometer for Precision
Even seasoned cooks can overcook thighs. A quick check with a thermometer at 165°F (74°C) guarantees doneness without sacrificing juiciness. I once tried to eyeball it, and the result was a dry, overcooked mess—lesson learned.
Serve Immediately for the Best Texture
While the glaze can be reheated, the skin’s crispness is best enjoyed fresh off the skillet. If you must reheat, do so gently in a low‑heat oven to avoid drying out the meat. The glaze will stay glossy if you warm it slightly before pouring it back over the thighs.
Creative Twists and Variations
This recipe is a playground. Here are some of my favorite ways to switch things up:
Spicy Cajun Surprise
Swap the smoked paprika for a Cajun spice blend and add a dash of cayenne pepper. The result is a fiery, smoky glaze that pairs well with a creamy coleslaw.
Asian Fusion Twist
Replace the honey with a tablespoon of hoisin sauce and add a splash of soy sauce. The glaze takes on a sweet‑salty profile that works beautifully with steamed rice.
Herb‑Infused Mediterranean
Use fresh oregano and basil instead of thyme, and add a squeeze of lemon juice to the glaze. The bright, herbaceous notes give the dish a refreshing Mediterranean vibe.
Maple‑Mustard Delight
Swap honey for pure maple syrup and add a pinch of ground cloves. The maple’s deep sweetness complements the mustard’s sharpness for a fall‑season favorite.
Glazed with a Twist of Orange
Add a tablespoon of orange zest and a splash of orange juice to the glaze. The citrusy brightness cuts through the richness and adds a vibrant pop.
Vegan Version
Replace chicken thighs with thick-cut tofu slices. Sear the tofu, then coat it with the same glaze; the tofu will absorb the flavors wonderfully.
Storing and Bringing It Back to Life
Fridge Storage
Cool the thighs completely before placing them in an airtight container. Store in the refrigerator for up to 3 days. The glaze will thicken slightly, but the flavors will intensify.
Freezer Friendly
Wrap the thighs individually in foil or plastic wrap and place them in a freezer bag. They can be stored for up to 2 months. Thaw overnight in the refrigerator before reheating.
Best Reheating Method
Reheat the thighs in a 300°F (150°C) oven for 10–12 minutes, then finish on the stovetop for a minute to restore crispness. Add a tiny splash of water before reheating to steam the meat back to juicy perfection.