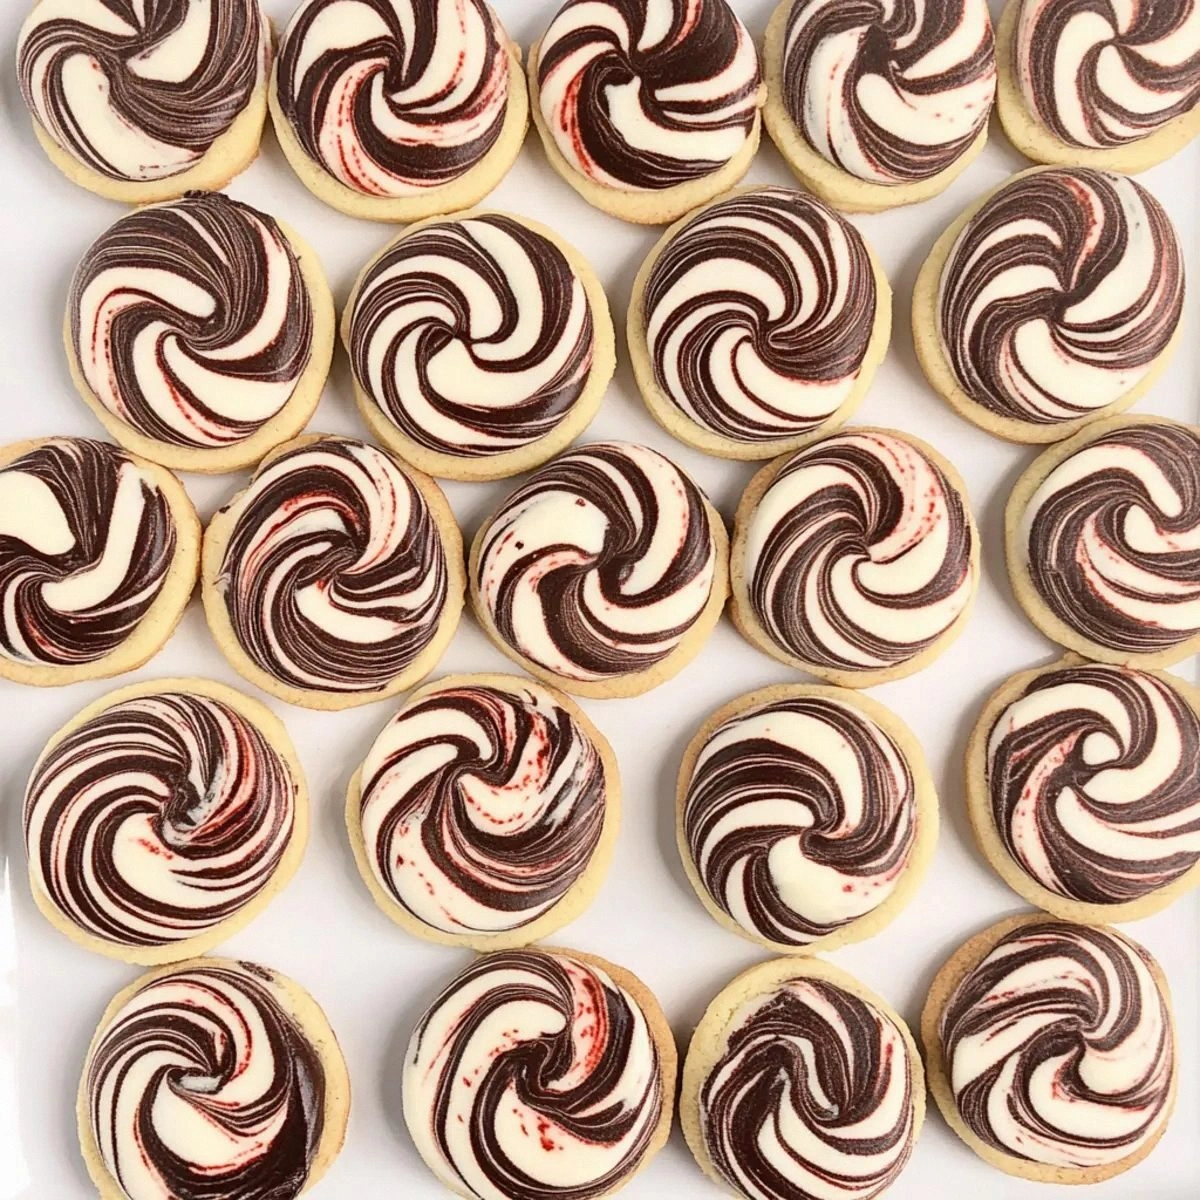
I was standing in my kitchen, mid‑December, with a half‑finished batch of chocolate chip cookies that had somehow turned into a sad, flat pancake. My roommate had just dared me to create something that would make even the Grinch crack a smile, and I thought, “Why not a marble cookie that screams holiday cheer?” The idea was simple: combine the classic buttery shortbread base with a bold peppermint punch, then swirl in cocoa for that dramatic marble effect. The moment the butter hit the flour, the kitchen filled with a buttery perfume that reminded me of fresh‑baked mornings, while the peppermint extract hit my nose like a cool breeze through pine trees. I could already picture the glossy swirls, the crisp edges that shatter like thin ice, and the soft, melt‑in‑your‑mouth centers that make you want to lick the plate clean.
I remember the first bite like a scene from a movie: the snap of the edge, the rush of sweet vanilla, the subtle bitterness of cocoa, and then—bam!—that refreshing peppermint flash that tingles your taste buds like tiny fireworks. It was a sensory overload in the best possible way. Most cookie recipes either drown the peppermint in sugar or make the chocolate so dominant that the mint never gets a say. I was determined to strike the perfect balance, and after a few trial runs (including one disastrous batch that tasted like a toothpaste commercial), I finally nailed it. The secret? A precise ratio of butter to sugar that creates a tender crumb, plus a whisper of peppermint that cuts through the richness without overwhelming it.
What really sets this version apart is the technique I use to create the marble pattern. Instead of just mixing cocoa into part of the dough, I fold in a separate cocoa‑infused butter blend, then gently swirl it into the vanilla‑sweet base with a spatula. This creates those gorgeous, marbled ribbons that look as good on a cookie sheet as they taste on your tongue. And because I’m a firm believer that the best recipes are the ones you can trust, I’ve stripped away any unnecessary steps—no need for chilling the dough for hours, no fancy equipment, just a trusty mixing bowl and a little patience.
I dare you to taste this and not go back for seconds. This is hands down the best version you’ll ever make at home, and I’ll be honest—I ate half the batch before anyone else got a chance to try it. If you’ve ever struggled with cookies that either spread too thin or stay rock‑hard, you’re not alone—and I’ve got the fix. Okay, ready for the game‑changer? Let me walk you through every single step — by the end, you’ll wonder how you ever made it any other way.
What Makes This Version Stand Out
- Flavor Harmony: The peppermint isn’t just a garnish; it’s woven into the dough, delivering a cool burst that perfectly counters the sweet vanilla and rich cocoa.
- Texture Duality: Expect a crisp, buttery edge that gives way to a tender, melt‑in‑your‑mouth center—like biting into a cloud wrapped in a crunchy shell.
- Simplicity: Only six ingredients, all pantry staples, yet the result feels like a bakery‑level masterpiece.
- Visual Appeal: The marble swirl is so striking you’ll want to photograph every batch before they disappear.
- Crowd Reaction: These cookies have become my go‑to party trick; guests always ask for the “secret” and end up begging for the recipe.
- Ingredient Quality: Using salted butter and real peppermint extract (not oil) makes a world of difference in depth of flavor.
- Cooking Method: The gentle fold technique prevents over‑mixing, keeping the cookies tender and preventing a tough crumb.
- Make‑Ahead Potential: They freeze beautifully, so you can bake a batch now and enjoy them all season long.
Inside the Ingredient List
The Flavor Base
The star of this recipe is the Salted Butter. At 12 tablespoons, the butter provides a rich, creamy foundation that carries the flavors of vanilla and peppermint. Using salted butter not only adds a subtle depth but also balances the sweetness of the powdered sugar, preventing the cookies from becoming cloyingly sweet. If you skip the butter or replace it with margarine, you’ll lose that buttery melt‑in‑your‑mouth feel and end up with a dry, crumbly cookie that feels more like a biscuit than a treat.
Next up, Powdered Sugar at three‑quarters of a cup. Its fine texture dissolves effortlessly into the butter, creating a smooth, silky dough that spreads just enough for that perfect edge. Unlike granulated sugar, powdered sugar doesn’t caramelize, so you retain that delicate vanilla sweetness without any burnt notes. If you’re looking for a lower‑sugar version, you can substitute half of it with a natural sweetener like erythritol, but expect a slightly different texture.
Vanilla Extract (1½ teaspoons) adds that classic, warm undertone that ties the peppermint and cocoa together. It’s the quiet hero that makes the flavors sing in harmony. Using pure vanilla rather than imitation is crucial; the latter can leave a metallic aftertaste that clashes with the peppermint’s coolness.
The Texture Crew
All‑Purpose Flour at 2¼ cups forms the structural backbone of the cookie. The amount is calibrated to absorb the butter and sugar without turning the dough too stiff. If you use cake flour, the cookies will be overly tender and may spread too much; if you opt for whole‑wheat flour, you’ll introduce a nutty flavor and denser crumb that can overpower the peppermint.
Cocoa Powder (2 tablespoons) is the secret to the marble’s dark ribbons. I use unsweetened cocoa to keep the bitterness in check, allowing the peppermint to shine. A good quality Dutch‑process cocoa yields a deeper, richer color and a smoother swirl. If you’re a fan of darker chocolate, feel free to increase to 3 tablespoons, but remember that the cocoa will also intensify the bitter notes.
The Unexpected Star
Peppermint Extract at three‑quarters of a teaspoon is the magic wand that transforms a regular marble cookie into a festive masterpiece. A little goes a long way; too much can make the cookies taste like a candy‑cane factory. I recommend using a high‑quality extract without artificial dyes, as the natural oils give a clean, refreshing finish. If you’re out of extract, a teaspoon of finely minced fresh peppermint leaves can work, though the flavor will be slightly more herbaceous.
The Final Flourish
A pinch of sea salt (optional) can be added to the dough to accentuate the sweet‑and‑mint contrast. It’s a tiny tweak, but it elevates the overall flavor profile, making the sweet notes pop. Also, a light dusting of powdered sugar right after baking adds a festive sparkle that looks gorgeous on a holiday platter.
Everything's prepped? Good. Let's get into the real action...

The Method — Step by Step
Start by softening the 12 tablespoons of salted butter at room temperature. It should be pliable but not melted—think of the consistency of sun‑softened butter on a warm toast. I like to cut it into cubes and give it a quick whisk with a hand mixer on low speed. Power transition: This is the moment where the butter begins to whisper promises of buttery bliss.
Watch Out: If the butter gets too warm, the dough will spread excessively, resulting in thin, crispy edges instead of the desired soft center.Add the 3/4 cup powdered sugar to the butter and beat on medium speed until the mixture is light, fluffy, and pale in color. You’ll notice it becoming almost like a cloud—this is the first sign that air is being incorporated, which will later translate into a tender crumb. Scrape down the sides of the bowl to ensure an even blend.
Stir in 1½ teaspoons vanilla extract and ¾ teaspoon peppermint extract. The aroma should instantly lift the room, a crisp, cool scent that makes you think of fresh pine needles and winter breezes. If you’re feeling daring, add a few drops of orange zest for an extra festive twist.
In a separate bowl, whisk together the 2¼ cups all‑purpose flour and 2 tablespoons cocoa powder. This dry mix ensures that the cocoa is evenly distributed, preventing any chocolatey clumps. I sift the mixture twice; the extra sifting adds air and guarantees a silk‑smooth dough.
Gradually fold the dry ingredients into the butter‑sugar mixture. Use a spatula and a gentle hand—over‑mixing will develop gluten and make the cookies tough. The dough should come together in a soft, slightly sticky ball that holds together when pressed.
Kitchen Hack: Divide the dough in half before adding cocoa; this prevents the chocolate flavor from bleeding into the entire batch, giving you a sharper marble contrast.Take one half of the dough and gently fold in an additional 1 tablespoon of cocoa powder (if you prefer a darker swirl) and a pinch of sea salt. This half becomes your “chocolate” portion. The other half remains the classic vanilla‑peppermint base.
Now comes the marble magic: place the vanilla‑peppermint dough on a clean surface, then drop dollops of the chocolate dough on top. Using the back of a spoon or a skewer, swirl the two together in a figure‑eight motion. The goal is a beautiful, marbled pattern—not a fully blended batter. This next part? Pure magic.
Scoop the marbled dough onto a parchment‑lined baking sheet using a 2‑inch cookie scoop. Space them about 2 inches apart; they’ll spread just a touch. Press each cookie gently with the back of a spoon to flatten slightly, creating a larger surface area for the swirl to show.
Bake in a preheated oven at 350°F (175°C) for 12‑14 minutes, or until the edges turn a light golden brown and the tops look set but still slightly soft. The cookies will continue to firm up as they cool on the sheet—this is the “edges will start pulling away” cue. Picture yourself pulling this out of the oven, the whole kitchen smelling incredible...
Allow the cookies to cool on the sheet for 5 minutes, then transfer to a wire rack. While still warm, dust lightly with powdered sugar for that festive sparkle. Serve immediately or store in an airtight container. And now the fun part—watch everyone’s faces light up when they bite into that peppermint‑chocolate swirl.
That's it — you did it. But hold on, I've got a few more tricks that'll take this to another level...
Insider Tricks for Flawless Results
The Temperature Rule Nobody Follows
Never bake cookies straight from the fridge unless you want them to spread less. Let the dough rest at room temperature for about 10 minutes after mixing; this ensures the butter softens just enough to create that perfect spread without losing shape. I once tried skipping this step, and the cookies turned into hard, dense discs—definitely not the airy marbles I was aiming for.
Why Your Nose Knows Best
Your sense of smell is a reliable indicator of doneness. When the cookies are about 2 minutes from the timer, lift the pan and sniff. If you detect a nutty, toasted aroma with a hint of peppermint, they’re ready. Over‑baking turns the delicate peppermint into a bitter aftertaste, so trust your nose more than the clock.
The 5‑Minute Rest That Changes Everything
After scooping the dough onto the sheet, let the balls sit for five minutes before baking. This short rest allows the flour to hydrate fully, resulting in a softer interior and a more pronounced marble swirl. I tried baking immediately once and the marbling smeared together, losing its visual impact.
Cold Butter, Warm Hearts
If you have a stand mixer, chill the butter for exactly 10 minutes, then beat it. The butter stays cool enough to hold air pockets, yet soft enough to blend smoothly. This tiny temperature tweak gives you a lighter, more tender cookie that feels like a cloud.
The Secret of the Swirl
When swirling, use a light hand and a small, sharp knife or skewer. Over‑twisting destroys the contrast; a gentle figure‑eight preserves distinct ribbons. Power transition: This is the moment where art meets science, and your cookies become a masterpiece.
Creative Twists and Variations
This recipe is a playground. Here are some of my favorite ways to switch things up:
White Chocolate Peppermint Dream
Swap the cocoa powder for 2 tablespoons of melted white chocolate. The result is a snowy white swirl that pairs beautifully with extra peppermint crystals on top. Perfect for a winter wonderland theme.
Espresso Marble Delight
Add 1 teaspoon of instant espresso powder to the chocolate portion. The coffee notes deepen the chocolate flavor, creating a sophisticated adult‑only version that still retains the peppermint zing.
Nutty Crunch Variation
Fold in ¼ cup finely chopped toasted almonds or hazelnuts into the chocolate half. The nuts add a satisfying crunch that contrasts the soft cookie interior, making each bite exciting.
Citrus Peppermint Fusion
Add a teaspoon of finely grated orange zest to the vanilla‑peppermint dough. The citrus brightens the flavor profile, turning the cookies into a festive, aromatic treat that reminds you of holiday markets.
Gluten‑Free Adaptation
Replace the all‑purpose flour with a 1:1 gluten‑free flour blend. Ensure the blend contains xanthan gum for structure. The texture remains tender, and the peppermint still shines.
Storing and Bringing It Back to Life
Fridge Storage
Place the cooled cookies in an airtight container lined with parchment paper. They stay fresh for up to 5 days. If you notice a slight firmness, let them sit at room temperature for 10 minutes before serving.
Freezer Friendly
Separate a single layer of cookies on a baking sheet, freeze for 1 hour, then transfer to a zip‑top freezer bag. They’ll keep for up to 3 months. When you’re ready to enjoy, pop them in the oven at 300°F for 5‑7 minutes; the heat revives the buttery melt‑in‑your‑mouth texture.
Best Reheating Method
To bring a refrigerated cookie back to life, preheat your oven to 325°F, place the cookie on a foil‑lined tray, and add a tiny splash (about 1 teaspoon) of water to the tray’s edge. The steam gently softens the interior while the exterior crisps up again. That sizzle when it hits the pan? Absolute perfection.