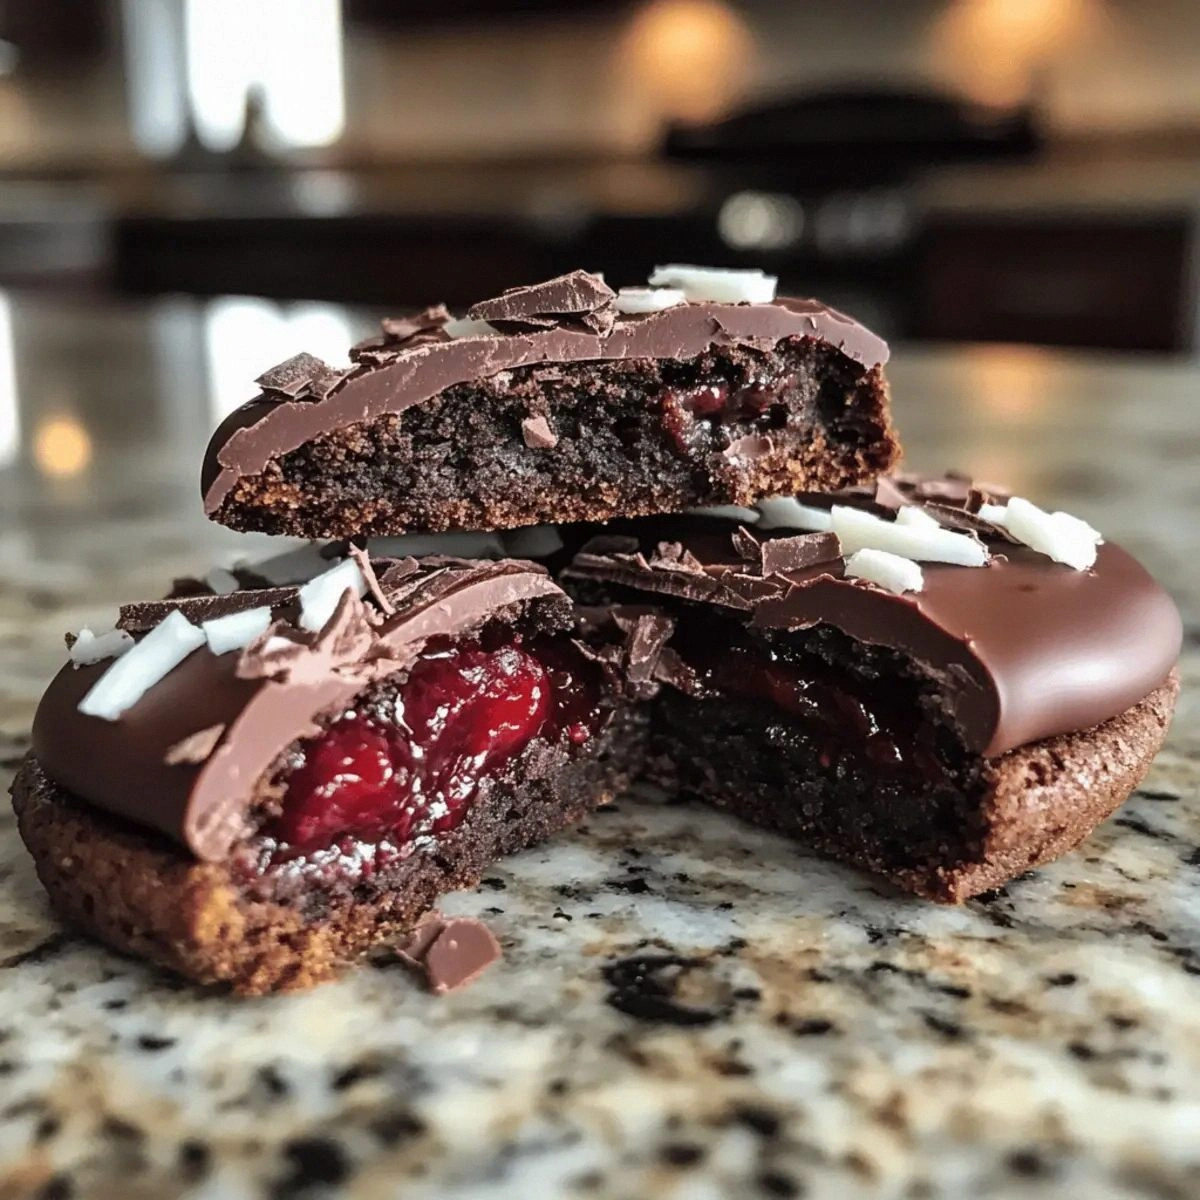
I was standing in my kitchen, a half‑finished batch of brownies cooling on the counter, when my roommate walked in with a bag of fresh cherries and a mischievous grin. She dared me to combine the two into something that would make even the most skeptical sweet‑tooth swoon. I laughed, tossed the cherries into a pan, and the next hour turned into a culinary experiment that felt like a love‑story between dark chocolate and tart fruit. The result? A cake that flips the whole upside‑down concept on its head, delivering a glossy cherry‑laden base and a moist, fudgy chocolate top that makes you question every dessert you’ve ever known.
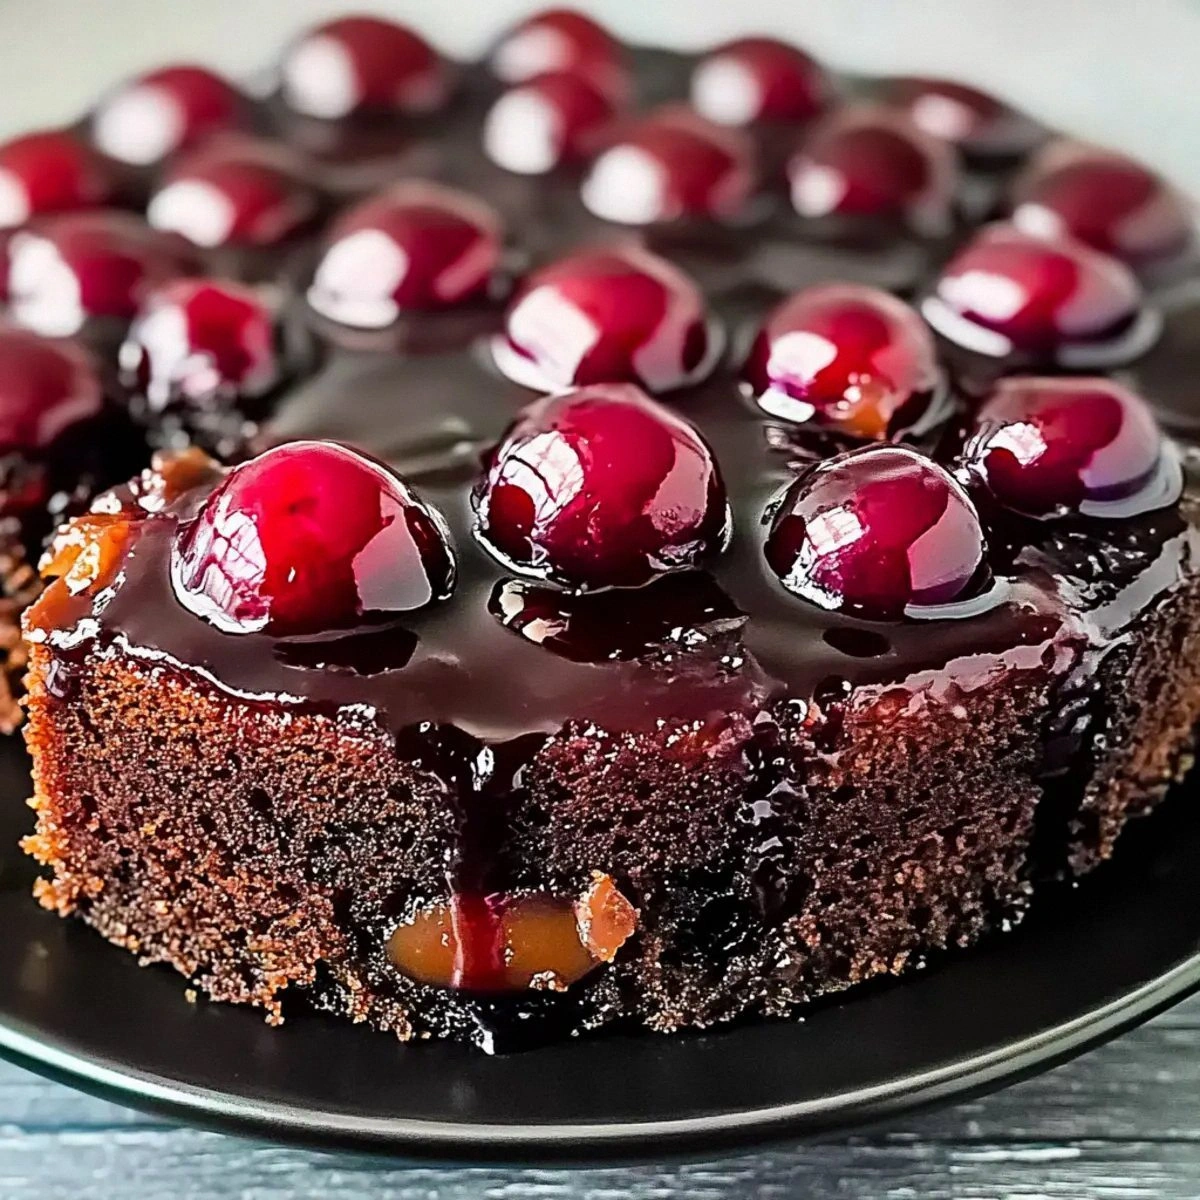
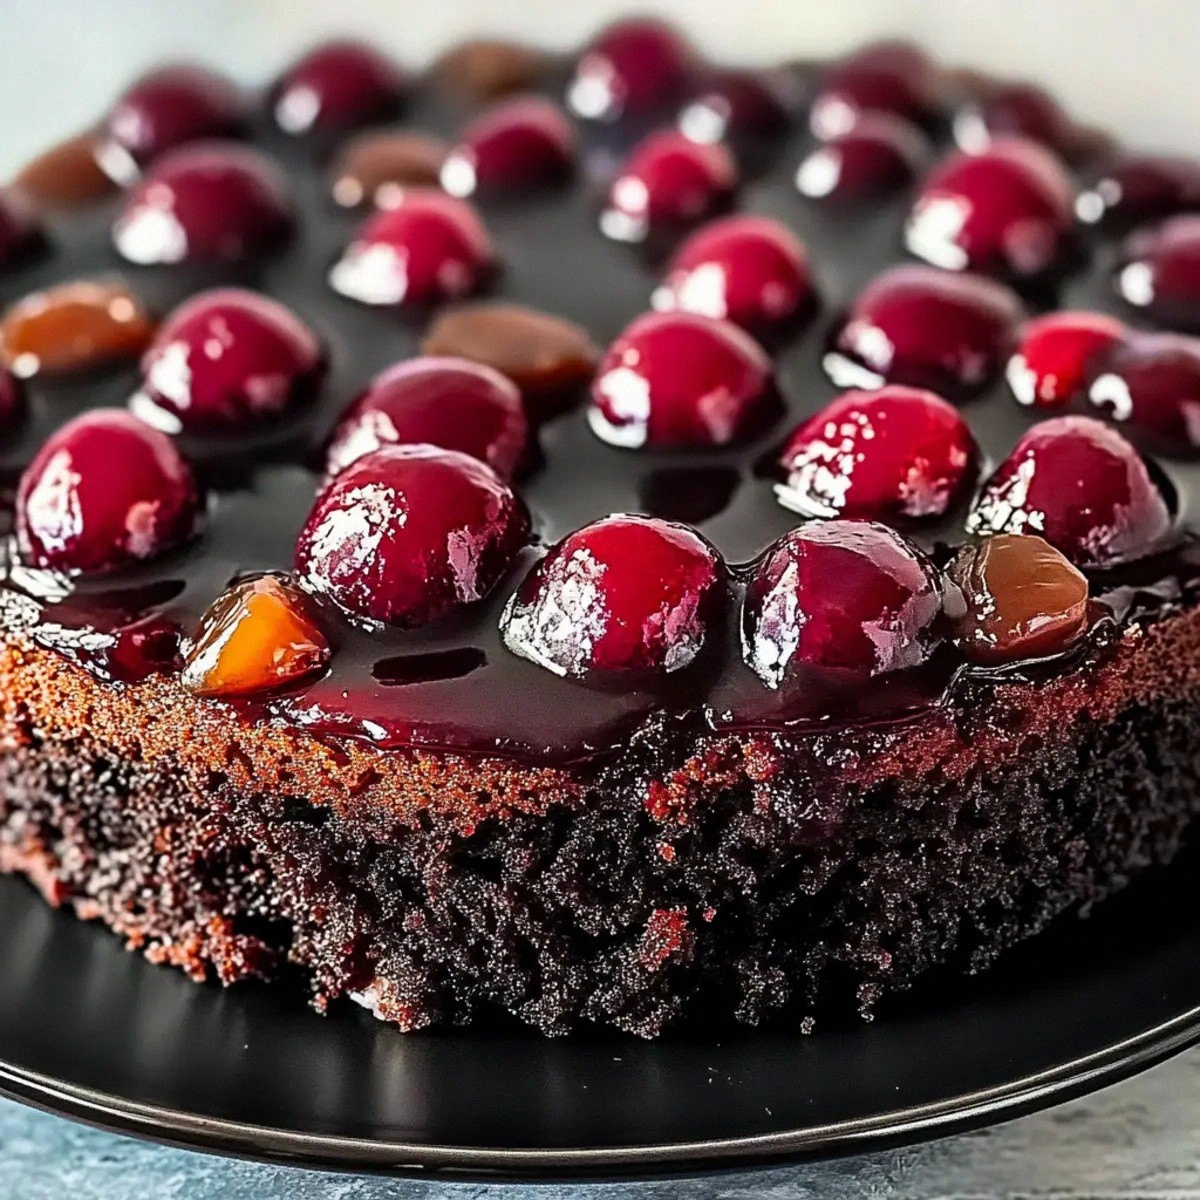
Picture this: the kitchen humming with the sound of a whisk beating, the sweet perfume of butter and sugar caramelizing, and a faint, earthy aroma of cocoa rising like a warm blanket. The cherries sizzle as they hit the hot butter, their skins blistering and releasing juices that turn the pan into a glossy, ruby‑red lake. When the batter hits the pan, it spreads like liquid silk, and the whole thing bakes into a cake that looks like a work of art and tastes like a hug from your favorite childhood memory. The moment you flip it onto a plate, the cherries cascade down, creating a glossy crown that glistens under the kitchen lights.
Most upside‑down cakes either drown in sugary syrup or end up dry and crumbly, but this version hits the sweet spot with a perfect balance of richness and tang. The secret lies in a few unconventional moves: a splash of buttermilk for tender crumb, boiling water to bloom the cocoa, and a quick caramelization of the cherries before the batter ever sees the oven. I dare you to taste this and not go back for seconds—because once you’ve tried it, you’ll understand why I’m calling it the best version you’ll ever make at home.
Okay, ready for the game‑changer? I’m about to walk you through every single step—by the end, you’ll wonder how you ever made any other cake any other way. Stay with me here — this is worth it.
What Makes This Version Stand Out
- Flavor Fusion: The deep, slightly bitter cocoa pairs with the bright, tart cherries, creating a contrast that dances on the palate like a well‑rehearsed duet.
- Moisture Mastery: Buttermilk and boiling water keep the crumb unbelievably tender, preventing the dreaded dry texture that plagues many chocolate cakes.
- Caramelized Crown: By sautéing the cherries in butter and sugar first, you get a glossy, caramel‑kissed topping that stays glossy even after the flip.
- Simplicity Meets Sophistication: Only pantry staples are required, yet the technique feels like a pro‑level pastry chef’s secret.
- Crowd‑Pleaser Factor: The visual impact of the upside‑down presentation guarantees applause at any gathering, from brunches to birthday parties.
- Ingredient Quality: Using real tart cherries (fresh or well‑drained frozen) and high‑quality cocoa powder ensures each bite sings.
- One‑Pan Wonder: No need for multiple bowls or pans; everything happens in the same skillet, cutting down cleanup dramatically.
- Make‑Ahead Magic: This cake freezes beautifully, so you can prep it ahead of time and still serve a fresh‑baked experience.
Inside the Ingredient List
The Flavor Base
Unsalted butter is the foundation of any good upside‑down cake because it carries the caramelization of the cherries. When melted, it creates a glossy, buttery lake that the cherries dive into, releasing their natural sugars and creating that coveted shine. If you skip the butter or use a low‑quality margarine, you’ll end up with a dull, greasy topping that looks like a sad pancake. For an extra nutty note, try browning the butter for a minute before adding the sugar—just watch it closely, or you’ll have burnt butter instead of buttery bliss.
Granulated sugar does double duty: it sweetens the cherries and helps them caramelize, forming that glossy glaze. Using a fine, white sugar ensures even dissolution; coarse sugar can leave gritty spots. If you’re watching sugar, you can substitute half with coconut sugar for a deeper, caramel‑like flavor, but expect a slightly darker hue.
The Texture Crew
All‑purpose flour provides the structure, while cocoa powder injects the chocolatey depth that makes this cake unforgettable. The cocoa should be unsweetened and high‑quality; cheap cocoa can taste metallic and ruin the balance. If you’re a fan of extra richness, swap a quarter of the flour for almond flour—just remember it will make the cake a bit denser.
Baking powder and baking soda are the leavening duo that gives the cake its lift. The powder adds gentle rise, while the soda reacts with the buttermilk’s acidity for a tender crumb. Too much soda and the cake will have a metallic aftertaste; too little and you’ll end up with a flat, dense loaf. Measure carefully with a level spoon.
Salt, though tiny, is the flavor enhancer that pulls all the sweet and bitter notes together. Skipping it is a rookie mistake that leaves the cake tasting flat. A pinch of flaky sea salt sprinkled on top before baking can add a subtle crunch and surprise burst of flavor.
The Unexpected Star
Buttermilk is the secret weapon that makes the crumb so moist and tender. Its acidity reacts with the baking soda, creating tiny bubbles that keep the cake light. If you don’t have buttermilk, you can make a quick substitute: one cup of milk plus one tablespoon of lemon juice or white vinegar, let it sit for five minutes. The result will be nearly identical.
Vegetable oil keeps the cake moist without adding any extra flavor that could clash with the chocolate. Unlike butter, oil stays liquid at room temperature, ensuring the cake stays soft even after cooling. If you prefer a richer taste, you can replace half the oil with melted coconut oil, but be aware it will add a faint coconut aroma.
Eggs bind everything together and add structure. Using large eggs at room temperature helps the batter emulsify properly, giving you a smooth, glossy top. If you’re vegan, try using two flax eggs (2 tbsp ground flaxseed + 6 tbsp water) but expect a slightly denser texture.
The Final Flourish
Boiling water might sound odd, but it’s essential for blooming the cocoa powder, releasing its full flavor potential. When you pour the hot water into the batter, it creates a thin, almost liquid chocolate that spreads evenly, ensuring no dry pockets. The water also helps to create a steam‑rich environment in the oven, which contributes to a tender crumb.
Everything's prepped? Good. Let's get into the real action...
The Method — Step by Step
Preheat your oven to 350°F (175°C). While the oven warms, melt the 4 tablespoons of unsalted butter in a 9‑inch cast‑iron skillet over medium heat. Once melted, add the 1 cup of granulated sugar, stirring constantly until the mixture turns a light amber color and you hear a gentle sizzle—that’s the caramel foundation. Watch out: If the sugar burns, it will give the whole cake a bitter aftertaste, so keep the heat moderate and the spoon moving.
Watch Out: If the butter separates, lower the heat and whisk vigorously; the butter will re‑emulsify.Add the 2 cups of tart cherries to the caramel, stirring gently to coat each fruit. Let them cook for about 3‑4 minutes, allowing the skins to blister and the juices to thicken into a glossy glaze. You’ll notice a fragrant, slightly sweet aroma—this is the moment the cherries become the star of the show. Kitchen Hack: If using frozen cherries, thaw them first and pat dry; excess water will dilute the caramel.
In a separate bowl, whisk together 1 ¾ cups of all‑purpose flour, ¾ cup cocoa powder, 1 ½ teaspoons baking powder, 1 teaspoon baking soda, and ½ teaspoon salt. This dry mixture should be uniform in color; any streaks of cocoa mean you’ll get pockets of bitterness. Sift the mixture once if you have a fine mesh to ensure a velvety texture.
In a large mixing bowl, combine ½ cup vegetable oil, 2 large eggs, 1 teaspoon vanilla extract, and the remaining 1 cup of buttermilk. Whisk until the mixture is smooth and slightly frothy; the eggs should fully incorporate, creating a glossy batter base. Kitchen Hack: Add the eggs one at a time, whisking after each addition to avoid curdling.
Gradually fold the dry ingredients into the wet mixture, stirring just until no flour streaks remain. Over‑mixing will develop gluten and make the cake tough, so stop as soon as the batter looks cohesive. At this stage, the batter will be thick but still pourable.
Carefully pour the 1 cup of boiling water into the batter, whisking gently. The water will thin the batter slightly and fully bloom the cocoa, giving the cake a deep, dark hue. You’ll hear a faint sizzling sound—this is the steam releasing, which is a good sign for a tender crumb.
Now, the crucial assembly step: pour the batter over the caramelized cherries in the skillet, spreading it evenly with a silicone spatula. The batter should sit atop the cherries like a smooth blanket, and the edges will start to pull away as it settles. Kitchen Hack: Tap the skillet gently on the counter to release any trapped air bubbles.
Slide the skillet into the preheated oven and bake for 30‑35 minutes. The cake is ready when a toothpick inserted into the center comes out with a few moist crumbs, and the edges are pulling away from the pan, revealing a glossy cherry top. The kitchen will fill with an intoxicating scent of chocolate and caramel—trust your nose; it’s a reliable indicator.
Remove the skillet from the oven and let the cake rest for 5 minutes. This short cooling period allows the caramel to set just enough so the cake won’t slide off the pan when you invert it. While you wait, wipe down the counter and set a serving plate ready.
Place a large, flat plate over the skillet and, with a swift, confident motion, flip the cake upside down. The cherries will now crown the cake, creating a glossy, ruby‑red tableau against the dark chocolate base. Let the cake cool for another 10 minutes before slicing; this lets the flavors meld and the glaze to firm up.
Kitchen Hack: If the cake sticks, run a thin metal spatula around the edge before flipping; it creates a release channel.
That's it — you did it. But hold on, I've got a few more tricks that'll take this to another level...
Insider Tricks for Flawless Results
The Temperature Rule Nobody Follows
Never underestimate the power of a consistent oven temperature. If your oven runs hot, the caramel can burn before the cake sets, leaving a bitter aftertaste. Invest in an oven thermometer and aim for a steady 350°F. I once baked this cake at 375°F and ended up with a crisped‑over bottom that tasted more like a burnt pancake than a delicate dessert.
Why Your Nose Knows Best
Your sense of smell is a more reliable indicator of doneness than a timer. Around the 25‑minute mark, you’ll start to notice a sweet, toasty aroma wafting from the oven. If the scent turns slightly burnt, pull the cake out immediately. Trusting your nose saved me from a disastrous batch once when the timer failed.
The 5‑Minute Rest That Changes Everything
Allow the cake to rest for five minutes after you take it out of the oven. This short pause lets the steam redistribute, keeping the crumb moist and preventing a dry top. Skipping this step is a common mistake that leads to a cracked surface and uneven texture.
The Flip Technique That Saves You
Flipping an upside‑down cake can feel like a high‑wire act. The secret is confidence: place your plate firmly, hold the skillet with both hands, and flip in one smooth motion. If you hesitate, the cake can slide off the plate and break. I once tried a half‑hearted flip and ended up with a shattered mess—lesson learned.
Cooling on a Wire Rack
After you’ve inverted the cake, transfer it to a wire rack for the final 10‑minute cool. This prevents the bottom from becoming soggy from steam condensation. The rack also allows the cherry glaze to set nicely, giving you a clean slice later.
The Secret of the Cherry Glaze
If you want an extra glossy finish, brush the top with a light glaze made from 1 tablespoon of apricot jam thinned with a teaspoon of warm water. The glaze adds a subtle shine and a hint of fruitiness that elevates the visual appeal. I tried this at a dinner party and received compliments on both taste and presentation.
Creative Twists and Variations
This recipe is a playground. Here are some of my favorite ways to switch things up:
Cherry‑Orange Zing
Add the zest of one orange to the caramelized cherry mixture. The citrus brightens the tartness and adds a fragrant note that pairs beautifully with chocolate. Perfect for spring brunches when oranges are in season.
Nutty Crunch
Stir ½ cup of toasted chopped almonds or hazelnuts into the batter before baking. The nuts add a satisfying crunch and a buttery flavor that complements the cherries. This variation is a hit with anyone who loves texture contrast.
Mocha Madness
Replace ¼ cup of the cocoa powder with finely ground espresso beans. The coffee undertones deepen the chocolate flavor, turning the cake into a sophisticated dessert for after‑dinner coffee lovers.
Spiced Autumn
Add ½ teaspoon of ground cinnamon and a pinch of ground nutmeg to the dry ingredients. The warm spices create an autumnal vibe, making the cake perfect for holiday gatherings.
Vegan Velvet
Swap the butter for coconut oil, use flax eggs, and replace buttermilk with almond milk plus lemon juice. The result is a vegan-friendly version that still boasts that glossy cherry crown and moist crumb.
Storing and Bringing It Back to Life
Fridge Storage
Cover the cake tightly with plastic wrap or store it in an airtight container. It will stay fresh for up to 4 days. Before serving, let it come to room temperature for 20 minutes, or gently warm a slice in the microwave for 15 seconds.
Freezer Friendly
Wrap the entire cake (or individual slices) in a double layer of freezer‑grade parchment, then foil, and place in a zip‑top bag. It freezes beautifully for up to 2 months. To reheat, thaw overnight in the fridge, then warm in a 300°F oven for 10 minutes.
Best Reheating Method
Add a tiny splash of water (about a tablespoon) to the bottom of the reheating dish, then cover with foil and heat for 8‑10 minutes. The steam revives the cake’s moisture, and the cherry glaze regains its shine. This trick works wonders for leftovers that have started to dry out.