I still remember the Halloween when my well-intentioned witch-finger cookies looked more like zombie thumbs after baking, and the kids at the neighborhood party politely asked if they were supposed to be "abstract art." That culinary catastrophe sent me on a mission to find a foolproof treat that would actually impress without requiring a culinary degree or seven hours of my life. After three weeks of testing every no-bake Halloween dessert on the internet, I stumbled across a recipe for Oreo cookie balls that looked promising, but the results were bland blobs that tasted like sweetened drywall.
Fast forward through four more batches, a cream cheese epiphany, and one very enthusiastic eight-year-old assistant who insisted we make them "look like bats because bats are cool," and suddenly I had created the most addictive Halloween treat my kitchen has ever seen. These bat Oreo cookie balls vanished faster than free candy on November 1st, and my neighbor actually hid the container from her husband after he ate eight in one sitting. The combination of that familiar cookies-and-cream flavor with the tangy cream cheese base, all wrapped in a crisp chocolate shell, creates something that's somehow both nostalgic and completely new.
What makes these little flying mammals of deliciousness so dangerous is that they require zero baking skills, take about twenty minutes of actual work time, and taste like you spent hours crafting something from a fancy bakery. The texture contrast alone will make your taste buds do a happy dance — that initial snap of the chocolate coating giving way to the smooth, almost truffle-like interior that's studded with tiny bits of Oreo for the perfect crunch. I dare you to taste one and not immediately reach for a second, especially when you realize they're basically portion-controlled (well, theoretically anyway).
The secret that takes these from good to absolutely irresistible lies in the temperature dance and the way we handle the cream cheese. Most recipes get this completely wrong, telling you to use room temperature everything, but I've discovered that slightly chilled cream cheese actually creates a better texture that holds its shape and doesn't turn into a sticky mess. Picture yourself pulling these out of the fridge, the chocolate gleaming like little obsidian sculptures, while the whole kitchen smells like the inside of an Oreo factory. Stay with me here — this next part is worth it.
What Makes This Version Stand Out
Texture Perfection: These aren't those sad, mushy Oreo balls that fall apart when you look at them wrong. The combination of properly chilled cream cheese and the right Oreo-to-binder ratio creates a truffle-like interior that holds its shape while still melting on your tongue like chocolate velvet.
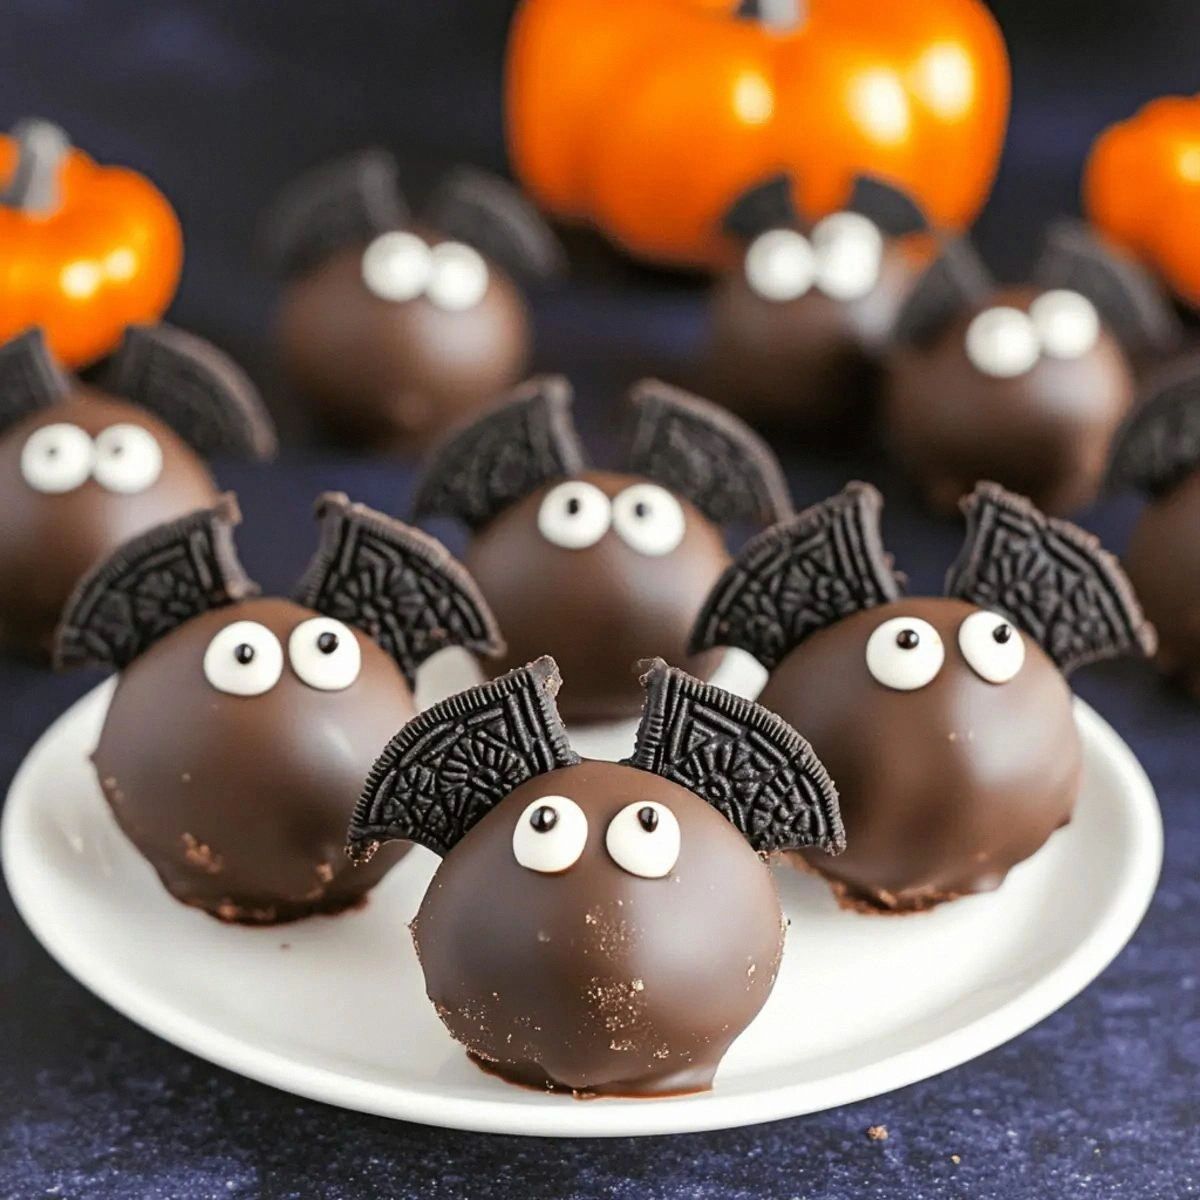
Visual Impact: Let's be honest — most Halloween treats look like they were decorated by someone wearing oven mitts in the dark. These bat shapes are actually achievable for normal humans, and they look professionally crafted when arranged on a platter with some strategically placed candy eyes.
Make-Ahead Magic: You can whip up a double batch of these babies and they'll keep beautifully in the freezer for up to two months. I always make them the weekend before Halloween, which means zero stress when the neighborhood party invitations start flying in.
Kid-Friendly Assembly: Unlike those complicated decorated cookies that require steady surgeon hands, kids can actually help roll and decorate these without creating a disaster zone. My niece was seven when she first helped, and her bats looked more like abstract bats, but she was so proud she wouldn't let anyone eat "her creations" for three days.
Flavor Balance: The cream cheese cuts through the sweetness of the Oreos perfectly, creating a sophisticated flavor that adults actually crave while still being sweet enough to satisfy the sugar monsters. It's like the dessert equivalent of a perfectly balanced cocktail.
Ingredient Quality: Using real cream cheese instead of that whipped tub stuff makes all the difference in the world. The richness it adds transforms these from "oh, that's nice" to "holy cow, what did you put in these?"
Crowd Reaction Guarantee: I've never brought these to a party without at least three people asking for the recipe and one person trying to sneak extras into their purse. They're that universally loved combination of familiar flavors in an unexpected package.
Alright, let's break down exactly what goes into this masterpiece...
Inside the Ingredient List
The Flavor Foundation
Oreo cookies aren't just Oreo cookies in this recipe — they're the entire backbone of flavor, and using the right ones makes the difference between good and legendary. I've tested this with generic sandwich cookies, and while they're edible, they lack that deep chocolate flavor and perfect sweetness balance that real Oreos bring to the party. The cream filling actually serves a purpose beyond just adding sweetness — it helps bind everything together naturally, reducing the amount of cream cheese you need and preventing the balls from becoming too dense.
Cream cheese is the unsung hero that transforms these from overly sweet candy into sophisticated treats that grown-ups actually get excited about. The tanginess cuts through all that chocolate and sugar like a culinary lightsaber, creating balance that keeps you coming back for more. I learned the hard way that whipped cream cheese doesn't work here — it introduces too much air and makes the balls fragile. Stick with the brick-style, full-fat version for the best texture and flavor that'll make your taste buds sing.
The Texture Crew
Chocolate candy coating might seem like a boring afterthought, but it's actually doing the heavy lifting in the texture department. Real chocolate would require tempering and would melt all over your fingers at room temperature, but the candy coating sets into a satisfying snap that shatters like thin ice when you bite into it. The trick is using good quality coating — skip the waxy grocery store stuff and head to the craft store for the real candy-making brands. Your teeth will thank you, and the flavor is infinitely better than that weird plastic taste cheap coating can have.
Mini chocolate chips aren't just there for decoration — they add tiny pockets of chocolate that melt at a slightly different rate than the coating, creating these delightful textural surprises. The mini size is crucial because regular chips would make decorating a nightmare and would overwhelm the bat wing aesthetic we're going for. Plus, they stick better to the coating and don't fall off when people grab them, which means less sweeping up later.
The Unexpected Star
Here's where I diverge from traditional recipes — I add a tiny pinch of salt to the cookie mixture. Not enough to make them salty, just enough to amplify all the chocolate and cream flavors in a way that makes people say "what did you put in these?" without being able to identify it. Salt is the flavor enhancer that most dessert recipes skip, but it's the difference between good and unforgettable. Think of it as the bass line in a great song — you don't necessarily notice it's there, but you'd miss it if it was gone.
The Final Flourish
The decoration is where these really come alive, and it's simpler than you think. Those little candy eyes aren't just cute — they add a tiny pop of vanilla flavor that complements the chocolate perfectly. The key is applying them when the coating is just set enough to hold them but still slightly tacky. Too soon and they'll slide off, too late and you'll need edible glue. Timing is everything, but I'll walk you through the exact moment to strike.
Everything's prepped? Good. Let's get into the real action...
The Method — Step by Step
- Start by clearing a workspace that's about two feet wide — you're going to need room to spread out without feeling cramped. Take your package of Oreos and give them a rough break-up while they're still in the package — just squeeze and crunch until you hear that satisfying crackle of cookies breaking. This pre-crushing saves your food processor from overworking and creates more uniform pieces. Don't go crazy here — you want golf-ball sized pieces, not dust.
- Dump those broken cookies into your food processor and pulse in short bursts until you have a mixture that looks like coarse sand with some pea-sized chunks throughout. Those little chunks are going to be your texture stars, so resist the urge to process until it's completely uniform. If you don't have a food processor, throw them in a zip-top bag and go to town with a rolling pin — it's therapeutic and gives you better control over the texture.
- Now for the game-changing part — cube your cold cream cheese into half-inch pieces and scatter them over the cookie crumbs. Most recipes tell you to soften the cream cheese, but trust me on this one. The slight firmness helps create those perfect little pockets of tangy flavor throughout the balls instead of just blending everything into homogenous sweetness. Pulse just until the mixture starts to clump together when you squeeze it.
- Grab a tablespoon of the mixture and roll it between your palms until you have a smooth, round ball. They should be about the size of a ping-pong ball — any bigger and they're awkward to eat, any smaller and the chocolate coating overwhelms the filling. If the mixture starts sticking to your hands, wash them with cold water and dry thoroughly — the natural oils on your skin are the enemy here. Place the balls on your chilled cookie sheet as you go, and don't worry if they're not perfectly round — you'll get better with practice.
- Once all your balls are rolled, pop the whole tray into the freezer for at least fifteen minutes. This isn't just about firming them up — it's about creating a cold core that prevents the cream cheese from warming up too quickly when you add the hot chocolate coating. While they're chilling, set up your dipping station with your melted candy coating, a fork for dipping, and parchment paper for setting.
- Melt your candy coating in short bursts in the microwave, stirring between each burst. You're looking for a consistency that's like warm honey — fluid enough to coat smoothly but thick enough to cling. If it's too thin, add more chips and stir until melted; too thick, add a tiny bit of vegetable oil. The temperature should feel warm but not hot on your finger — about body temperature is perfect.
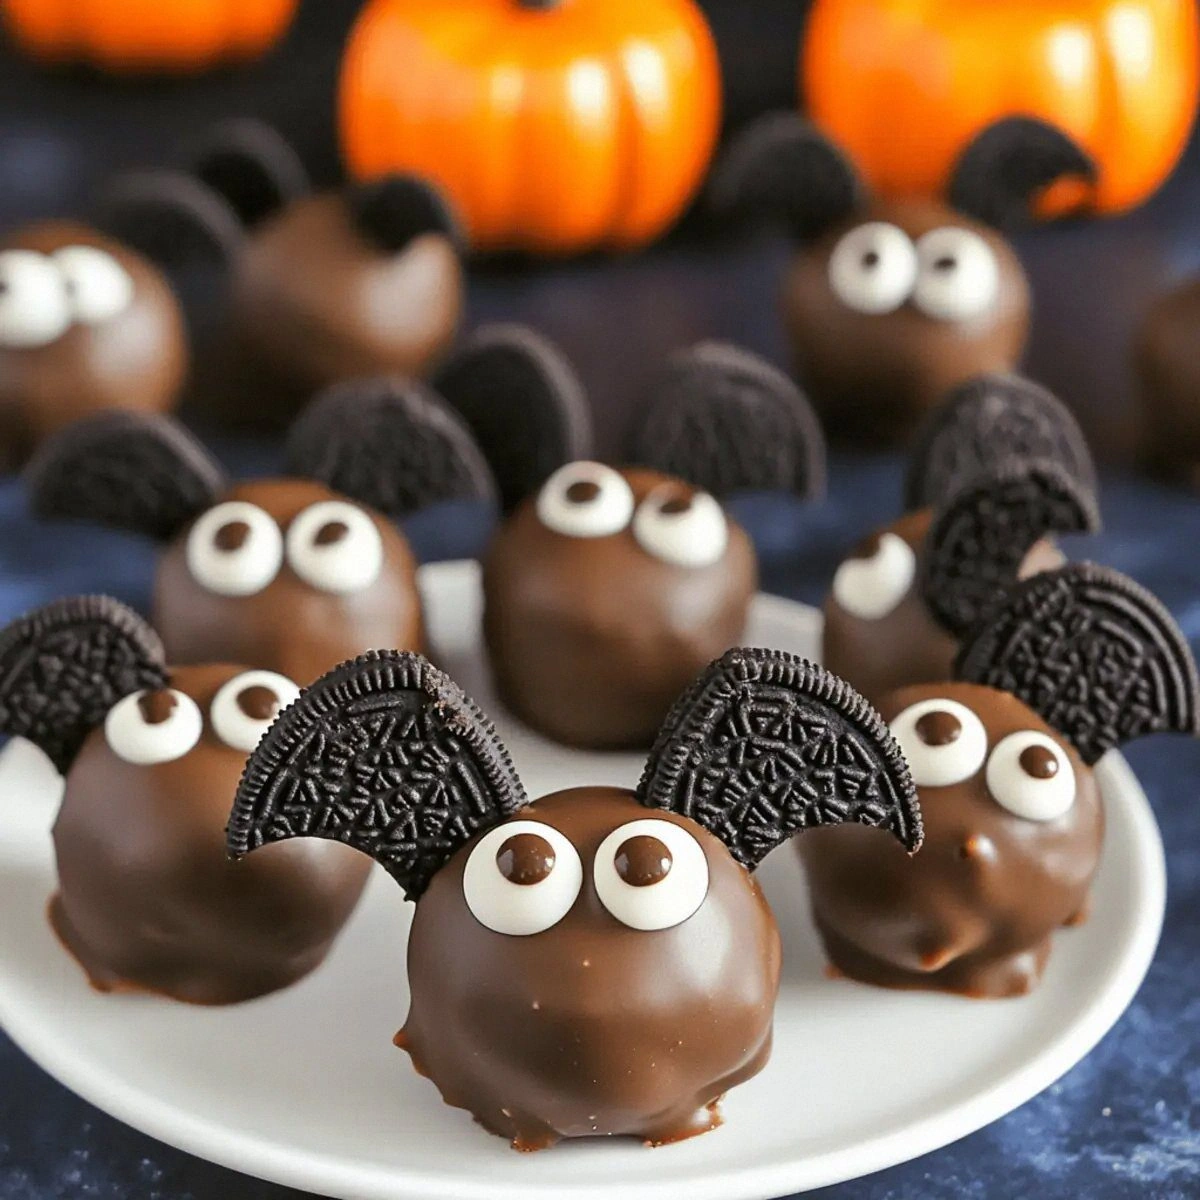
- Now for the fun part — drop a chilled ball into the coating and use your fork to roll it around until completely covered. Lift it out with the fork, letting the excess coating drip back into the bowl. Give the fork a gentle tap against the bowl edge — this creates that perfect thin, even coating that snaps when you bite into it. Slide the coated ball onto your parchment paper and immediately press two mini chocolate chips into the sides for wings and add candy eyes while the coating is still tacky.
- Repeat with the remaining balls, working quickly before they warm up too much. If they start getting soft, pop them back in the freezer for five minutes. Once all your bats are decorated, let them set completely — about fifteen minutes at room temperature or five minutes in the fridge if you're impatient. They should be firm to the touch and the coating should have lost its glossy wet look.
That's it — you did it. But hold on, I've got a few more tricks that'll take this to another level...
Insider Tricks for Flawless Results
The Temperature Rule Nobody Follows
Here's the thing that separates the pros from the amateurs — temperature management throughout the entire process. Your cream cheese should be cold when you mix it, your cookie sheet should be frozen when you place the balls on it, and your coating should be just warm enough to flow smoothly. I keep a thermometer handy and aim for 68-70°F in my kitchen when I'm making these. Too warm and everything turns into a sticky, melty disaster. Too cold and the coating sets before you can decorate properly. It's like Goldilocks, but for candy making.
Why Your Nose Knows Best
Trust your sense of smell throughout this process — it tells you things your eyes can't see. When the cream cheese is mixing properly, you'll get that tangy dairy aroma mixed with chocolate. If you smell something sharp or sour, your cream cheese might be past its prime. During coating, the chocolate should smell rich and sweet, not waxy or artificial. That sizzle when a chilled ball hits the warm coating? That's the sound of success happening. A friend tried skipping this sensory check once and ended up using rancid cream cheese — let's just say it didn't end well for anyone involved.
The 5-Minute Rest That Changes Everything
After you coat your bats, resist the urge to immediately move them or stack them. Give them that full five minutes to set properly — I know it feels like forever when you're excited, but this is where the magic happens. The coating crystallizes into that perfect snap, the chocolate chips adhere properly, and the whole thing becomes stable enough to stack and transport. During this time, the flavors also meld together in a way that makes them taste like they've been friends forever instead of just meeting.
The Secret to Perfect Bat Wings
Those mini chocolate chips aren't just randomly stuck on the sides — there's actually an art to making them look like convincing bat wings. Hold the chip with the point facing forward and press it in at a slight angle, so it looks like the wing is extending from the bat's body. The curved side should face outward, creating that classic bat silhouette. Space them evenly and press firmly enough that they don't fall off but not so hard that you crack the coating. Two chips per side, positioned symmetrically, and suddenly you've got adorable flying mammals instead of chocolate blobs.
Storage That Actually Works
Here's where most people mess up — they refrigerate these thinking it will keep them fresh, but the fridge actually ruins the texture. The cold temperature makes the coating sticky and the cream cheese firms up too much, losing that perfect creamy interior. Store them in an airtight container at cool room temperature for up to five days, or freeze them for up to two months. If you must refrigerate because your kitchen is warm, let them come back to room temperature for thirty minutes before serving. The texture difference is night and day.
Creative Twists and Variations
This recipe is a playground. Here are some of my favorite ways to switch things up:
Golden Bat Variation
Swap out regular Oreos for Golden Oreos and use white chocolate candy coating instead. The vanilla-cream flavor profile is completely different but equally addictive. Add orange food coloring to the coating for pumpkin bats, or use dark chocolate chips for a more dramatic contrast. Kids go crazy for these because they taste like cookies and cream ice cream in candy form.
Peanut Butter Bat Bombs
Add two tablespoons of creamy peanut butter to the cream cheese before mixing, and use chocolate-coated peanut butter candies instead of chocolate chips for the wings. The peanut butter adds richness and makes these taste like the inside of a peanut butter cup. Warning: these disappear even faster than the original version, if that's possible.
Mint Chocolate Flyers
Use mint Oreos and add a quarter teaspoon of peppermint extract to the mixture. Dip in dark chocolate coating and use white chocolate chips for the wings. The mint flavor makes these incredibly refreshing, and they taste like thin mint cookies in candy form. Perfect for adults who claim they don't like "too sweet" desserts.
Salted Caramel Creatures
Drizzle melted caramel over the finished bats and sprinkle with flaky sea salt. The sweet-salty combination is sophisticated enough for a dinner party but still fun enough for a kids' Halloween bash. The caramel adds a chewy element that plays beautifully against the crisp coating.
White Chocolate Vampires
Use white chocolate coating and add red food coloring to create pink bats. Use red candy melts to create little fangs, and suddenly you've got vampire bats. These are particularly popular with the under-ten crowd who think anything pink is automatically better.
Double Chocolate Midnight Bats
Use chocolate Oreos with chocolate cream filling, dip in dark chocolate coating, and use dark chocolate chips for the wings. These are for serious chocolate lovers — rich, intense, and completely over the top. Serve them with cold milk or strong coffee to cut through all that chocolate intensity.
Storing and Bringing It Back to Life
Fridge Storage
Despite what I said earlier about avoiding the fridge, sometimes it's necessary in warm climates. If you must refrigerate, place the bats in a single layer in an airtight container with parchment paper between layers. They'll keep for up to a week, but let them sit at room temperature for at least thirty minutes before serving. The coating will lose its snap but the flavor remains excellent. If they start looking dull, you can refresh them by placing them in front of a fan for ten minutes — seriously, it works like magic.
Freezer Friendly
These freeze beautifully for up to two months in a freezer-safe container. The key is flash-freezing them first — place them in a single layer on a baking sheet and freeze until solid, then transfer to a container. This prevents them from sticking together and keeps their shape perfect. Thaw them in the refrigerator overnight, then bring to room temperature before serving. They taste almost exactly like fresh, and the texture holds up remarkably well.
Best Reheating Method
Okay, you can't really "reheat" these since they're meant to be served at room temperature, but if they've been refrigerated or frozen, the best method is patience. Let them come to room temperature naturally — don't microwave them or you'll end up with a melted mess. If you're in a hurry, place them near (not on) a warm stovetop or in a sunny spot. The goal is gentle warming that brings back that perfect texture without melting the coating.