The first time I attempted Halloween cupcakes, I ended up with something that looked like a crime scene from a low-budget zombie flick—lopsided graves, frosting that resembled radioactive slime, and biscuit headstones that snapped faster than my patience at 2 a.m. when the candy-eyed kids were due home from trick-or-treating in six hours. I swore I’d never bake again, but then October rolled around, the air turned crisp, and that stubborn, sugar-addicted gremlin inside me whispered, “Try again, but this time, make them fear your kitchen prowess.” Fast-forward through three more trials, a near-miss with a piping-bag explosion, and one heroic taste tester (okay, it was my neighbor’s black cat who leapt onto the counter), and I finally cracked the code: moist midnight-dark chocolate cupcakes hiding a silky cream-cheese-Oreo crypt, crowned with grassy-green buttercream, cookie gravestones, and just enough spooky whimsy to make both kids and grown-ups cackle with delight.
Picture this: it’s dusk on All Hallows’ Eve, candles flicker, spooky playlists hum, and you glide in carrying a tray of these graveyard cupcakes. The chocolate aroma wraps around the room like a velvet cape, the Oreo “dirt” looks freshly exhumed, and the green frosting grass sways in the breeze from your front door opening for the fourth Elsa or Spider-Man of the night. You watch someone bite in—first the sweet crunch of Lotus Biscoff tombstone, then the airy buttercream, then the fudgy crumb that collapses into a pocket of tangy cheesecake filling studded with midnight-black cookie rubble. Their eyes widen, they mutter “whoa” through a mouthful, and you feel the warm rush of culinary victory that no store-bought Halloween candy can deliver.
Most Halloween desserts are sugar bombs that taste like food coloring and regret. These cupcakes are different. They balance real chocolate depth against light cream-cheese richness, use natural cocoa for that hauntingly dark color, and hide a cookies-and-cream surprise that makes people pause mid-sentence to process the plot twist happening on their tongue. The decoration looks complicated, but I’ll show you how to shortcut like a professional set designer: one zip-lock bag becomes your grass piping tool, a microwave melts white-chocolate “RIP,” and a single Oreo in a sandwich bag moonlights as grave dirt—no fancy equipment required.
Stay with me here—this is worth it. By the time we’re done you’ll have a spooky centerpiece that tastes like a top-shelf bakery, plus bragging rights until next October. Ready to dig in—pun fully intended? Let me walk you through every single step; by the end you’ll wonder how you ever celebrated Halloween without these edible graveyards in your arsenal.
What Makes This Version Stand Out
Flavor Depth: We’re talking a double-chocolate whammy: Dutch-process cocoa plus melted dark chocolate for a cupcake that actually tastes like chocolate instead of brown food coloring. The cheesecake filling brings tangy relief so you never hit that cloying wall of sugar halfway through.
Texture Play: Moist crumb, velvet cream-cheese center, crisp cookie gravestones, and buttercream grass that melts on your tongue—every bite is a roller-coaster of crunch, cream, and collapse. I dare you to stop at one.
Shortcut Friendly: Sure, you can make everything from scratch, but I’ll show you where boxed shortcuts won’t sabotage flavor, so you can finish before the costume party starts and still have time to contour zombie cheekbones.
Photo-Ready Wow Factor: These look like you rented a pastry chef for the night. Yet the decorating moves are kindergarten-simple: crumble, pipe, stick. Your guests will swear you attended culinary school in Transylvania.
Make-Ahead Magic: Cupcakes freeze beautifully, filling keeps three days chilled, and decorations can be stamped out while binge-watching Hocus Pocus. Assemble day-of and watch your spooky soirée stress evaporate.
Crowd Reaction: I’ve served these at office potlucks, kindergarten carnivals, and grown-up masquerade balls—every demographic loses their minds. One friend tried hiding a second cupcake in her purse “for the road.”
Inside the Ingredient List
The Flavor Base
Dark chocolate is the soul of these graveyard cupcakes—choose one you’d happily nibble solo; cheap chips taste like wax crayons once baked. I keep mine around 60% cacao so the bitterness doesn’t bully the sweeter components. Cocoa powder amplifies that chocolate aroma; go Dutch-processed for a darker crumb that looks like midnight at a haunted cemetery. Vanilla extract might seem humble, but it bridges cocoa and chocolate the way a good bass player glues a band together. Skip it and the flavor feels like an unfinished sentence.
The Texture Crew
Baking spread (or butter if you’re a dairy devotee) keeps the crumb delicate; melt and cool it slightly so you don’t scramble the eggs when mixing. Caster sugar dissolves faster than granulated, giving you that smooth, bubble-free batter that rises evenly—no volcanoes in the middle of your cupcakes, promise. Self-raising flour plus a whisper of baking powder lifts the batter just enough to keep things fluffy without turning them into sad muffins. Milk loosens everything; I use whole for richness, but oat milk works if you want a spooky vegan spin—just add a teaspoon of vinegar for lift.
The Unexpected Star
Full-fat cream cheese is non-negotiable for the cryptic center; low-fat versions weep water like a melancholy ghost and sink into gummy puddles. Beat it with icing sugar until the mixture resembles thick clouds—over-mix and it turns runny, under-mix and you’ll hit tangy lumps. Crushed Oreos provide graveyard dirt both inside the filling and on top; twist open the cookies and scrape the cream if you want blacker crumbs, or leave it on for speckled “stone.” Future pacing moment: imagine slicing a cupcake and that cookies-and-cream lava oozing out—camera phones will click faster than you can say “cheese… in a mousetrap.”
The Final Flourish
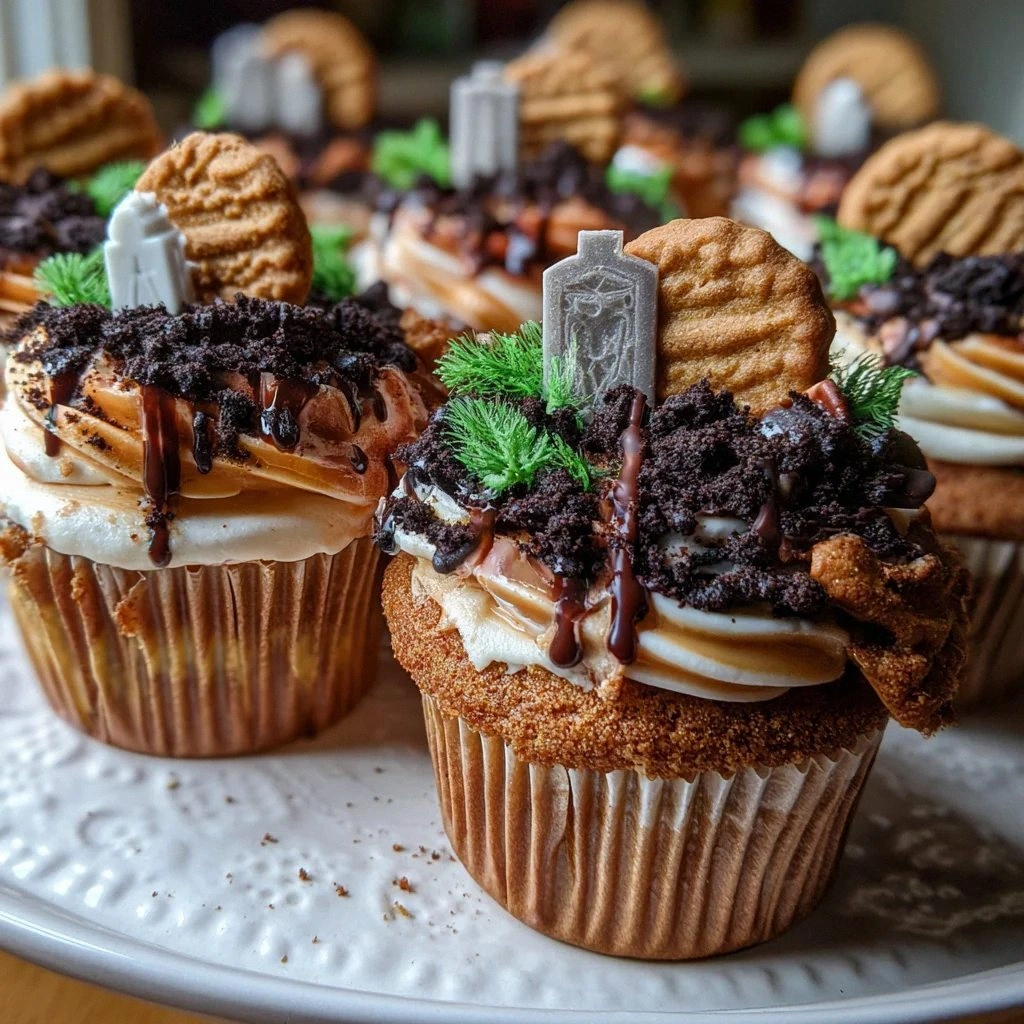
Green food coloring transforms basic buttercream into believable grass; gel color gives vivid results without thinning. Lotus Biscoff biscuits are the pièce de résistance gravestones—thin, crisp, and they stand upright without toppling like drunken skeletons. A dot of melted white chocolate acts as glue to secure them and as ink for your “RIP” inscription. And here’s a confession: I ate half a pack of those biscuits while waiting for the cupcakes to cool. Quality control, obviously.
The Method — Step by Step
- Preheat your oven to 350°F (175°C) and line a 12-cup muffin tin with black or orange paper liners—because presentation starts now, not at the frosting stage. In a heat-proof bowl, melt dark chocolate with the baking spread in 20-second bursts in the microwave, stirring until glossy. Let this puddle of velvet cool for five minutes so it doesn’t cook the eggs on contact; patience here prevents chocolate scrambled eggs, which sound interesting but taste like sadness.
- In a separate large bowl whisk caster sugar, eggs, milk, and vanilla until the mixture looks like sunshine-yellow silk—about two minutes by hand, 45 seconds with a mixer on medium. You want the sugar mostly dissolved so your cupcakes don’t have gritty spots that ruin the luxurious mouthfeel. Now stream in the cooled chocolate mixture while whisking; admire the marbled swirl that reminds you of storm clouds over a haunted mansion. The aroma right now? Pure Willy Wonka meets Halloween midnight.
- In another bowl combine self-raising flour, cocoa powder, and baking powder, and whisk out any stubborn cocoa lumps that refuse to blend. Think of this as polishing the dry team so they incorporate without a trace of floury pockets. Tip the dry mix into the wet in two additions, folding gently like you’re tucking in a sleeping vampire—over-mixing toughens the crumb, and no one wants to chew a hockey puck while bobbing for apples.
- Fill each liner two-thirds full; an ice-cream scoop works like a charm for even sizing and minimal mess. The batter should mound up like fresh graves; resist the urge to overfill or you’ll end up with mushroom tops that fuse together and crack when you try to remove them. Slide the tin into the oven on the center rack and bake for 18-20 minutes, rotating halfway for even browning. Your olfactory cue: when the kitchen smells like a chocolate cavern and a toothpick comes out with a few moist crumbs, not wet streaks, they’re done.
- Cool the cupcakes in the pan for five minutes—any longer and condensation turns bottoms soggy—then transfer to a rack. While they chill out, prepare the cream-cheese filling: beat room-temp cream cheese with icing sugar until satin smooth, then fold in crushed Oreos for speckled grave dirt. Spoon the mixture into a piping bag fitted with a long bismarck tip (or a zip-lock with corner snipped) and plunge the tip into the center of each cupcake, squeezing until you feel a slight resistance. You’ve just injected a subterranean tomb of flavor; expect delighted gasps when people discover the hidden treasure.
- For the grass buttercream, beat softened butter until pale and fluffy—about three minutes—then heap in powdered sugar, a splash of milk, and a toothpick swipe of green gel color. Beat until the frosting resembles the lusliest cemetery lawn; if it looks like radioactive slime, you’ve nailed the spooky vibe. Load the buttercream into a piping bag fitted with a multi-opening grass tip (Wilton 233) and pipe short upward strokes to cover the cupcake tops. The sizzle when frosting meets air? Absolute perfection.
- Time to craft tombstones: microwave white chocolate in 15-second bursts, stirring until just melted—overheated chocolate seizes faster than a startled black cat. Dip a toothpick into the chocolate and write “RIP” or the deceased year on each Biscoff biscuit. If your handwriting looks like ancient runes, embrace it; Halloween is forgiving of shaky artistry. Let the letters set for two minutes on parchment while you crumble remaining Oreos into coarse dirt.
- Press a biscuit gravestone into the center of each grassy mound, using a dab of buttercream as glue. Sprinkle Oreo dirt around the base to hide any frosting imperfections and give that freshly-dug grave vibe. Optional but epic: add candy pumpkins or gummy worms crawling out of the soil for extra cinematic flair. Stand back and watch your mini cemetery come alive—then quickly snap photos because these disappear faster than ghosts at sunrise.
That’s it—you did it. But hold on, I’ve got a few more tricks that’ll take this to another level...
Insider Tricks for Flawless Results
The Temperature Rule Nobody Follows
Room-temperature dairy isn’t a snobby suggestion; it’s structural science. Cold cream cheese refuses to blend smoothly, leading to lumpy filling that clogs piping tips faster than a poltergeist in a vacuum. Pull dairy out two hours ahead, or microwave cream cheese (sans foil) for 10 seconds per side. Same goes for eggs and milk—thermal harmony yields a batter that rises evenly, bakes faster, and tastes silkier than a vampire’s cape.
Why Your Nose Knows Best
Timer be damned—your kitchen’s aroma is the most accurate doneness indicator. When chocolate perfume blooms and a faint caramel note creeps in, cupcakes are moments from perfection. If you wait for the timer while the scent is already knocking at heaven’s door, you’re likely overbaking. Trust your olfactory instincts; they’ve guided bakers centuries before digital displays.
The 5-Minute Rest That Changes Everything
After filling and frosting, park cupcakes in the fridge for five minutes. Chilling firms the buttercream just enough that your decorations won’t slide sideways when kids grab them like grabby zombies. Bonus: cold cheesecake filling contrasts beautifully with room-temp sponge, creating a sensory whiplash that keeps guests intrigued bite after bite. Just don’t forget them overnight or you’ll bite into chocolate ice cubes.
Chocolate Seizing SOS
If your white chocolate turns into cement, add a teaspoon of neutral oil (sunflower or coconut) and stir gently over a barely warm water bath. The fat loosens seized crystals and restores fluidity so you can keep scripting tombstone epitaphs instead of hurling parchment across the kitchen. A friend once tried skipping this rescue—let’s just say her “RIP” looked like it had already decomposed.
Creative Twists and Variations
This recipe is a playground. Here are some of my favorite ways to switch things up:
Red Velvet Blood Bath
Swap cocoa for one tablespoon red velvet emulsion and add a splash of buttermilk; tint the cheesecake filling with raspberry purée for a gory “bleeding” center. Pipe white chocolate bones instead of RIP for anatomical accuracy that would make a biology teacher proud.
Mummy Mint Chocolate
Use mint chocolate chips in the batter and peppermint extract in the buttercream. Pipe white icing in bandage strips across the top, tucking two candy eyes peeking through. Tastes like an After Eight in cupcake form—refreshingly spooky.
Pumpkin Patch Graveyard
Add canned pumpkin purée and pumpkin-pie spice to the cheesecake filling for autumnal vibes. Top with orange candy pumpkins and green sprinkle “vines.” Your house will smell like a Starbucks had a baby with a haunted farm.
Gluten-Free Ghouls
Replace self-raising flour with a 1:1 gluten-free blend plus ¼ tsp xanthan gum; use gluten-free chocolate sandwich cookies for dirt. Nobody will notice the switch—my celiac-suffering cousin dubbed them “life-changing.”
Vegan Voodoo
Sub vegan butter, flax eggs, and oat milk; fill with coconut cream whipped with crushed vegan cookies. Finish with black cocoa powder for the deepest, darkest graveyard soil you ever saw—100% plant-based sorcery.
Spiked Spirits
Add a tablespoon of coffee liqueur to the batter and a teaspoon of bourbon to the cheesecake mix. Adults-only graveyard: guaranteed to raise more than spirits.
Storing and Bringing It Back to Life
Fridge Storage
Place cupcakes in an airtight container; they’ll keep four days refrigerated. To prevent the biscuits from softening, add tombstones just before serving or store them separately in a cookie tin with a packet of silica gel to absorb moisture. Bring cupcakes to room temp 20 minutes before serving—cold chocolate dulls flavor, and you want that lush aroma to smack guests awake.
Freezer Friendly
Unfrosted cupcakes freeze like a charm for up to two months. Wrap each in plastic, then foil, and stash in a labeled zip-lock bag (trust me, mystery pucks at midnight are no fun). Thaw overnight in the fridge, then frost fresh. Cheesecake filling can be frozen in the piping bag; thaw in the fridge, re-whip for 10 seconds, and you’re back in business.
Best Reheating Method
If you must reheat (say a late-night zombie craving), microwave a cupcake sans decoration for 8 seconds at 50% power—just enough to take the chill off without melting the tombstone. Add a tiny splash of water on the plate; the gentle steam revives crumb softness. Never reheat with the biscuit in place unless you enjoy gnawing on drywall.