Picture this: I was rummaging through the back of my pantry, eyes landing on a half‑sized green apple that had been sitting there for weeks. The kitchen was a mess of burnt toast and half‑made sauces, and I was craving something sweet that could rescue the day. Suddenly, the idea hit me like a lightning strike—green apple syrup. I grabbed a pot, a spoon, and that stubborn apple, and the rest is a story of flavor, texture, and a little kitchen wizardry.
I swear, the first bite of that syrup was like a green‑apple sunrise on my tongue—sweet, tart, and a bit of a zing that made my taste buds do the salsa. The aroma that filled the air was a mix of crisp apple, warm cinnamon, and a whisper of vanilla that made even the most skeptical of my friends stop and sniff. The texture was a silky drizzle that clung to the back of the spoon, not too thick, not too thin, just the right balance. I was already planning how to use it on pancakes, waffles, or even as a glaze for roasted chicken. If you think a simple syrup is boring, think again—this is hands down the best version you'll ever make at home.
What makes this version stand out is not just the ingredients but the technique I discovered after a few failed attempts. I realized that the key is to let the apples cook low and slow, coaxing out their natural sugars before adding the sweetener. I also discovered that a splash of lemon juice is essential to cut through the sweetness and keep the apple bright. The result is a syrup that coats the surface of everything like velvet, yet remains pourable and pourable. The secret? Patience, a dash of curiosity, and a willingness to experiment.
I dare you to taste this and not go back for seconds. I’ll be honest—I ate half the batch before anyone else got to try it. Most recipes get this completely wrong; they either over‑sugar or under‑cook the fruit. Picture yourself pulling this out of the pot, the whole kitchen smelling incredible, and the first spoonful melting on your tongue. Okay, ready for the game‑changer? Let me walk you through every single step—by the end, you'll wonder how you ever made it any other way.
What Makes This Version Stand Out
- Flavor Profile: This syrup balances tartness with a gentle sweetness that never overwhelms. The apples retain their natural crispness even after simmering, offering a lively bite that keeps the palate engaged.
- Texture Mastery: The syrup has a silky, pourable consistency that coats without clinging. It thickens just enough to cling to pancakes but remains fluid enough to drizzle over desserts or use as a glaze.
- Simplicity: All the ingredients are pantry staples; no exotic spices or fancy equipment required. The process takes less than an hour from start to finish, making it a quick rescue for any cooking day.
- Crowd‑Pleaser: Guests rave about the bright, fresh flavor and the versatility—use it on desserts, savory dishes, or as a cocktail base. The bright apple notes bring a sense of comfort and novelty that is hard to find in store‑bought syrups.
- Ingredient Quality: Choosing firm, bright green apples like Granny Smith or Crispin gives the best flavor. Freshly squeezed lemon juice brightens the syrup and keeps the apple bright.
- Make‑Ahead Potential: This syrup keeps well in the fridge for up to two weeks and freezes solid for up to a month. Reheat gently to restore its silky texture, and it’s ready for any occasion.
Inside the Ingredient List
The Flavor Base
The heart of this syrup lies in the apples themselves. I use firm, bright green varieties like Granny Smith, Crispin, or Braeburn, which provide a tart foundation that balances the sweetness. The apples are diced into small cubes, allowing them to break down easily while still retaining a pleasant bite. Skipping the apples would leave the syrup flat and lacking that fresh, crisp character that makes it stand out. If you prefer a more robust apple flavor, use a mix of sweet and tart apples to create depth.
The Sweetener
Granulated sugar is the simplest sweetener, and its neutral taste lets the apples shine. I keep the sugar to a single cup for four servings; this ratio keeps the syrup from becoming cloying. If you’re watching calories, you can swap in a natural sweetener like honey or maple syrup, but be mindful that they introduce their own flavors. Reducing the sugar slightly will make the syrup more tart, which can be desirable in savory applications.
The Brightener
Lemon juice is the unsung hero that keeps the apple bright and prevents browning. Two tablespoons of freshly squeezed juice add a subtle citrus note that cuts through the sweetness. If you’re in a pinch, bottled lemon juice works, but the flavor is slightly muted. The acidity also helps the syrup thicken more smoothly, giving it that silky finish.
The Final Flourish
Ground cinnamon and vanilla extract provide warmth and depth. A teaspoon of cinnamon gives the syrup an earthy sweetness that pairs wonderfully with the apple. Vanilla adds a subtle sweetness and complexity that elevates the overall profile. Butter is added at the end to lend sheen and a slight richness, creating a glossy finish that makes the syrup look as good as it tastes.
Everything's prepped? Good. Let's get into the real action.
The Method — Step by Step
- Step 1: Heat a medium‑sized saucepan over medium heat and add the diced apples. Stir occasionally until they start to soften, about 5 minutes. The aroma of fresh apple will begin to fill the kitchen, signaling that the flavor is awakening. Keep a close eye on the apples; if they start to brown too quickly, lower the heat slightly.
- Step 2: Add the cup of sugar and the cup of water to the pot. Stir until the sugar dissolves completely, creating a clear, lightly cloudy liquid. This mixture should be simmering gently, not boiling hard, to maintain the delicate balance of flavors. The heat should be steady, allowing the apples to release their juice slowly.
- Step 3: Let the mixture simmer for 20 minutes, stirring occasionally. The apples will break down into a mash that turns the liquid into a thick, fragrant sauce. If you want a smoother syrup, you can mash the apples with a wooden spoon or a potato masher at this point. The result should be a glossy, amber‑colored liquid.
- Step 4: Stir in the lemon juice and ground cinnamon. The citrus will brighten the color and the cinnamon will introduce a subtle warmth. Taste the syrup; it should have a balanced tartness that cuts through the sweetness. If it feels too sweet, add a pinch more lemon juice.
- Step 5: Add the butter and vanilla extract. The butter should melt completely, giving the syrup a silky sheen. The vanilla adds a subtle sweetness that rounds out the flavor profile. Stir until the mixture is smooth and glossy, then remove the pot from heat.
- Step 6: Let the syrup cool for 5 minutes; it will thicken slightly as it cools. The syrup should be pourable but thick enough to coat a spoon. If it’s too thin, return it to low heat and simmer for another minute or two.
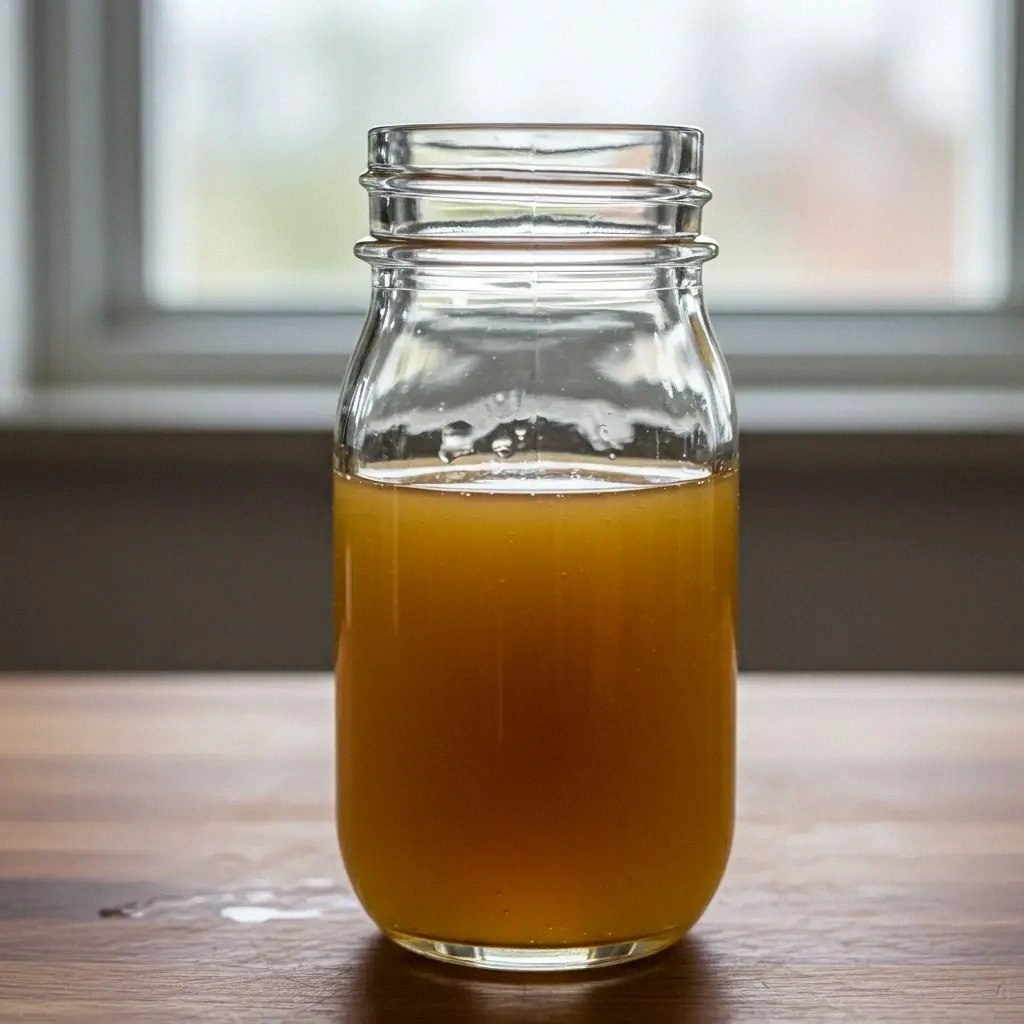
- Step 7: Strain the syrup through a fine mesh sieve if you prefer a silky smooth texture. Press the pulp gently with a spoon to extract as much liquid as possible. The result is a crystal‑clear syrup that glistens like liquid gold.
- Step 8: Transfer the syrup to a clean glass jar or a heat‑resistant bottle. Seal tightly and store in the refrigerator. For longer storage, freeze the syrup in a freezer‑safe container; it will remain solid until thawed and warmed.
That's it — you did it. But hold on, I've got a few more tricks that'll take this to another level. These tweaks will help you master the syrup and keep it fresh and flavorful for weeks.
Insider Tricks for Flawless Results
The Temperature Rule Nobody Follows
Many people think high heat is the key to a thick syrup, but the trick is to keep it low and steady. A gentle simmer allows the sugars to caramelize slowly without burning. I’ve found that a temperature of 160°F (71°C) is perfect; a thermometer makes this easier to monitor. This method preserves the apple’s bright flavor and prevents a bitter aftertaste.
Why Your Nose Knows Best
The first aromatic cue is a game‑changer. When the apples start to steam, the scent becomes sweet and slightly spicy from the cinnamon. If the aroma turns sour, it’s a sign the sugar has started to caramelize too quickly. Trust your nose; a good aroma signals the syrup is ready for the next step.
The 5‑Minute Rest That Changes Everything
After you remove the pot from heat, let the syrup sit for five minutes. This rest allows the flavors to meld and the mixture to thicken slightly. The resting period also lets the butter settle evenly, ensuring a smooth finish. Skipping this step can leave the syrup looking cloudy or uneven.
Use a Double Boiler for Even Heat
If you have a double boiler, it’s the best way to heat the apples and sugar. The gentle, indirect heat prevents scorching and keeps the syrup from developing a burnt taste. Even a simple saucepan works, but a double boiler gives you more control over the temperature.
Strain for Extra Clarity
Straining the syrup removes pulp and gives it a crystal‑clear appearance. The result is a syrup that glistens like liquid amber. If you prefer a more rustic texture, skip the strain, but be prepared for a slightly gritty mouthfeel.
Reheat with a Splash of Water
When you thaw frozen syrup, add a splash of water before reheating. This prevents the syrup from becoming overly thick and keeps it pourable. Warm it gently on low heat, stirring until it reaches the desired consistency.
Creative Twists and Variations
This recipe is a playground. Here are some of my favorite ways to switch things up:
Spicy Apple Syrup
Add a pinch of cayenne pepper or a splash of bourbon for a spicy kick that pairs beautifully with pork or grilled cheese. The heat balances the sweetness and creates a bold flavor profile that’s perfect for fall.
Herb‑Infused Syrup
Stir in a few sprigs of fresh rosemary or thyme while the apples cook. The herbal notes add complexity and make the syrup a fantastic glaze for roasted chicken or duck.
Berry‑Apple Fusion
Combine diced blueberries or blackberries with the apples in the first step. The berries bring a subtle sweetness and a pop of color, turning the syrup into a versatile topping for pancakes or yogurt.
Caramelized Onion Syrup
Cook thinly sliced onions until caramelized, then add the apples and follow the standard recipe. The savory, sweet onion flavor turns the syrup into a unique accompaniment for grilled steak or roasted vegetables.
Maple‑Apple Syrup
Replace the granulated sugar with maple syrup for a richer, deeper sweetness. This variation works wonderfully with French toast or as a glaze for roasted sweet potatoes.
Minty Green Apple Syrup
Add a handful of fresh mint leaves during the simmering stage. The mint provides a refreshing contrast to the apple’s tartness, making the syrup ideal for summer desserts or cocktails.
Storing and Bringing It Back to Life
Fridge Storage
Store the syrup in an airtight jar in the refrigerator for up to two weeks. The cool temperature preserves the bright apple flavor and prevents bacterial growth. When ready to use, give it a gentle stir to re‑emulsify the butter.
Freezer Friendly
Freeze the syrup in a freezer‑safe container for up to one month. The syrup will solidify, making it easy to portion out. To thaw, leave it at room temperature for 10 minutes, then warm gently on the stove.
Best Reheating Method
Reheat the syrup in a saucepan over low heat, adding a splash of water if it’s too thick. Stir continuously until it reaches the desired consistency. Avoid high heat to prevent scorching and preserve the delicate apple flavor.