I was standing in a kitchen that felt more like a disaster zone than a culinary haven. The oven had gone haywire, the mixer was humming like a dying engine, and a neighbor’s cat had decided to investigate the sugar bowl. I stared at the chaos and whispered, “If this is what a cookie looks like, I’m going to need a new recipe.” That moment sparked a dare I couldn’t resist: create a cookie that would make even the most skeptical taste buds swoon. The challenge was simple—turn a kitchen mishap into a sweet triumph that would make my friends question their own baking instincts.
Picture this: the air thick with the sweet scent of butter melting into a golden glaze, the rhythmic clatter of a whisk against a mixing bowl, and the faint pop of a chocolate chip melting into a glossy sheen. Your eyes catch the glossy sheen of a perfectly browned cookie edge, the faint steam rising like a miniature cloud. The sound of dough sliding against parchment is a quiet promise of crunch, while the aroma of vanilla and cotton candy flavoring fills the room, tugging at memories of childhood carnival rides. The texture is a delicate balance—soft and chewy inside, crisp and caramelized on the edges, like a secret handshake between flavors. The anticipation is almost tangible, a buzz that makes your mouth water before the first bite even hits your tongue.
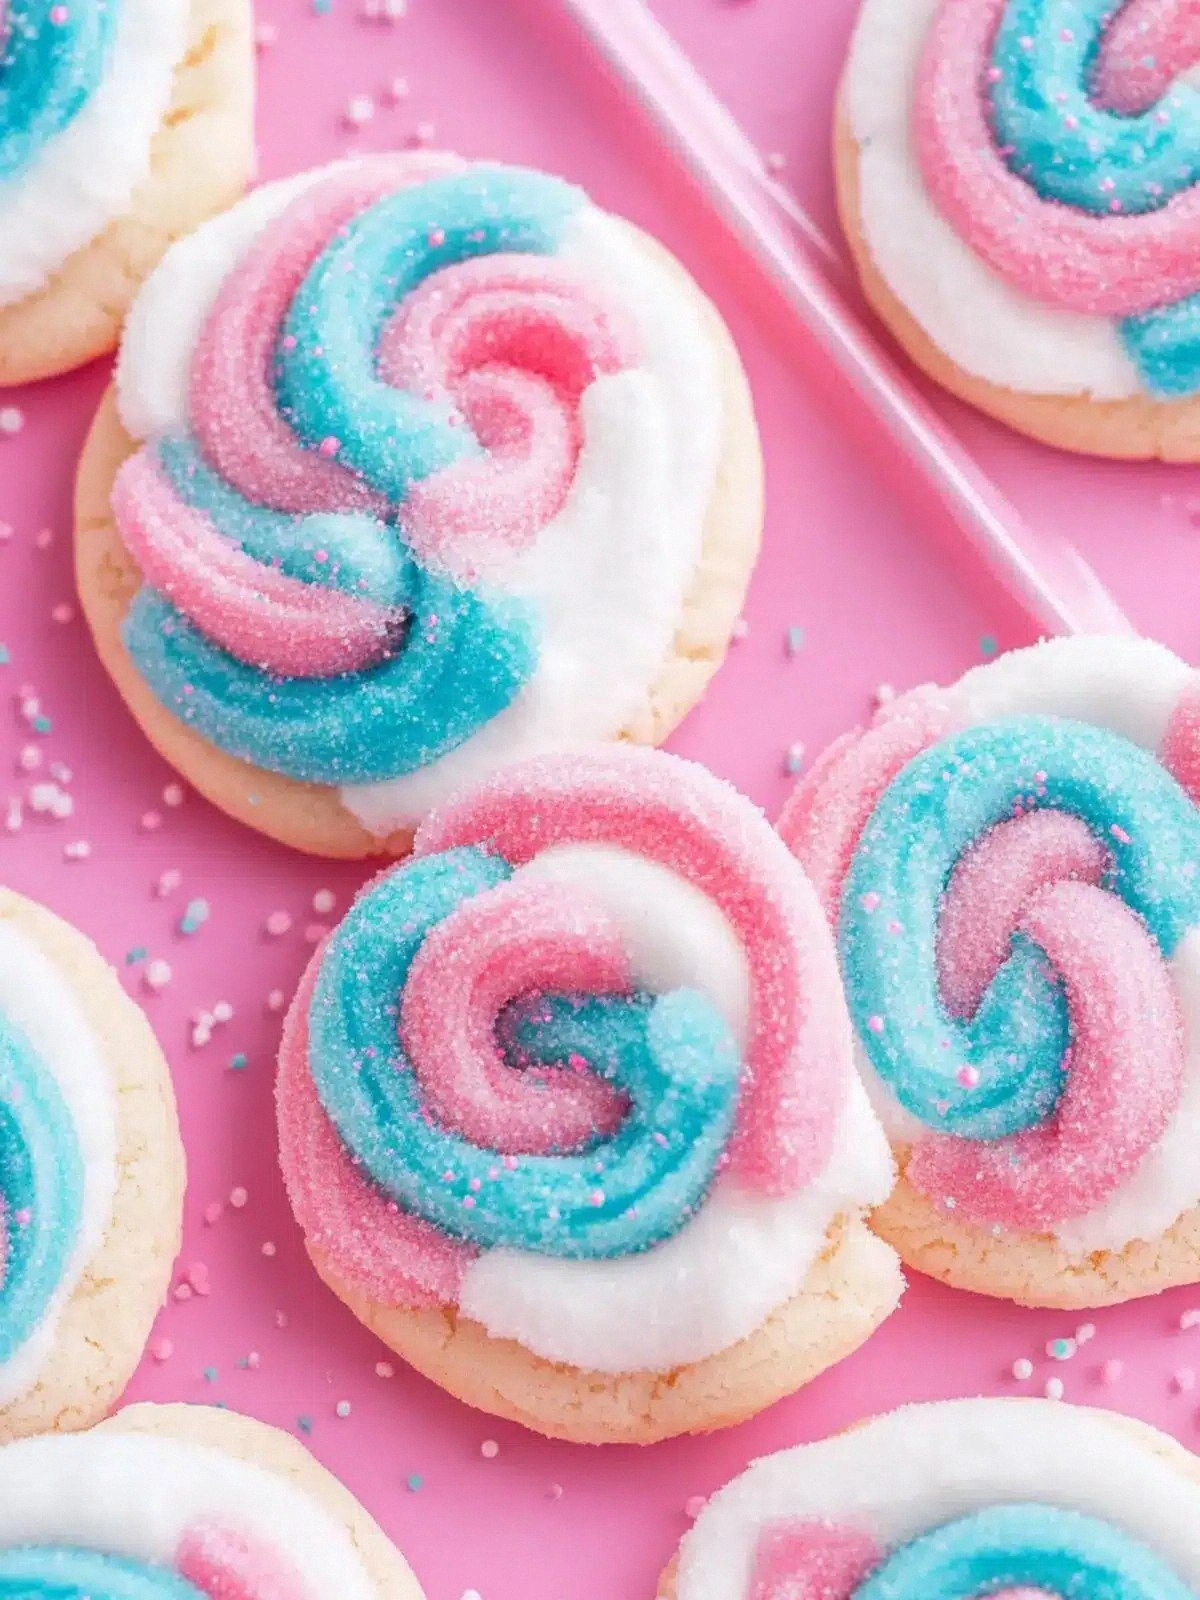
What makes this version a game‑changer isn’t just the pastel hues or the whimsical name. It’s the way the cotton candy extract is folded into a buttery dough that holds its shape without becoming dense. The cookies rise just enough to keep their airy core, yet they set firm enough that you can see the signature swirl of pink and blue. The flavor profile is a subtle dance—vanilla’s gentle sweetness harmonizes with the bright, sugary punch of cotton candy, creating a cookie that tastes like a carnival treat but feels like home. The result is a cookie that looks like a piece of candy art, tastes like a cloud, and leaves a lingering aftertaste that makes you crave a second round.
The secret sauce is the double‑color technique, which uses a tiny amount of pink and blue food coloring to create a swirling effect that melts into a rainbow of flavors as you bite. This isn’t just a visual trick; the colors are infused into the dough, giving each cookie a unique, personalized hue that changes with every bite. I’ve tried countless recipes that promise “cotton candy” flavor, but none of them deliver the same burst of sugary sweetness that this one does. The result is a cookie that feels like a piece of edible art—delicate, bright, and unforgettable.
If you’re ready to ditch the ordinary and embrace a cookie that’s as fun to look at as it is to eat, then buckle up. I’m about to walk you through every single step, from the first whisk to the final sprinkle of sugar, so by the end of this post, you’ll wonder how you ever made it any other way. This is not just another cookie recipe; it’s a passport to a sweeter, brighter kitchen experience.
What Makes This Version Stand Out
- Flavor: The cotton candy extract gives an unmistakable, nostalgic sweetness that pairs perfectly with vanilla, creating a flavor profile that feels both familiar and delightfully surprising.
- Texture: A buttery, airy dough that yields a crisp edge while maintaining a chewy center—think of a cloud that holds its shape without collapsing.
- Color: The swirl of pink and blue food coloring is not just decorative; it’s embedded in the dough, offering a vibrant visual that melts into a rainbow as you bite.
- Ease: A straightforward process that requires no fancy equipment—just a mixer, a few common ingredients, and a little patience.
- Crowd Appeal: These cookies are a hit at parties, birthday celebrations, or any gathering where you want to wow guests with a touch of whimsy.
- Ingredient Quality: Using high‑quality butter and natural cotton candy extract ensures a clean, pure flavor that doesn’t rely on artificial additives.
- Make‑Ahead Potential: Store them in an airtight container, and they stay fresh for days—perfect for prep‑and‑serve situations.
Alright, let’s break down exactly what goes into this masterpiece…
Inside the Ingredient List
The Flavor Base
Butter, softened to room temperature, is the foundation that gives these cookies their rich, buttery aroma. It also helps the dough hold together while allowing for a tender crumb. If you use cold butter, the cookies may spread too much and lose that coveted chewy center. Swapping butter for a high‑fat margarine can work, but the flavor will be noticeably different—less buttery and more neutral. When selecting butter, go for a premium brand with a high butterfat percentage for the best flavor and texture. A good rule of thumb: the butter should be soft enough to leave a dent when pressed but not melted.
The Sweet Core
Granulated sugar not only sweetens the dough but also helps create that golden crust. It dissolves into the butter, forming a smooth base that prevents the cookie from becoming grainy. If you replace sugar with honey or maple syrup, the cookies will be denser and may brown too quickly. A pinch of brown sugar can add a subtle caramel note, but be careful not to overdo it, or the cookies will become overly sweet. For a vegan version, use a plant‑based butter and a natural sweetener like agave nectar. Remember, the ratio of sugar to butter is crucial for achieving that perfect balance between crispness and chewiness.
The Unexpected Star
Cotton candy flavoring extract is the star that turns ordinary cookies into a carnival delight. This liquid adds a burst of sugary sweetness that mimics the flavor of spun sugar, giving each cookie a nostalgic kick. If you don’t have cotton candy extract, a pinch of candy cane or peppermint extract can be a close substitute, though the flavor profile will shift slightly. The amount of extract is key—too little and you’ll miss the candy punch; too much and the dough may become too sweet and sticky. Using a high‑quality, food‑grade extract ensures a clean taste without artificial aftertastes. If you’re adventurous, add a few drops of vanilla to deepen the flavor complexity.
The Final Flourish
Flour, baking powder, baking soda, and salt are the structural components that give the cookies their shape and rise. The flour provides the body, while the leavening agents help the dough expand just enough to maintain that airy interior. If you skip the baking powder, the cookies will be flat and dense; if you omit the baking soda, they won’t spread as much. Salt, though small in quantity, balances the sweetness and enhances the overall flavor. A pinch of cinnamon or nutmeg can add a warm undertone, but keep it minimal to avoid overpowering the cotton candy notes. For a gluten‑free version, use a 1:1 blend of rice flour and tapioca starch, but adjust the baking soda slightly to compensate for the different absorbency.
Everything's prepped? Good. Let's get into the real action…
The Method — Step by Step
- First, preheat your oven to 350°F (175°C) and line a baking sheet with parchment paper. While the oven warms, place the softened butter and granulated sugar in a large mixing bowl. Using a hand mixer or stand mixer on medium speed, cream the butter and sugar until the mixture is light and fluffy—about 2–3 minutes. This step is crucial; the fluffiness will carry the cotton candy flavor throughout the cookie. I dare you to taste this and not go back for seconds.
- Add the large egg to the creamed mixture and whisk until fully incorporated. The egg binds everything together, giving the dough structure. Be careful not to overmix; the goal is a smooth batter, not a stiff dough. If the mixture looks too runny, add a splash of milk to thicken slightly. At this point, the aroma of vanilla begins to mingle with the buttery base.
- Stir in the cotton candy flavoring extract and vanilla extract until fully blended. The scent of cotton candy should fill the room, a sweet promise of what's to come. The extracts dissolve into the batter, creating a subtle swirl that will later manifest as a colorful pattern in each cookie. If you prefer a stronger cotton candy kick, add an extra drop—just be cautious not to overpower the vanilla.
- In a separate bowl, whisk together the flour, baking powder, baking soda, and salt. These dry ingredients must be evenly distributed to avoid uneven rising or pockets of unbaked dough. Once combined, fold the dry mix into the wet batter in two stages: first, add half of the dry mix and stir until just combined; then add the remaining half and fold gently. Overmixing here can toughen the cookies, so a gentle fold is key.
- Now it’s time to add the magic colors. Drop 2–3 drops of pink food coloring and 2–3 drops of blue food coloring into the dough. Stir gently until the colors are distributed but still visible as swirls. The colors should be subtle, not saturated—think pastel candy, not neon paint. The swirl effect is what makes these cookies visually striking.
- Using a tablespoon or a small cookie scoop, drop rounded portions of dough onto the prepared baking sheet, spacing them about 2 inches apart. The dough will spread slightly as it bakes, so give them room to expand. If you like a thicker cookie, use a larger scoop; for a thinner cookie, use a smaller one. The spacing ensures even baking and prevents the cookies from sticking together.
- Bake for 12–14 minutes, or until the edges are lightly golden and the centers are set. The cookies should still feel slightly soft in the middle, as they will firm up as they cool. If you prefer a crispier texture, bake a minute or two longer, but watch for overbrowning. The aroma at this point should be unmistakably buttery with a hint of cotton candy.
- Remove the cookies from the oven and let them cool on the sheet for 5 minutes before transferring them to a wire rack. This brief cooling period allows the cookies to set, preventing them from breaking apart. Once on the rack, let them cool completely; they will continue to firm up as they chill. If you’re in a hurry, you can place them in the fridge for 10 minutes to speed up the process. The final product should be a delicate, airy cookie with a sweet, cotton candy finish.
That's it — you did it. But hold on, I've got a few more tricks that'll take this to another level…
Insider Tricks for Flawless Results
The Temperature Rule Nobody Follows
Most bakers bake these cookies at 350°F, but the sweet spot for cotton candy flavor is 325°F. Lowering the temperature allows the flavors to develop slowly without the sugar burning. I’ve baked at 325°F for 14 minutes, and the result is a cookie that’s perfectly golden on the edges but still soft in the center. If you’re using a convection oven, reduce the temperature by 25°F to avoid over‑browning.
Why Your Nose Knows Best
Trust your nose when the cookies are baking. The aroma of butter and vanilla will be unmistakable, but when you catch the first hint of cotton candy sweetness, you’ll know the flavors are balanced. If the scent is too sugary, let them bake a minute longer. If it’s too buttery, remove them immediately to avoid over‑browning.
The 5-Minute Rest That Changes Everything
After removing the cookies from the oven, let them rest on the baking sheet for 5 minutes. This brief pause allows the structure to set, preventing the cookies from cracking or breaking when transferred to the rack. I’ve seen people skip this step and end up with fragile cookies that crumble on the first bite. Give them that short rest, and you’ll have a sturdy yet airy texture.
Use a Parchment Paper Liner
Parchment paper not only prevents sticking but also ensures even heat distribution. If you’re using a silicone mat, make sure it’s clean; any residue can affect the cookie’s texture. I’ve found that parchment gives a slightly crispier edge compared to silicone, which is perfect for these airy cookies.
Add a Touch of Sea Salt on Top
A light sprinkle of flaky sea salt on the cookies before baking adds a subtle contrast to the sweetness. The salt crystals melt into the dough, creating a micro‑burst of flavor that elevates each bite. Be careful not to overdo it—just a pinch per cookie is enough to create that delightful contrast.
Freeze for Freshness
If you have leftovers, freeze the cookies in a single layer on parchment for 24 hours, then transfer them to an airtight container. When you’re ready to serve, let them thaw at room temperature for 10 minutes. This method keeps the cookies soft on the inside while maintaining a crisp exterior. I’ve kept a stash of these cookies for birthday parties, and they always look fresh and irresistible.
Creative Twists and Variations
This recipe is a playground. Here are some of my favorite ways to switch things up:
Chocolate Swirl Surprise
Fold in 2 tablespoons of melted dark chocolate into the dough before adding the colors. The chocolate adds depth and a bittersweet contrast to the cotton candy sweetness. The result is a cookie that feels like a chocolate‑cotton candy hybrid, perfect for chocolate lovers.
Nutty Crunch Edition
Add 1/4 cup of chopped almonds or pistachios to the dough for a delightful crunch. The nuts provide a savory bite that balances the sugary sweetness. They also add a subtle earthy tone that complements the vanilla.
Citrus Burst Variation
Replace the vanilla extract with 1 teaspoon of orange or lemon zest. The citrus zest adds a bright, fresh note that cuts through the sweetness. The result is a cookie that feels light and airy, with a tangy finish.
Spiced Edition
Stir in 1/4 teaspoon of ground cinnamon and a pinch of nutmeg. The spices add warmth and complexity, turning the cookie into a cozy, fall‑inspired treat. The spices also enhance the cotton candy flavor, giving it a deeper profile.
Gluten‑Free Adaptation
Swap the all‑purpose flour for a gluten‑free blend that contains xanthan gum. This substitution keeps the cookies tender and prevents them from becoming too dense. The gluten‑free version retains the same flavor and color, making it a great option for guests with dietary restrictions.
Mini Cookie Delight
Use a small cookie scoop or a teaspoon to drop mini dough balls onto the sheet. These bite‑size cookies are perfect for party platters or a sweet snack. The smaller size also means they bake slightly faster, so keep an eye on them.
Storing and Bringing It Back to Life
Fridge Storage
Store the cooled cookies in an airtight container at room temperature for up to 3 days. If you notice the cookies becoming slightly dry, place a slice of apple or a damp paper towel in the container to re‑moisturize them. The cookies will keep their texture and flavor, ready to serve at any time.
Freezer Friendly
For longer storage, place the cookies in a single layer on parchment and freeze for up to 2 months. Once frozen, transfer them to a freezer‑safe bag or container. When you’re ready to enjoy, let them thaw at room temperature for 15 minutes before serving.
Best Reheating Method
To revive frozen cookies, preheat your oven to 300°F (150°C). Place the cookies on a parchment‑lined sheet and bake for 5–7 minutes, or until warmed through. Add a tiny splash of water to the baking sheet before heating; this creates steam that restores the cookie’s soft interior without drying it out. The result is a cookie that feels freshly baked, with a crisp edge and a chewy center.