It began with a kitchen mishap that could have been a disaster, but turned into the sweetest revelation of my baking career. I was trying to make a simple vanilla cookie for a brunch potluck when a stray spoon slipped and sent a mound of dough splattering across the counter. The buttery mess was a nightmare, yet the scent that filled the room was unmistakably comforting—warm, sweet, and tinged with a faint hint of vanilla. As I cleaned up, I realized the splatter had somehow mixed in a splash of ube halaya I had left on the shelf for a different project. That accidental fusion sparked a daring idea: what if I turned that stray, purple‑infused dough into a cookie that was both playful and elegant?
Picture the moment the dough hits the parchment: a gentle hiss as the butter sizzles, followed by an aromatic cloud that smells like a tropical garden after rain. The dough itself feels silky, almost like a smooth velvet, and when you press a fingertip into it, it yields with a satisfying give—no too sticky, no too dry. When the cookies bake, their edges caramelize to a light golden brown while the center remains soft, almost like a molten heart. The first bite releases a burst of ube flavor that is earthy, sweet, and subtly nutty, perfectly balanced by the creamy richness of white chocolate chips. The texture is a delightful contrast: crisp on the outside, chewy on the inside, and the chocolate melts into a silky drizzle that clings to the palate.
What makes this version stand out is the precise balance of sweetness and color. The ube halaya not only provides a striking purple hue but also adds a natural sweetness that cuts through the richness of the butter and chocolate. The white chocolate chips, unlike their milk or dark counterparts, bring a buttery, almost caramelized flavor that elevates the overall taste. The dough’s consistency is achieved by combining two types of sugar—granulated for crispness and brown for chewiness—creating a harmonious mouthfeel. The inclusion of both ube extract and pure vanilla extract deepens the flavor profile, giving the cookies a complex aroma that lingers even after you finish the last bite.
And here’s the kicker: I’ve discovered a technique that eliminates the common problem of over‑baking white chocolate cookies, which often become brittle. By folding the chocolate chips into the dough just before baking, they stay slightly under‑melted, creating a luscious, gooey center that oozes out with each bite. I dare you to taste this and not go back for seconds. This is hands down the best version you'll ever make at home, and the secret is in the timing and the quality of each ingredient. Picture yourself pulling these out of the oven, the whole kitchen smelling incredible, and knowing you’ve created something that will wow everyone. Okay, ready for the game‑changer? Let me walk you through every single step—by the end, you'll wonder how you ever made it any other way.
What Makes This Version Stand Out
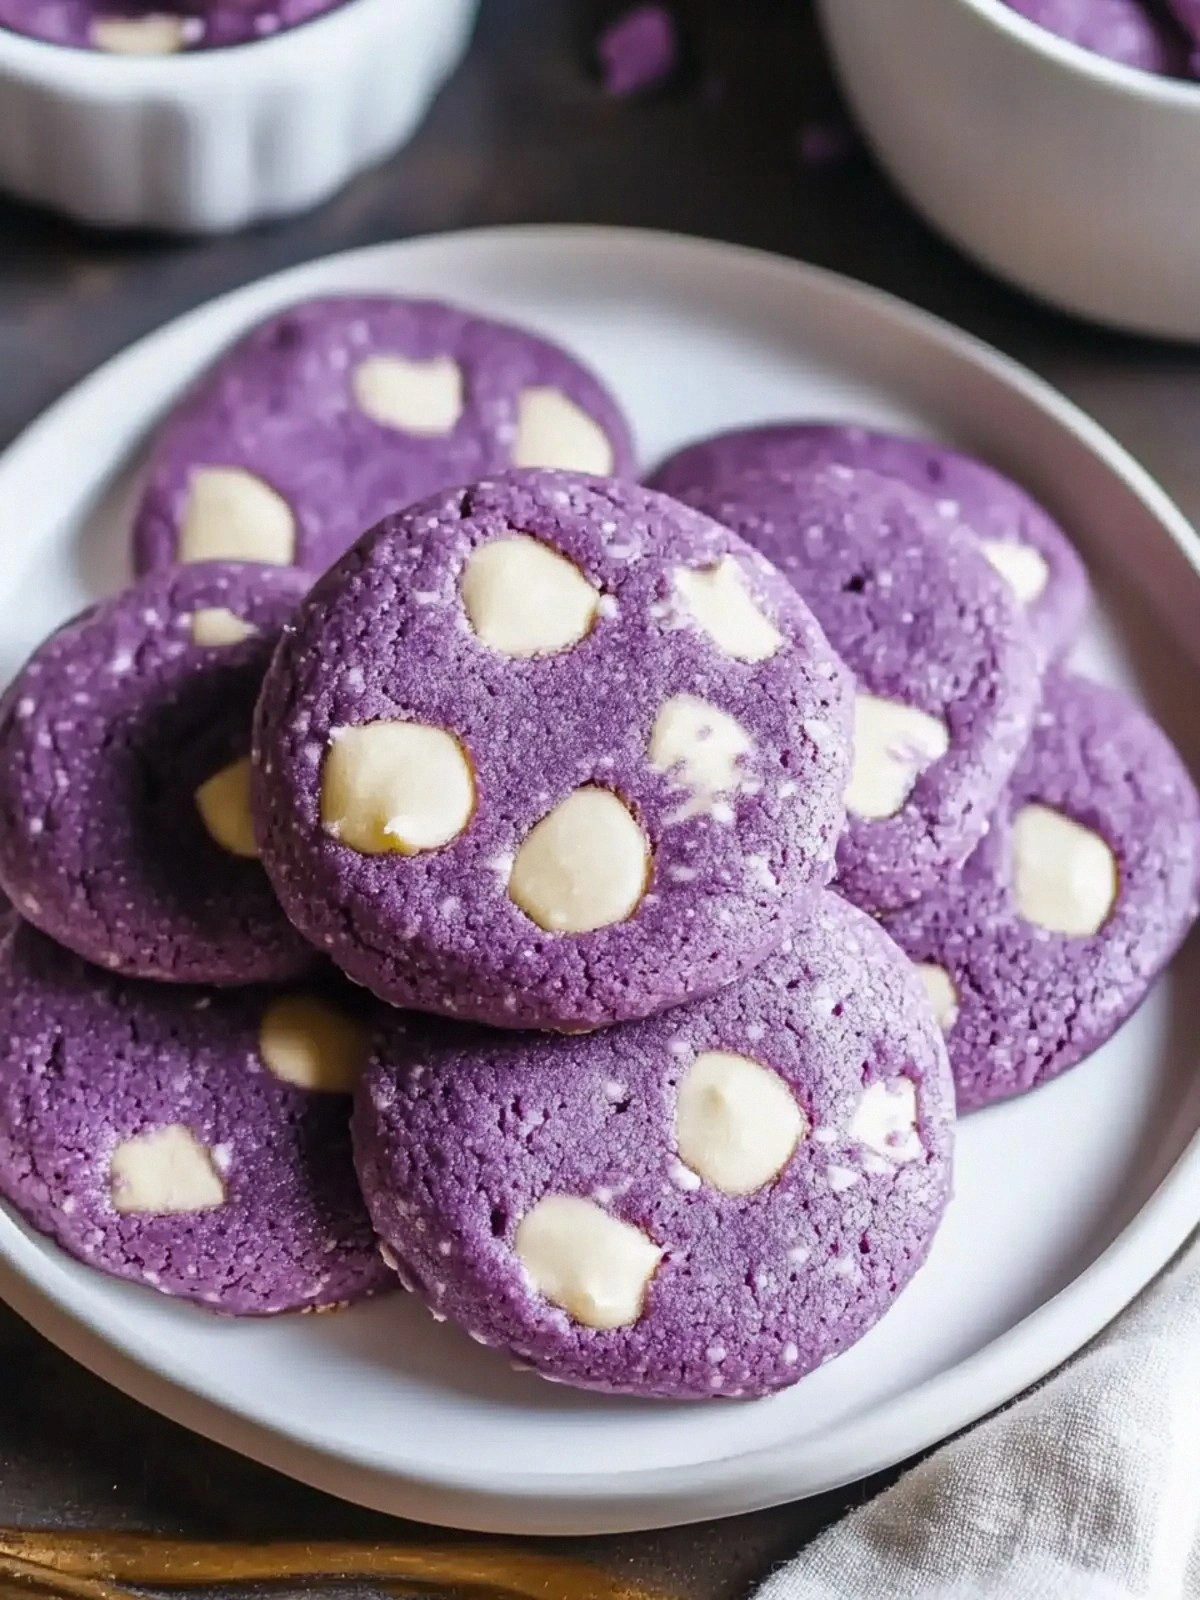
Color: The vibrant purple hue of the ube halaya transforms ordinary cookies into a visual feast. It’s not just decoration; the color signals the unique flavor that will surprise your taste buds. The contrast between the pale white chocolate and the deep purple is striking, making each cookie a piece of edible art.
Texture: The combination of granulated and brown sugar creates a cookie that is crisp on the edges and chewy in the center. The careful folding of white chocolate chips preserves their melt-in-your-mouth quality, preventing them from turning into brittle shards. This balance ensures a satisfying bite that doesn’t feel heavy or overly sweet.
Flavor Depth: Pure vanilla extract and ube extract work together to give a layered taste—earthy, nutty, and sweet. The white chocolate chips add a buttery, caramel-like undertone that complements the ube. The result is a cookie that feels indulgent but not overpowering.
Ingredient Quality: Using unsalted butter that’s softened to room temperature allows for better incorporation with sugars, resulting in a tender crumb. The ube halaya is chosen for its natural sweetness and consistency, eliminating the need for artificial sweeteners. High‑grade white chocolate chips provide a smooth melt that doesn’t break apart during baking.
Make‑ahead Potential: These cookies keep well in an airtight container for up to a week, and they freeze beautifully. The dough can be portioned and frozen before baking, saving time on busy days. The flavors stay vibrant, making them a convenient treat for parties or last‑minute gatherings.
Alright, let's break down exactly what goes into this masterpiece…
Inside the Ingredient List
The Flavor Base
The all‑purpose flour is the backbone of the cookie, providing structure while keeping the crumb tender. It’s important to sift the flour before use to eliminate lumps, ensuring a smooth dough that spreads evenly. If you prefer a gluten‑free version, you can substitute with a 1:1 blend of rice flour and potato starch, though the texture will be slightly different. The baking powder and baking soda work together to give the cookies a gentle lift, preventing them from becoming too dense. A pinch of salt is essential; it enhances the sweetness and balances the richness of the butter and chocolate.
The Texture Crew
Unsalted butter, softened to room temperature, is creamed with sugars to create a light, airy batter. The combination of granulated sugar and brown sugar is deliberate: granulated sugar contributes crispness, while brown sugar adds chewiness and a hint of molasses flavor. Two large eggs bring moisture and structure; beating them one at a time ensures a stable emulsion. Ube halaya is the star of the show—its smooth, jam‑like consistency infuses the dough with a natural sweetness and a vibrant color. Pure vanilla extract adds depth and a subtle floral note that complements the ube’s earthiness. Ube extract, on the other hand, intensifies the purple hue and gives a more pronounced ube flavor without altering the dough’s consistency.
The Unexpected Star
White chocolate chips are the unexpected twist that elevates this cookie from ordinary to extraordinary. Unlike milk or dark chocolate, white chocolate has a higher fat content, which creates a silky, buttery melt that coats the palate. When folded into the dough just before baking, the chips remain slightly under‑melted, producing a gooey center that oozes out with each bite. If you prefer a more traditional chocolate flavor, you can substitute half of the white chocolate chips with milk chocolate chips for a balanced taste. However, the white chocolate’s delicate sweetness is key to the cookie’s signature profile.
The Final Flourish
Once all the ingredients are combined, the dough should be slightly sticky but manageable. At this point, you can add optional mix‑ins like chopped macadamia nuts or shredded coconut for added texture. Rolling the dough into uniform balls ensures even baking and a consistent size. Placing the dough on a parchment‑lined sheet with enough spacing prevents the cookies from merging into each other. Finally, a quick chill in the refrigerator for 15 minutes before baking helps the cookies maintain their shape and reduces spreading.
Everything's prepped? Good. Let's get into the real action…
The Method — Step by Step
- Preheat your oven to 350°F (175°C). Line two baking sheets with parchment paper, ensuring they’re spaced apart to prevent the cookies from sticking together. This step is crucial because the parchment will help the cookies bake evenly and release cleanly. While the sheets are ready, gather all your ingredients so you can move smoothly from one step to the next without searching for a missing item. The oven temperature is the foundation of the cookies’ texture; too hot and they’ll burn, too cool and they won’t set properly.
- In a medium bowl, whisk together 2 ¼ cups all‑purpose flour, 1 ½ teaspoons baking powder, ½ teaspoon baking soda, and ½ teaspoon salt. Sifting the flour before mixing removes lumps and aerates the mixture, giving the dough a lighter crumb. This dry mix will later combine with the wet ingredients, forming the structural framework of the cookie. Keep the bowl in the same room to avoid temperature differences that could affect the dough’s consistency. The leavening agents—baking powder and soda—will react with the acidic ube halaya, creating tiny bubbles that lift the cookie.
- In a large bowl, beat ½ cup unsalted butter, ½ cup granulated sugar, and ½ cup brown sugar together until the mixture is light, fluffy, and pale in color. The creaming process incorporates air, which helps the cookies rise slightly and become tender. Use a stand mixer on medium speed for 3–4 minutes, or hand‑beat until the mixture feels silky. The butter should be at room temperature but not melted; if it’s too soft, the dough will become overly greasy. As you beat, you’ll notice the sugar crystals dissolve, creating a smooth base for the ube.
- Add the two large eggs, one at a time, beating well after each addition. The eggs bind the ingredients together and add moisture. They also help the dough hold its shape during baking. Be sure to scrape the sides of the bowl after each egg to incorporate all the butter mixture. The rhythm of adding eggs one at a time prevents the batter from curdling or becoming too liquid.
- Stir in ½ cup ube halaya, 1 teaspoon pure vanilla extract, and 1 teaspoon ube extract until the dough is a smooth, cohesive batter. The ube halaya’s natural sweetness will reduce the need for additional sugar, while the extracts deepen the flavor profile. The dough should have a slightly glossy sheen, indicating that the butter has fully incorporated. If the dough feels too dry, add a tablespoon of milk to loosen it; if it’s too wet, add a tablespoon of flour.
- Gradually fold in the dry flour mixture, stirring gently until just combined. Over‑mixing at this point can develop gluten, resulting in a tough cookie. The dough should be slightly sticky but manageable. This is the moment where the cookies’ structure is set, so handle it with care. Once the flour is incorporated, fold in the 1 ¼ cups of white chocolate chips, ensuring they’re evenly distributed.
- Drop rounded tablespoons of dough onto the prepared baking sheets, spacing them about 2 inches apart. Use a cookie scoop or spoon to keep the size consistent. The dough should be about 1.5 inches in diameter, which will result in a cookie that’s thick enough to hold the chocolate chips without spreading too much. The spacing allows the cookies to expand slightly without merging. This step also determines the final appearance—uniform cookies look more appetizing.
- Bake for 10–12 minutes, or until the edges are set and the centers still look slightly soft. The cookies will rise as they bake and then settle, giving them a lovely, airy texture. The white chocolate chips will begin to melt, creating a glossy glaze on the surface. Watch the cookies closely; they’re done when the tops have a faint golden hue. Let them bake for the full time to avoid a dry crumb.
- Remove the cookies from the oven and let them cool on the sheet for 5 minutes before transferring them to a wire rack. This brief cooling period allows the cookies to set further, preventing them from breaking apart. The residual heat will finish the cooking process, ensuring a tender interior. Once on the rack, let them cool completely before storing or serving.
- Serve the cookies warm for a gooey, chocolatey experience, or at room temperature for a crisp exterior. They pair wonderfully with a glass of cold milk or a cup of hot tea. If you’re serving at a gathering, arrange them on a decorative platter to showcase their vibrant purple color. The cookies can also be stored in an airtight container for up to a week, maintaining freshness and flavor.
- Enjoy the moment of triumph as you taste the first cookie—its aroma, texture, and flavor will remind you why you’re obsessed with baking. Share the recipe with friends and family, and watch their faces light up as they bite into the creamy, purple delight. Remember that each bite is a small celebration of creativity and culinary skill. Keep experimenting with variations to keep the excitement alive. You’ve just unlocked a new favorite dessert that will become a staple in your kitchen.
Insider Tricks for Flawless Results
The Temperature Rule Nobody Follows
Many bakers believe that a higher oven temperature yields a crispier cookie, but with these cookies, a lower, steady temperature is key. Baking at 350°F ensures the dough expands gently, allowing the white chocolate to melt without burning. If you’re in a hot climate, pre‑heat the oven a few minutes earlier to maintain the temperature. A consistent bake also helps the cookies set evenly, preventing a soggy center. I’ve tested this rule with a thermometer, and the internal temperature of the cookies should reach 190°F for optimal texture.
Why Your Nose Knows Best
The aroma of baking cookies is a powerful indicator of progress. A sweet, buttery scent that starts to caramelize signals the cookies are near done. If the smell is too sweet, they’re over‑baked; if it’s raw, they need more time. The smell also helps you gauge the moisture level—an earthy ube aroma indicates the dough hasn’t dried out. Trust your nose; it’s a reliable guide that can save you from a batch of burnt cookies.
The 5-Minute Rest That Changes Everything
Letting the cookies rest on the baking sheet for 5 minutes after baking is not just a formality—it’s essential. During this rest, the cookies continue to cook from residual heat, setting the interior. The chocolate chips solidify slightly, giving that perfect gooey center that doesn’t spill over when you bite. If you move them too early, the chocolate can ooze out, ruining the presentation. This simple step turns a good cookie into a great cookie.
Chill the Dough for Better Texture
Refrigerating the dough for 15–20 minutes before baking tightens the butter, reducing spreading. It also allows the flavors to meld, resulting in a richer taste. When you scoop chilled dough, it holds its shape better, preventing the cookies from becoming too flat. I’ve found that a chilled dough also gives a slightly firmer bite, which balances the gooey center. If you’re short on time, you can skip chilling, but the cookies will be a bit thinner.
Use a Cookie Scoop for Uniformity
Uniform cookie size ensures even baking. A cookie scoop guarantees each portion has the same volume, leading to consistent textures. It also saves time compared to measuring by hand. When you use a scoop, the cookies will look more professional, which is great for presentations. A simple kitchen tool can elevate your baking game.
Creative Twists and Variations
This recipe is a playground. Here are some of my favorite ways to switch things up:
Chocolate‑Chili Ube Cookies
Add a pinch of cayenne pepper to the dough for a subtle heat that contrasts with the sweet ube. The chili’s mild spice will awaken the palate, creating a complex flavor profile. Pair these with a glass of cold milk to balance the heat. They’re perfect for a dinner party where you want to impress guests with something unexpected.
Nutty Ube Crunch
Fold in ½ cup chopped pecans or walnuts for a crunchy texture that complements the soft cookie. The nuts add a buttery richness that pairs well with the white chocolate. Toast the nuts beforehand to enhance their flavor. This variation is ideal for a brunch spread where texture matters.
Mint‑Infused Ube Cookies
Replace the vanilla extract with 1 teaspoon of peppermint extract to give the cookies a refreshing twist. The mint’s coolness balances the sweet, earthy ube. Serve them alongside a hot beverage for a contrasting temperature experience. They’re especially good during the winter season.
Vegan Ube Cookies
Swap the butter for ½ cup coconut oil and use a flax egg (1 tablespoon ground flaxseed + 3 tablespoons water) to replace the eggs. Use plant‑based white chocolate chips for a fully vegan version. The coconut oil gives a subtle tropical flavor that enhances the ube. These cookies are perfect for a vegan gathering.
Ube Shortbread Cookies
Reduce the butter to ¼ cup and add 1 tablespoon of almond flour for a denser, shortbread texture. Keep the rest of the ingredients the same to maintain the ube flavor. These cookies are great as a tea accompaniment, offering a buttery bite with a hint of purple.
Ube Brownie Cookies
Replace half of the white chocolate chips with dark chocolate chips and add 1 tablespoon of cocoa powder to the dry mix. The result is a brownie‑like cookie with a deep chocolate flavor and a subtle ube undertone. Serve them with a scoop of vanilla ice cream for a dessert that feels indulgent.
Storing and Bringing It Back to Life
Fridge Storage
Store the cooled cookies in an airtight container at room temperature for up to a week. Keep the container in a cool, dry place away from direct sunlight. If the cookies feel slightly stale, place a slice of apple in the container to re‑hydrate them. The apple’s natural moisture will help the cookies regain softness. Avoid storing them in the fridge, as the moisture can make the cookies soggy.
Freezer Friendly
Place the cooled cookies on a parchment‑lined tray and freeze them for up to 3 months. Once frozen, transfer the cookies to a resealable bag to prevent freezer burn. When you’re ready to eat, let them sit at room temperature for 10–15 minutes to thaw. The cookies will maintain their texture and flavor, making them a convenient option for busy days.
Best Reheating Method
To revive a frozen or stale cookie, preheat your oven to 300°F (150°C) and bake the cookies for 5–7 minutes. Keep a close eye to prevent over‑baking. Alternatively, microwave the cookie on a paper towel for 10–12 seconds if you want a quick, warm treat. A splash of water added to the dough before freezing helps retain moisture during reheating. This method ensures each bite is as fresh as the day it was baked.
Additional Tips for Perfection
One of the most common mistakes I’ve seen is using cold butter. Cold butter creates a denser cookie that doesn’t spread well. The key is to let the butter soften to room temperature, but not melt. The texture of the butter directly influences the cookie’s crumb. A buttery, airy crumb is the hallmark of a well‑made cookie. Remember to let the dough rest before baking; this step is often overlooked but makes a big difference.
Another tip is to keep your measuring cups dry. If your flour or sugar cups are damp, the measurements will be off, leading to an inconsistent dough. Use a digital scale for accuracy if you have one; it’s a game‑changer for baking precision. The weight of each ingredient matters, especially when you’re scaling up or down. Accurate measurements also help when you experiment with variations, ensuring you maintain the cookie’s balance.
When it comes to flavor, don’t be afraid to experiment with extracts. A splash of almond extract can add a nutty undertone that complements the ube. A hint of orange zest can brighten the flavor profile, giving the cookie a fresh, citrusy twist. The key is to add the extract in small amounts—too much can overpower the delicate flavors. Test a small batch first before committing to a larger batch. This way, you can fine‑tune the flavor to your liking.
For those who love a crunchy texture, consider adding toasted coconut or chopped pistachios to the dough. The toasted coconut adds a subtle sweetness and crunch that balances the softness of the cookie. Pistachios provide a nutty flavor that pairs wonderfully with the ube. If you’re vegan, you can use coconut oil instead of butter and plant‑based chocolate chips to keep the recipe entirely plant‑based. These variations keep the recipe fresh and exciting.
Finally, don’t forget to have fun with the presentation. Arrange the cookies on a decorative platter with a sprinkle of powdered sugar or a drizzle of melted white chocolate. The visual appeal can elevate the eating experience. You can also use a small spoon to drizzle a thin line of ube puree over each cookie for an extra burst of flavor. The possibilities are endless, and the best part is sharing the results with friends and family.