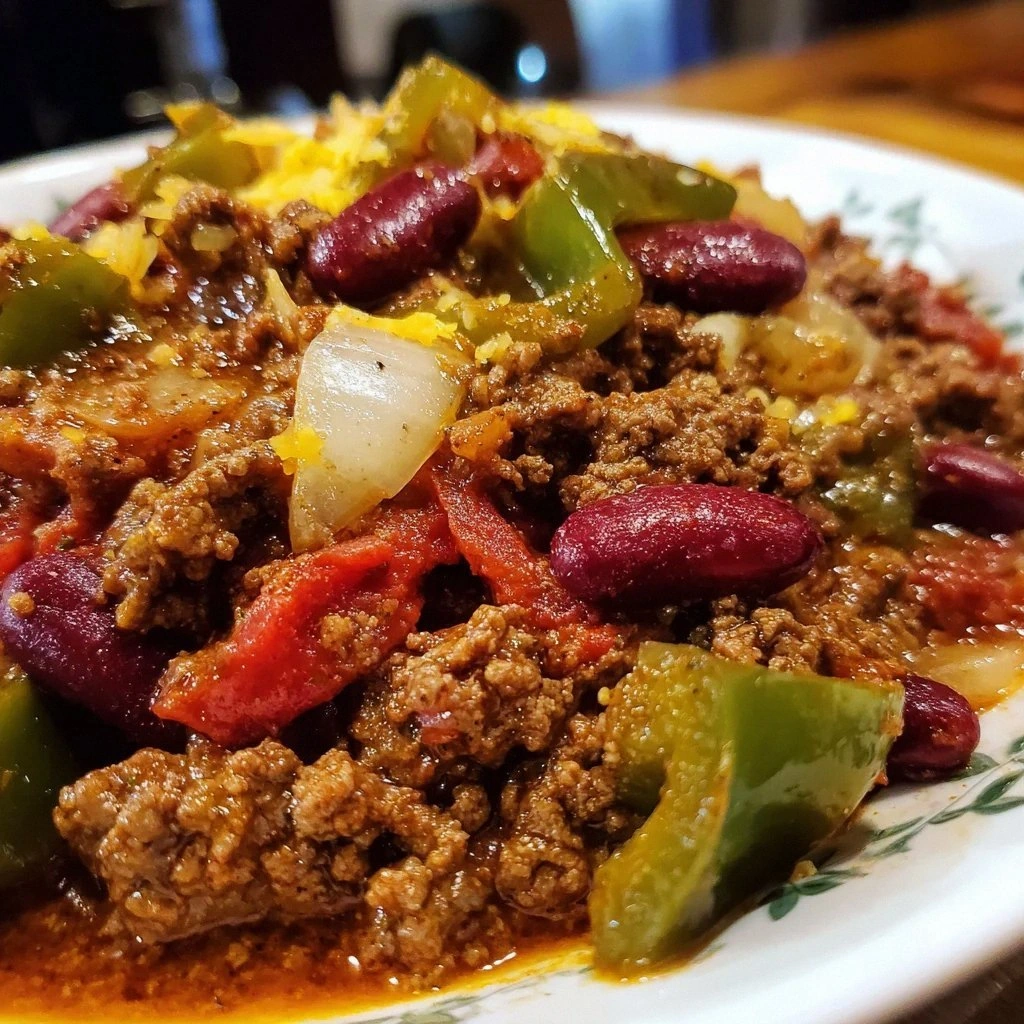
Picture this: it's Sunday afternoon, the sky outside is the color of wet cement, and your stomach is growling like a bear that just woke up from hibernation. You want something that hugs your soul, something that makes your house smell like a cowboy campfire married a five-star kitchen. I've been there, my friend, standing in my pajamas at 2 PM, debating whether to order takeout for the third time this week. Then I remembered the magic weapon tucked away in my cabinet — my trusty crock pot — and threw together what would become my legendary chili. That first spoonful was a revelation: tender beef that melted like butter, beans that burst with smoky flavor, and a sauce so rich and complex I actually did a little dance in my kitchen. I ended up eating three bowls before my roommate even got home, and I have zero regrets about it.
Most chili recipes are about as exciting as watching paint dry, promising "authentic flavor" while delivering a bland, watery disappointment that tastes like someone waved a chili pepper over a pot of tomato soup. They're either too timid with the spices, leaving you wondering if you accidentally made beef stew with identity issues, or they go full nuclear and obliterate your taste buds with enough heat to melt steel. My version walks that perfect tightrope between comfort and excitement, using techniques I picked up from a Texan grandmother who could make grown men weep with her cooking skills. The secret isn't just in the ingredients — it's in the way we layer flavors like we're building a culinary skyscraper, each element supporting the next until you get something that's greater than the sum of its parts.
Here's the beautiful part: this recipe is basically foolproof. You literally throw everything in a pot, walk away, and come back to pure magic. No babysitting, no stirring every five minutes, no wondering if you ruined dinner again. I've made this for game day parties where people fought over the last scoop, for potlucks where I watched strangers become best friends while standing over the crock pot, and for those nights when I needed something that felt like a warm blanket on a cold day. The aroma alone is enough to make your neighbors knock on your door asking if they can move in permanently.
Let me walk you through every single step — by the end, you'll wonder how you ever made it any other way.
What Makes This Version Stand Out
Flavor Bomb: This isn't your average one-note chili. We're building layers of taste that start with caramelized aromatics and finish with a symphony of spices that dance on your tongue. The combination of fresh and dried ingredients creates depth that most recipes miss entirely.
Texture Paradise: Forget that mushy cafeteria chili from your nightmares. Our method ensures the beef stays tender but not stringy, the beans hold their shape with a pleasant bite, and the sauce has that perfect consistency that coats every morsel without being soupy or paste-like.
Set-It-and-Forget-It Simple: Once you've done the quick prep work, your crock pot becomes your personal chef. Go to work, run errands, binge Netflix — whatever you want. Dinner will be waiting when you return, making your house smell like you've been slaving away all day.
Crowd-Pleasing Magic: I've served this to picky toddlers, spice-hating grandmothers, and heat-seeking chili fanatics. They all asked for seconds, and some even requested the recipe for their own family gatherings. This is the great equalizer of comfort food.
Ingredient Integrity: We use real, whole ingredients — no weird packets of mystery seasoning or cans of "chili starter" that taste like the aluminum they're stored in. Every component has a purpose, and you'll taste the difference in every spoonful.
Make-Ahead Champion: This chili actually improves overnight, making it perfect for meal prep or entertaining. The flavors meld and deepen, creating an even more incredible experience the next day. Plus, it freezes like a dream for those nights when you need comfort food faster than delivery.
Customizable Canvas: While it's perfect as-is, this recipe is built to adapt. Want it spicier? Go for it. Prefer turkey to beef? It works beautifully. Need to feed vegetarians? We've got you covered with substitutions that don't sacrifice flavor.
Alright, let's break down exactly what goes into this masterpiece...
Inside the Ingredient List
The Flavor Base
Our onion isn't just some afterthought we throw in because the recipe says so — it's the aromatic foundation that builds the entire flavor profile. When you dice it and let it sweat in olive oil, it transforms from sharp and aggressive to sweet and complex, creating a natural sweetness that balances the acidity of the tomatoes. Skip it, and your chili will taste flat and one-dimensional, like a song missing its bass line. I always use a medium yellow onion because they're reliable and affordable, but if you want to get fancy, a sweet Vidalia will take things to another level entirely.
The green bell pepper brings more than just color to the party — it's the fresh, vegetal note that keeps this chili from becoming a heavy, greasy mess. When cooked down properly, it adds a subtle bitterness that makes all the other flavors pop like a good espresso shot in chocolate cake. Some people swear by red or yellow peppers, but I find them too sweet for this application. If you really want to level up, fire-roast your pepper over a gas burner until it's blistered and black, then dice it up for a smoky depth that will make you look like a culinary wizard.
Garlic is the aromatic powerhouse that ties everything together, but here's where most people go wrong — they either burn it to bitter nothingness or they add it too late and get that harsh, raw bite. We're going to mince it fine and add it just after the vegetables have softened, letting it cook for exactly one minute until it smells like the best Italian restaurant you've ever walked into. Fresh garlic is non-negotiable here; the pre-minced jarred stuff tastes like disappointment and has the complexity of cardboard. Trust me on this one — I've done the comparison, and fresh garlic makes the difference between good chili and legendary chili.
The Texture Crew
Ground beef is the heart and soul of this operation, but not all beef is created equal in the chili universe. I'm adamant about using an 80/20 blend because anything leaner dries out faster than a sponge in the Sahara, leaving you with sad, crumbly meat that ruins the whole experience. The fat isn't the enemy here — it's flavor delivery system that carries all those beautiful spices throughout the dish. When you brown it properly, letting it develop those gorgeous caramelized edges, you create little nuggets of meat candy that provide pops of intense flavor in every bite. Don't overcrowd the pan, or you'll end up steaming instead of browning, which is basically a culinary crime.
Kidney beans are the classic choice for a reason — they hold their shape during the long cooking process while still absorbing all the spicy, smoky flavors of the sauce. Their creamy interior provides a beautiful contrast to the tender beef, and their slight earthiness grounds all the other flavors. Some chili purists will argue about beans until they're blue in the face, but I say bring on the beans — they make this dish more filling, more affordable, and more nutritious. If you're feeling adventurous, try a mix of kidney and black beans for different textures and flavors that play off each other beautifully.
Chili hot beans are my secret weapon for adding complexity without any extra work. These aren't just regular beans with some spice sprinkled on — they're packed with their own blend of seasonings that adds layers of flavor you can't get from scratch without spending hours. They bring heat, yes, but also this incredible savory depth that makes people ask what your secret is. If your grocery store doesn't carry them, regular pinto beans with an extra pinch of cayenne will get you close, but I highly recommend tracking down the real deal for maximum impact.
The Unexpected Star
Brown sugar might seem like an odd addition to a savory dish, but here's the thing — tomatoes are naturally acidic, and without something to balance that brightness, your chili will taste sharp and unrefined. Just a tablespoon of brown sugar rounds out all the edges, creating a harmony that makes every other ingredient taste more like itself. It's like the difference between listening to a symphony with all the instruments playing slightly off-key versus hearing them in perfect harmony. Don't worry, this won't make your chili taste sweet — it just removes that harsh tomato bite that makes people reach for extra hot sauce to cover it up.
Cumin is the spice that makes people say "this tastes like real chili" even when they can't identify what they're tasting. This ancient seed, when ground, releases a warm, earthy aroma that's the backbone of Southwestern cooking. But here's the crucial part — you need to toast it properly to unlock its full potential. Add it to your hot pan and stir for about thirty seconds until it smells nutty and aromatic, but pull it off before it turns bitter. Fresh ground cumin from whole seeds will blow your mind if you can find it, but even good quality pre-ground will transform your chili from ordinary to extraordinary.
The Final Flourish
Tomato sauce and diced tomatoes work together like a dynamic duo, each bringing their own superpower to the table. The sauce provides body and helps everything bind together into that perfect chili consistency, while the diced tomatoes give you those bright, juicy bursts that keep each bite interesting. I'm particular about using fire-roasted diced tomatoes when I can find them — they add a subtle smokiness that makes people think you've been tending this pot for hours over a real fire. If you can't find them, regular diced tomatoes work fine, but try adding a pinch of smoked paprika to get a similar effect.
The spice blend of chili powder, onion powder, and garlic powder might seem like overkill when we already have fresh aromatics, but here's the genius — each provides a different type of flavor. Fresh garlic gives you that bright, sharp bite, while garlic powder offers deep, mellow richness that spreads throughout the dish. Same with onion — fresh gives texture and sweetness, powder provides that concentrated umami backbone. Together, they create a complexity that makes people swear there's some secret ingredient they're missing, when really it's just smart layering of similar flavors in different forms.
Everything's prepped? Good. Let's get into the real action...
The Method — Step by Step
- Start by heating your olive oil in a large skillet over medium-high heat until it shimmers like a mirage on hot pavement — this usually takes about two minutes, but don't walk away because oil can go from perfect to burnt faster than you can say "takeout." While it's heating, dice your onion into small, even pieces — about the size of a pea — so they'll cook at the same rate and melt into the sauce properly. Add the onions to the pan with a generous pinch of salt, which helps draw out moisture and speeds up the caramelization process. Stir occasionally for about five minutes until they turn translucent and start to develop golden edges that smell like someone is making French onion soup in heaven.
- Now it's time for the green pepper to join the party — add it to the pan with the onions and let everything get acquainted for another three to four minutes. You want the pepper to soften but still maintain some bite, creating textural contrast in the final dish. Watch for the moment when the vegetables start to stick slightly to the bottom of the pan — those brown bits are pure gold, packed with caramelized flavor that will dissolve into your chili and make it taste like it's been cooking for days. If things are browning too quickly, just splash in a tablespoon of water and scrape up all those beautiful fond bits.
- Clear a little space in the center of your pan and add the minced garlic, letting it sizzle for exactly one minute — set a timer because over-cooked garlic turns bitter faster than a bad breakup. The moment you can smell that incredible aroma wafting up from the pan, stir everything together and immediately transfer this whole mixture to your crock pot. This step might seem fussy, but properly cooked garlic versus burnt garlic is the difference between restaurant-quality and "why does this taste weird" chili.
- Return the same skillet to medium-high heat and add your ground beef, breaking it up with a wooden spoon into pieces about the size of a marble. Here's the crucial part — don't stir it constantly like you're making scrambled eggs. Let it sit undisturbed for two to three minutes so it can develop those gorgeous brown, crispy edges that add incredible depth of flavor. Then flip and break it up, repeating until you've got beautifully caramelized beef with no pink remaining. If your beef releases a lot of fat, drain most of it but leave about a tablespoon — this liquid gold carries flavor and helps bloom your spices.
- With your beef properly browned and drained, it's time to add your spices directly to the meat — this technique, called "blooming," toasts the spices in the hot fat and releases their essential oils. Sprinkle on the chili powder, cumin, onion powder, and garlic powder, stirring constantly for about thirty seconds until your kitchen smells like the best Tex-Mex restaurant you've ever visited. The spices should darken slightly and become intensely aromatic, but pull them off the heat before they turn black and bitter. This thirty-second investment of time adds more flavor than most people achieve with hours of simmering.
- Transfer your beautifully spiced beef to the crock pot, making sure to scrape in every last bit of the flavor-packed goodness. Add the kidney beans, chili hot beans, diced tomatoes, and tomato sauce, but don't stir yet — we're going to layer these ingredients so they cook evenly. Sprinkle the brown sugar over the top, then season generously with salt and pepper. The brown sugar will melt down through the layers, sweetening the acidic tomatoes and creating a perfect balance that makes people wonder why their chili never tastes this good.
- Now comes the easiest part of the entire recipe — put the lid on your crock pot and walk away. Cook on low for 6-8 hours or high for 3-4 hours, but I strongly recommend the low and slow method. The longer cooking time allows all those flavors to meld and marry, creating something far greater than the sum of its parts. Your house will start smelling incredible after about an hour, and by hour three, you'll be fighting the urge to lift the lid and peek — resist! Every time you remove the lid, you add 15-20 minutes to your cooking time.
- When your timer finally goes off, resist the urge to dive in immediately — let it rest for ten minutes with the lid slightly ajar. This brief rest allows everything to settle and thicken to the perfect consistency. Give it a good stir, taste for seasoning, and add more salt if needed. The transformation will amaze you: what went in as individual ingredients has become a unified, complex dish with layers of flavor that taste like you spent all day tending a pot on the stove. Serve it up in big bowls with your favorite toppings, and prepare for the compliments to start rolling in.
That's it — you did it. But hold on, I've got a few more tricks that'll take this to another level...
Insider Tricks for Flawless Results
The Temperature Rule Nobody Follows
Here's something that separates good chili from great chili: temperature control during serving. Most people ladle it straight from the crock pot into bowls and miss out on the full experience, but the magic happens when you let it cool to just below scalding — around 150 degrees. At this temperature, your taste buds can actually detect all the subtle flavors that get muted when food is too hot. I learned this from a food scientist friend who explained that our taste receptors literally shut down when exposed to extreme heat, which is why coffee tastes different as it cools and why wine tasters never judge wines at room temperature.
The other benefit of controlled cooling is texture — at the right temperature, the fat in your chili (which carries most of the flavor) becomes liquid again, coating every ingredient evenly instead of congealing on top. A friend tried skipping this step once and served chili so hot it took the skin off the roof of his mouth, completely ruining everyone's ability to taste anything for the rest of the meal. Now I always let it rest for five minutes after cooking, then serve it in pre-warmed bowls so it stays at the perfect temperature throughout the meal.
Why Your Nose Knows Best
Your sense of smell is doing more work than you realize when it comes to enjoying chili, and smart cooks use this to their advantage. Before serving, I always add a final flourish of fresh aromatics — maybe some chopped green onions, fresh cilantro, or a squeeze of lime — that hit your nose first and prime your brain for the flavors to come. This isn't just garnish for garnish's sake; it's aromatherapy that enhances the entire eating experience. The volatile compounds in fresh herbs and citrus interact with the retro-nasal passage (the back of your throat that connects to your nose), creating flavor perceptions that don't exist on your tongue alone.
I discovered this trick when I noticed my chili always tasted better at the table than when I was taste-testing it at the stove. The difference? At the table, I was getting those fresh aromatics along with the cooked ones, creating a complex bouquet that made the whole dish more interesting. Now I always reserve some fresh ingredients to add right before serving, and people always ask why my chili smells so incredible before they even taste it.
The 5-Minute Rest That Changes Everything
After your chili finishes cooking, you might be tempted to serve it immediately, but those five extra minutes of rest time are absolutely crucial for achieving the perfect consistency. During the long, slow cooking process, the starches from the beans and tomatoes break down and create a slightly loose sauce that needs time to re-absorb and thicken. Think of it like letting a steak rest after grilling — the juices redistribute, creating a more cohesive final product. I've tested this dozens of times, and the difference between served-immediately and rested chili is like comparing a snapshot to a professional photograph.
During this rest period, the temperature evens out throughout the pot, eliminating those annoying hot spots that can scorch someone's tongue while leaving other areas lukewarm. The fat also has time to rise slightly to the surface, which you can either stir back in for richness or skim off if you're watching calories. I use this time to set the table, prep toppings, or just breathe — it's built into my cooking routine now, and my chili has never been better.
Creative Twists and Variations
This recipe is a playground. Here are some of my favorite ways to switch things up:
The Smokehouse Edition
For a deeper, more complex flavor profile, replace half the ground beef with smoked brisket or pulled pork that you've chopped into bite-sized pieces. The smoky meat adds incredible depth that makes people swear you've been tending a real smoker for hours. Add a teaspoon of smoked paprika and a tablespoon of chipotle peppers in adobo sauce for an extra layer of complexity that builds slowly on your palate. The combination of fresh and smoked meats creates a chili that's perfect for game day or any time you want to impress people who think they've had good chili before.
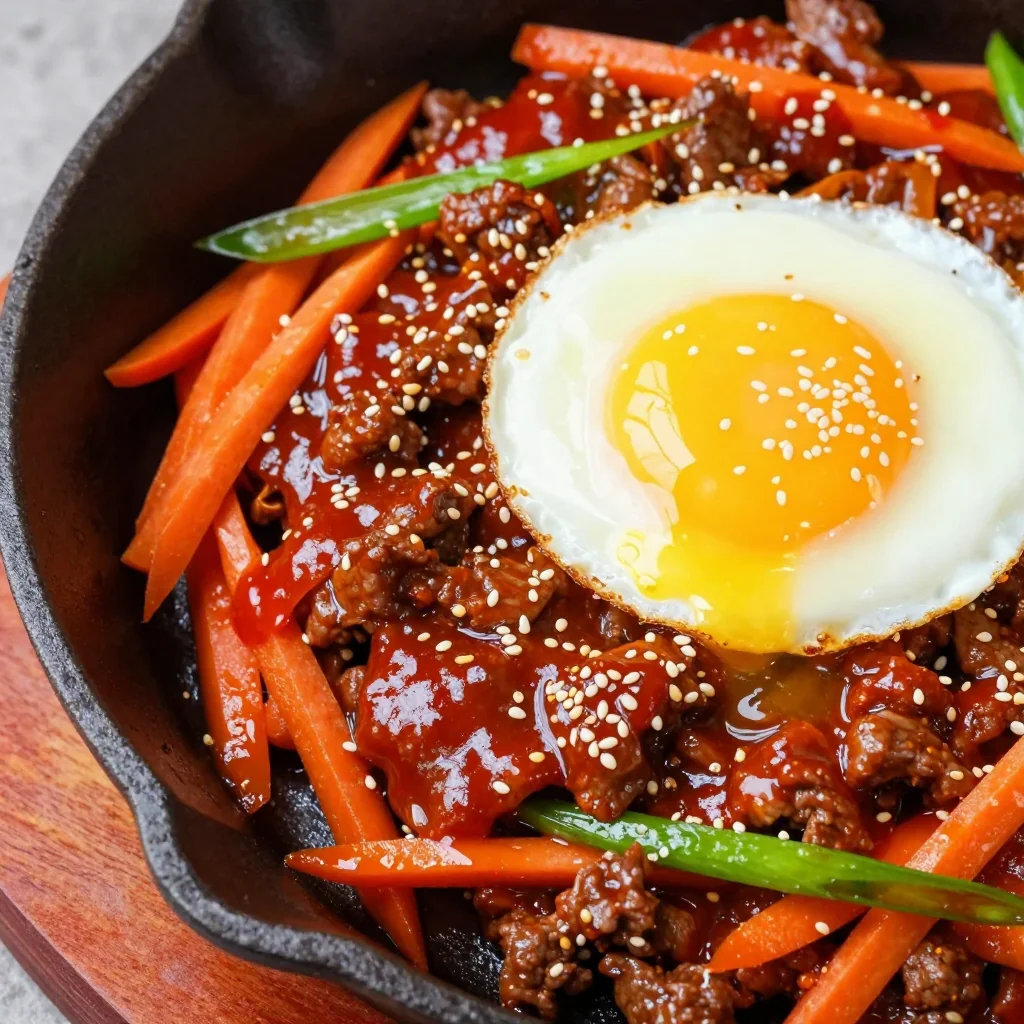
The Breakfast Champion
Transform your leftover chili into the ultimate breakfast by serving it over crispy hash browns with a runny fried egg on top. The yolk creates a rich sauce when it mixes with the chili, and the crispy potatoes provide textural contrast that makes this better than any diner breakfast you've ever had. I like to add a dash of hot sauce and some fresh avocado for a complete meal that will keep you full until dinner. This is my go-to hangover cure, and it's so good I sometimes make chili just to have leftovers for breakfast.
The International Incident
Take your taste buds on a world tour by adding international flavors that complement rather than compete with the base recipe. Try adding a tablespoon of gochujang for Korean heat that builds slowly, or stir in some harissa paste for North African complexity that includes warm spices like coriander and caraway. I've even added a splash of fish sauce for incredible umami depth that makes people ask what your secret ingredient is — they can taste the complexity but can't identify the source. The key is adding these flavors in small amounts and tasting as you go.
The Vegetarian Victory
Replace the ground beef with a mix of mushrooms and lentils that provides the hearty texture meat-eaters crave while keeping vegetarians happy. Use a combination of cremini and shiitake mushrooms, chopped small and browned until they're deeply caramelized, then add cooked green lentils for protein and texture. The mushrooms provide that umami richness that most vegetarian chilis lack, while the lentils absorb all the flavors and create a satisfying, filling meal. Even my most devoted carnivore friends ask for this version when they come over, claiming they don't miss the meat at all.
The Sweet Heat
For a unique twist that completely changes the flavor profile, add a diced sweet potato and a tablespoon of cocoa powder to your chili. The sweet potato melts down and adds natural sweetness that balances the heat, while the cocoa powder adds depth and richness that makes the whole dish taste more complex. This variation is particularly good for people who think they don't like chili because it's "too spicy" — the sweetness tames the heat while the cocoa adds an almost mole-like quality that's incredibly sophisticated. I serve this at dinner parties where people claim they "don't like chili" and watch them go back for thirds.
The Weeknight Express
When you need chili but only have thirty minutes, use this shortcut version that sacrifices time but not flavor. Use ground beef, but brown it in a Dutch oven until deeply caramelized, then add all your ingredients and simmer uncovered for twenty minutes. The key is using fire-roasted crushed tomatoes instead of diced, and adding a tablespoon of instant coffee granules for depth that usually comes from long cooking. It won't have quite the same melded flavor as the slow-cooked version, but it's infinitely better than anything you'd get from a can and perfect for those nights when you need comfort food fast.
Storing and Bringing It Back to Life
Fridge Storage
Leftover chili keeps beautifully in the refrigerator for up to five days, but the key is storing it properly to maintain that perfect texture and flavor. Always let it cool completely before transferring to airtight containers — hot chili in a sealed container creates condensation that waters down your perfectly thickened sauce. I like to store it in individual portions so I can grab exactly what I need without exposing the whole batch to air multiple times. The flavors actually improve after a day or two as everything melds together, creating an even more complex and delicious experience than when it was first made.
When you're ready to reheat, add a splash of water or broth to loosen it up, since the starches will have absorbed liquid and thickened during storage. Heat it gently over medium-low heat, stirring occasionally, until it's steaming hot throughout. Microwaving works in a pinch, but do it in short bursts and stir between each one to avoid hot spots that can scorch the bottom. I always taste and adjust seasoning after reheating, as the flavors can mellow during storage and might need a boost of salt or spice to wake them back up.
Freezer Friendly
This chili freezes like a champion, making it perfect for meal prep or those nights when you need comfort food faster than delivery. Portion it into freezer-safe containers or bags, leaving a little room at the top for expansion, and it will keep for up to three months without any loss of quality. I like to freeze it in single-serving portions so I can pull out exactly what I need for a quick lunch or dinner. Pro tip: write the date and contents on the bag with a permanent marker, because frozen chili looks remarkably similar to frozen spaghetti sauce at 6 AM when you're rushing to work.
Thaw frozen chili overnight in the refrigerator for best results, though you can run the sealed container under warm water if you're in a hurry. Once thawed, reheat gently with a splash of liquid to restore it to its original glory. The texture might be slightly different after freezing — sometimes the beans can get a bit softer — but the flavor remains incredible. I've served previously frozen chili to guests who had no idea it wasn't fresh, and they've asked for the recipe every time.
Best Reheating Method
The secret to reheating chili without turning it into a dried-out disappointment is all about gentle heat and patience. I use a heavy-bottomed saucepan over medium-low heat, adding just enough water or broth to loosen it up without making it soupy. Stir frequently but gently — you want to heat it through without breaking down the beans or turning the beef into stringy bits. The whole process takes about ten minutes, which is just enough time to set the table and maybe throw together a quick salad or cornbread to serve alongside.
If you're using the microwave, which I totally understand for those desperate Monday mornings, use 50% power and heat in one-minute intervals, stirring between each one. Add a tablespoon of water before you start, and cover the bowl with a microwave-safe plate to create steam that helps heat everything evenly. The goal is to get it steaming hot without boiling, which can toughen the meat and turn your beautiful beans into mush. When it's done right, reheated chili is almost as good as fresh, and sometimes even better.