
A comforting, cheesy casserole that turns a simple weeknight dinner into a celebration of flavor.
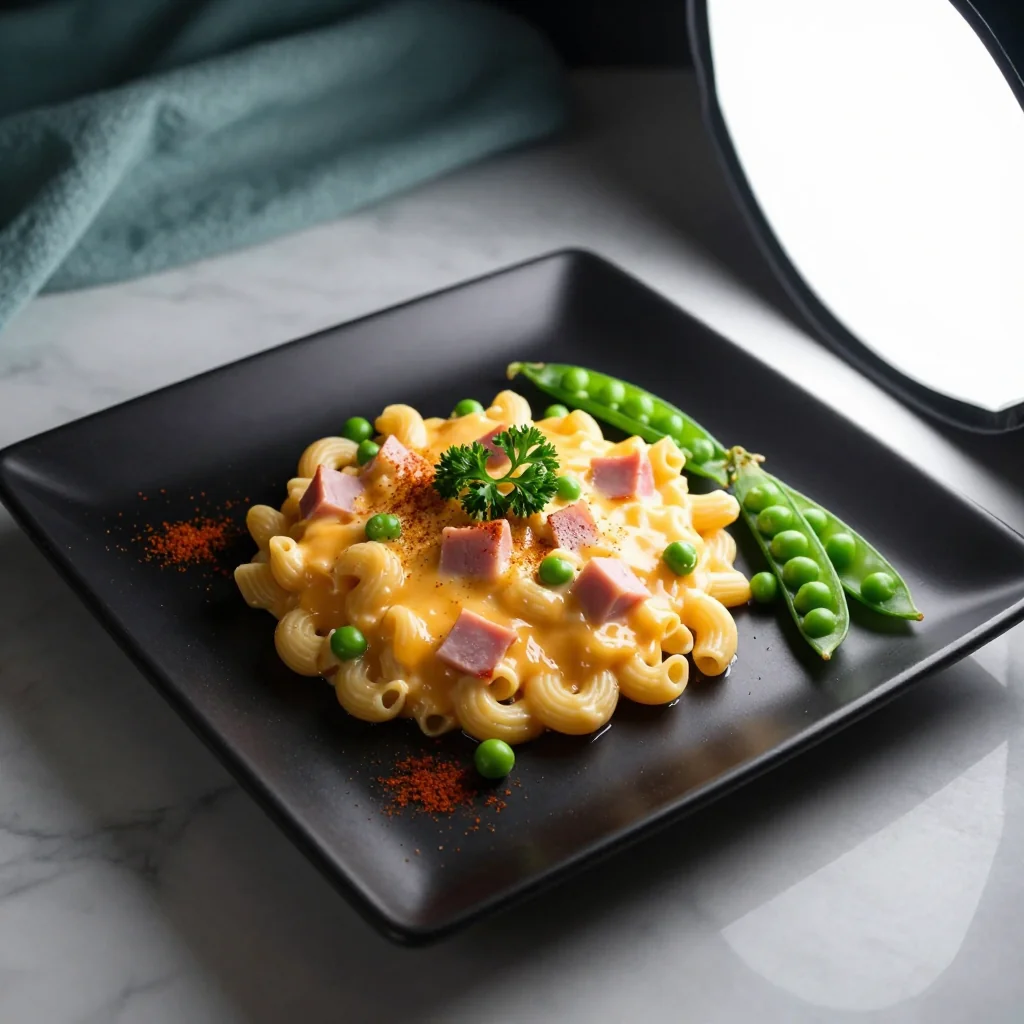
When I was a child, the smell of bubbling cheese drifting from the kitchen was the soundtrack of my happiest evenings. My mother would pull a tray of golden‑crowned macaroni out of the oven, and the entire family would gather around, each spoonful a warm hug. Years later, after countless experiments with sauces and cheeses, I finally perfected a version that balances richness with freshness: Creamy Macaroni and Cheese with Ham and Peas.
This dish hails from the classic American comfort food tradition, where pasta meets dairy in a luscious embrace. Adding smoked ham introduces a savory depth, while sweet green peas provide a burst of color and a subtle sweetness that cuts through the richness. It’s a recipe that feels both nostalgic and fresh, perfect for any season.
In this article, I’ll walk you through every step—from selecting the best cheddar to achieving that velvety sauce that clings perfectly to each elbow. You’ll also discover pro tips that turn an ordinary casserole into a restaurant‑quality centerpiece, and variations that let you tailor it to vegetarian, low‑fat, or globally‑inspired twists.
So preheat your oven, roll up your sleeves, and let’s bring this beloved classic to your table.
🌟 Why This Recipe Will Win Your Heart
From the first bite to the lingering aftertaste, this dish offers layers of comfort, flavor, and practicality that make it a staple for any home cook.
- ✨ Unbeatable Creaminess: The blend of milk, heavy cream, and sharp cheddar creates a sauce that coats every curve of the macaroni without feeling greasy.
- ✨ Balanced Sweet‑Savory Profile: Smoked ham adds depth while peas introduce a natural sweetness, preventing the dish from becoming one‑dimensional.
- ✨ Simple Ingredient List: All ingredients are pantry‑friendly, meaning you won’t need a trip to a specialty store.
- ✨ Adaptable for All Diets: Swap ham for smoked tofu, dairy for plant‑based alternatives, and you still get a satisfying result.
- ✨ Crowd‑Pleaser: Kids love the cheesy goodness, adults appreciate the nuanced flavors—perfect for family dinners or potlucks.
- ✨ Make‑Ahead Friendly: You can assemble the casserole a day ahead, refrigerate, and bake when ready, saving time on busy nights.
🥗 Ingredients
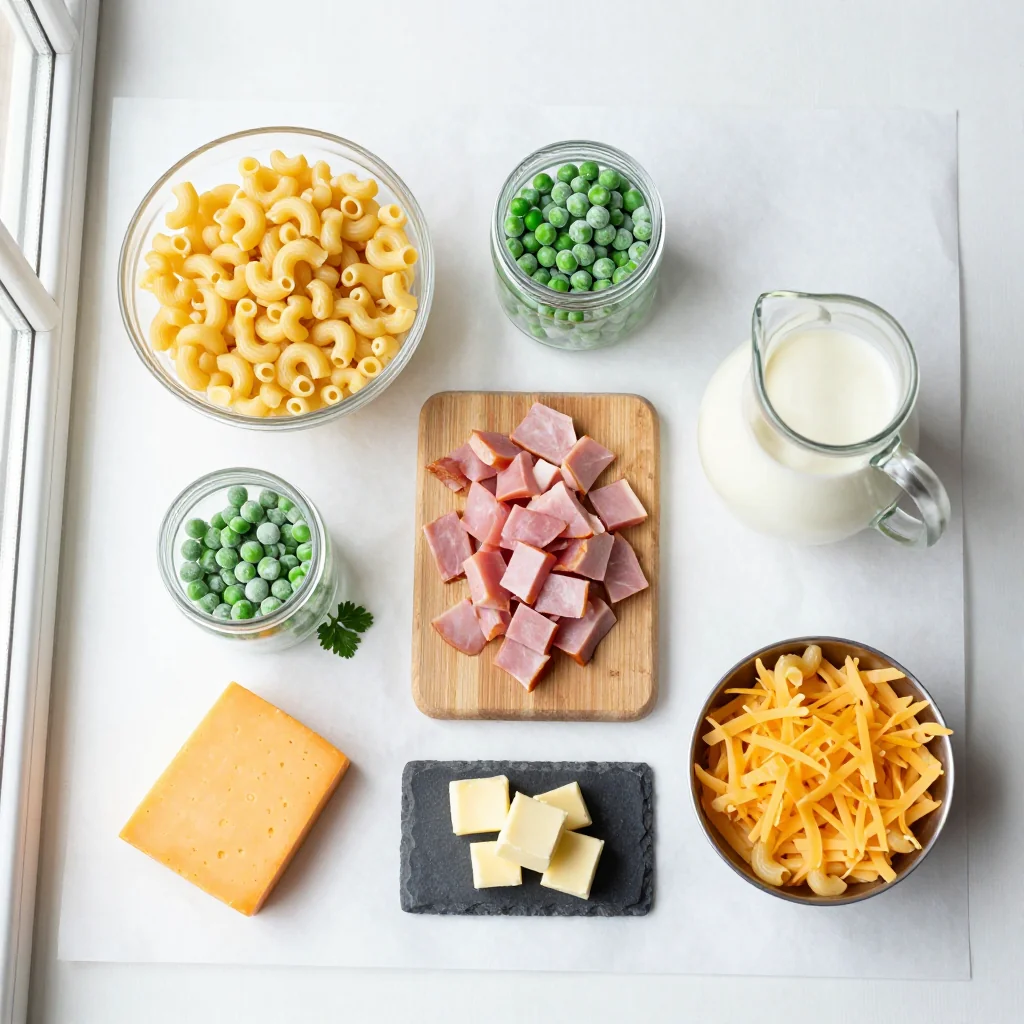
📝 Complete Ingredient List
For the Pasta:
For the Cheese Sauce:
For the Topping:
🔍 Focus on Key Ingredients
Elbow Macaroni
Elbow macaroni’s ridged shape traps the cheese sauce, ensuring every bite is coated. Look for durum wheat semolina pasta for a firm bite that won’t turn mushy during baking.
Sharp Cheddar Cheese
Sharp cheddar provides a robust flavor and melts smoothly. For the best texture, grate the cheese yourself rather than using pre‑shredded varieties, which often contain anti‑caking agents that can affect smoothness.
Smoked Ham
The ham adds a smoky, salty depth that balances the sweetness of peas. Choose a high‑quality smoked ham with a good meat‑to‑fat ratio; if you prefer a leaner option, turkey ham works well too.
🔄 Quick Substitutions
| If you don’t have... | Use instead... |
|---|---|
| Elbow macaroni | Shells or penne |
| Sharp cheddar | Gruyère or aged gouda |
| Smoked ham | Diced cooked bacon or smoked tofu |
👨🍳 Step‑by‑Step Instructions
Follow these detailed steps for a perfectly creamy, golden‑crowned casserole.
📋 Phase 1: Preparation and Mise en Place
Gather and prep all components before you start cooking.
Cook the Pasta
Bring a large pot of salted water to a boil. Add the elbow macaroni and cook for 6‑7 minutes, just shy of al dente. Drain and set aside, drizzling a thin layer of olive oil to prevent sticking.
Prepare the Ham and Peas
While the pasta cooks, dice the smoked ham into bite‑size cubes. If using frozen peas, briefly blanch them in boiling water for 2 minutes, then shock in ice water to retain their vibrant green color.
🔥 Phase 2: Cooking the Cheese Sauce and Assembling
Create a silky sauce that binds all flavors together.
Make the Roux
In a large saucepan over medium heat, melt the butter. Sprinkle the flour over the butter and whisk continuously for 2 minutes, forming a golden roux that will thicken the sauce without lumps.
Whisk in Milk and Cream
Slowly pour the whole milk and heavy cream into the roux while whisking. Continue to whisk until the mixture thickens, about 4‑5 minutes, reaching a smooth, velvety consistency.
Incorporate Cheese and Seasonings
Reduce the heat to low. Stir in the mustard powder, nutmeg, and a pinch of salt and pepper. Gradually add the shredded cheddar, allowing it to melt fully before adding the Parmesan. The sauce should be glossy and thick enough to coat the back of a spoon.
✨ Phase 3: Finishing Touches and Baking
Combine, top, and bake to golden perfection.
Combine Pasta, Ham, Peas, and Sauce
In a large mixing bowl, gently fold the cooked macaroni, diced ham, peas, and cheese sauce together until everything is evenly coated. Transfer the mixture into a greased 9‑x‑13‑inch baking dish.
Prepare the Crunchy Topping
In a small bowl, combine panko breadcrumbs, grated Parmesan, and melted butter. Sprinkle the mixture evenly over the casserole, ensuring full coverage for a crunchy crust.
Bake Until Golden
Place the dish in a preheated oven at 190°C (375°F). Bake for 20‑25 minutes, or until the topping turns a deep golden brown and the sauce bubbles around the edges.
💡 Expert Tips and Tricks
🛒 Choosing the Right Ingredients
Opt for a high‑quality sharp cheddar that’s aged at least 12 months; it melts smoothly and offers a deep flavor. When selecting ham, look for a piece with a thin layer of fat, as this renders during cooking, adding moisture without becoming greasy. Fresh peas provide a pop of sweetness and a bright color, but if you’re out of season, frozen peas work just as well after a quick blanch.
🔪 Preparation Techniques
Dry the cooked pasta briefly with a clean kitchen towel before mixing with the sauce; excess water can dilute the cheese sauce. When grating cheese, use the fine side of a box grater for a smoother melt. Dice ham uniformly so every bite has a balanced ham‑to‑pasta ratio.
🌡️ Mastering the Cooking Process
Maintain a medium‑low heat while whisking the sauce to avoid scorching. If the sauce thickens too quickly, add a splash of milk to loosen it. The final bake should be watched closely; the crust should be golden, not burnt, which usually occurs after 22 minutes.
🍽️ Presentation and Service
Let the casserole rest for 5 minutes after removing it from the oven; this allows the sauce to set, making serving cleaner. Garnish with a sprinkle of fresh chives or parsley for a pop of color. Serve alongside a crisp green salad dressed with a light vinaigrette to cut through the richness.
🏆 Pro‑Level Hacks
Elevate your casserole from home‑cooked comfort to restaurant‑grade brilliance with these insider secrets.
- 🎯 Use a Double Boiler for the Sauce: Cooking the roux and milk over a double boiler prevents scorching and yields an ultra‑silky texture, because the gentle heat distributes evenly.
- 🎯 Toast the Breadcrumbs Separately: Lightly toast panko in a skillet with butter before sprinkling on top; this adds a deeper, nutty flavor and ensures an even crunch.
- 🎯 Add a Touch of Umami: Stir in a teaspoon of miso paste or a splash of Worcestershire sauce into the cheese sauce for a subtle savory depth that balances the dairy richness.
- 🎯 Finish with a Drizzle of Truffle Oil: A few drops of white truffle oil right before serving adds an aromatic luxury without overwhelming the dish.
- 🎯 Incorporate a Crunchy Layer of Crispy Onions: Top the casserole with fried shallots in the last 5 minutes of baking for an extra textural contrast.
- 🎯 Use a Silicone Baking Mat: Lining the dish with a silicone mat prevents sticking and makes cleanup effortless while preserving the crust’s integrity.
“Great cooking is about balance—richness, texture, and a hint of surprise. This dish nails all three.” — Thomas Keller
🔄 Variations and Adaptations
The base recipe is a versatile canvas; feel free to experiment with flavors, textures, and dietary needs.
🥬 Vegetarian / Vegan Version
Swap smoked ham for smoked tempeh or diced roasted cauliflower. Replace dairy with plant‑based butter, flour, oat milk, and a blend of vegan cheddar and nutritional yeast for that cheesy bite.
- Use 200 g smoked tempeh, cubed, marinated in soy sauce and smoked paprika.
- Replace heavy cream with 1 cup coconut cream for richness.
🌶️ Flavor Twists
Play with global spices to create exciting new profiles.
Spicy Jalapeño Kick
Fold in 1‑2 finely diced jalapeños and a pinch of cayenne into the cheese sauce for heat that awakens the palate.
Mediterranean Flair
Add ½ cup chopped sun‑dried tomatoes, ¼ cup Kalamata olives, and a sprinkle of oregano. Finish with feta crumbles before baking.
Asian‑Inspired Twist
Stir in 1 tbsp soy sauce, 1 tsp sesame oil, and ½ cup shredded carrots. Top with toasted sesame seeds after baking.
⚠️ Dietary Adjustments
Gluten‑Free
Swap regular pasta for gluten‑free elbow macaroni and ensure the flour used in the roux is a gluten‑free blend (rice flour works well).
Lactose‑Free
Use lactose‑free milk and a dairy‑free cheese blend (e.g., a mix of dairy‑free cheddar and mozzarella). Coconut cream can replace heavy cream.
Low‑Calorie
Reduce butter to 1 tbsp, use low‑fat milk, and substitute half the cheddar with reduced‑fat cheese. Increase peas to 150 g for added volume without many calories.
👶 Kid‑Friendly Version
Omit the nutmeg and mustard powder, and use a milder cheese such as mild cheddar or mozzarella. Serve with a side of carrot sticks to add color and nutrition.
📦 Storage and Reheating
🧊 Conservation
Refrigerator:
- Duration: 3 days
- Container: Airtight glass or plastic container
- Tip: Place a sheet of parchment paper over the top before sealing to keep the crust crisp.
Freezer:
- Duration: 2 months
- Method: Cool completely, then wrap tightly in foil and place in a freezer‑safe bag.
- Defrost: Thaw overnight in the refrigerator before reheating.
💡 For best texture, reheat from frozen using the oven method; microwaving can make the sauce watery.
♨️ Reheating
🔥 Oven (Recommended)
- Preheat to 180°C (350°F).
- Cover with aluminum foil to prevent drying.
- Heat for 20 minutes.
- Remove foil and bake another 5‑7 minutes to restore the crispy topping.
⚡ Microwave (Quick)
- Place a portion on a microwave‑safe plate.
- Cover with a microwave‑safe lid.
- Heat on medium power for 2 minutes, stir, then continue in 30‑second bursts.
🍳 Stovetop
Transfer a portion to a skillet, add a splash of milk, and heat over low heat, stirring gently until warmed through.
🍷 Perfect Pairings
🥗 Side Dishes
- Mixed Green Salad: A simple vinaigrette balances the richness of the casserole.
- Garlic Roasted Brussels Sprouts: Their caramelized edges add a pleasant bitterness.
- Steamed Asparagus with Lemon Zest: Light, bright, and adds a pop of color.
🍷 Wine & Beverage
- Chardonnay (oaked): Its buttery notes echo the creaminess while its acidity cuts through the fat.
- Riesling (off‑dry): A hint of sweetness complements the peas and ham.
- Non‑Alcoholic: Sparkling apple cider provides a crisp, refreshing contrast.
🍰 To Complete the Meal
Start with a light citrus‑y appetizer such as a shrimp cocktail. Follow the main course with a classic apple crumble—its warm spices echo the nutmeg in the casserole while offering a sweet finish.
❓ Frequently Asked Questions
Q: Can I use a different shape of pasta?
A: Absolutely! Shells, penne, or even cavatappi work well because their ridges trap the sauce. Just adjust the cooking time so the pasta is al dente before mixing with the sauce.
Q: How do I prevent the cheese sauce from becoming grainy?
A: Keep the heat moderate when adding cheese, stirring constantly. Adding the cheese off the heat and allowing residual warmth to melt it gently also helps maintain a smooth texture.
Q: What if I don’t have panko breadcrumbs?
A: Traditional breadcrumbs work fine, but for extra crunch, toast them in a pan with a little melted butter before sprinkling on top.
Q: Can I make this recipe ahead of time?
A: Yes! Assemble the casserole, cover tightly, and refrigerate up to 24 hours before baking. This allows the flavors to meld and saves time on busy evenings.
Q: How can I make the dish lower in fat?
A: Substitute half the butter with olive oil, use low‑fat milk, and replace half the cheddar with a reduced‑fat cheese. Adding extra peas increases volume without adding much fat.
Q: Is it possible to freeze the casserole before baking?
A: Definitely. After assembling (but before topping), wrap the dish tightly and freeze. When ready, add the topping, bake directly from frozen, extending baking time by about 10‑15 minutes.
🎉 Let’s Get Cooking!
This Creamy Macaroni and Cheese with Ham and Peas brings together the best of comfort food—rich cheese, smoky ham, and sweet peas—in a single, satisfying dish. Whether you’re feeding a hungry family, impressing guests, or simply craving a cozy night in, the recipe’s balance of flavors, textures, and straightforward steps ensures success every time.
Remember, the secret lies in the quality of your ingredients and the gentle hand you give the sauce. Take advantage of the portion‑adjuster below to scale the recipe up or down, and feel free to experiment with the variations that speak to your palate.
Have you tried this recipe?
Leave a comment and rating below! Share your photos on Instagram with #MacAndCheeseMagic to be featured.
Creamy Macaroni and Cheese with Ham and Peas
A velvety, cheesy casserole that combines smoky ham, sweet peas, and a golden breadcrumb crust.
📝 Ingredients
Pasta
Cheese Sauce
Topping
👨🍳 Instructions
- 1 Cook elbow macaroni in salted boiling water for 6‑7 minutes, drain, and set aside.
- 2 Dice ham and blanch peas; set both aside.
- 3 Make a roux by melting butter and whisking in flour; cook 2 minutes.
- 4 Gradually whisk in milk and cream, simmer until thickened.
- 5 Stir in mustard, nutmeg, salt, pepper, then melt in cheddar and Parmesan.
- 6 Combine pasta, ham, peas, and sauce; transfer to a greased baking dish.
- 7 Mix panko, Parmesan, and melted butter; sprinkle over the casserole.
- 8 Bake at 190°C (375°F) for 20‑25 minutes until golden and bubbling.
- 9 Let rest 5 minutes before serving to set the sauce.
- 10 Serve hot, optionally garnished with fresh chives.
🥗 Nutritional Information (per serving)
*Values are approximate and based on standard ingredient brands.


💬 Comments & Reviews
Leave a Comment
No comments yet. Be the first to share your thoughts!