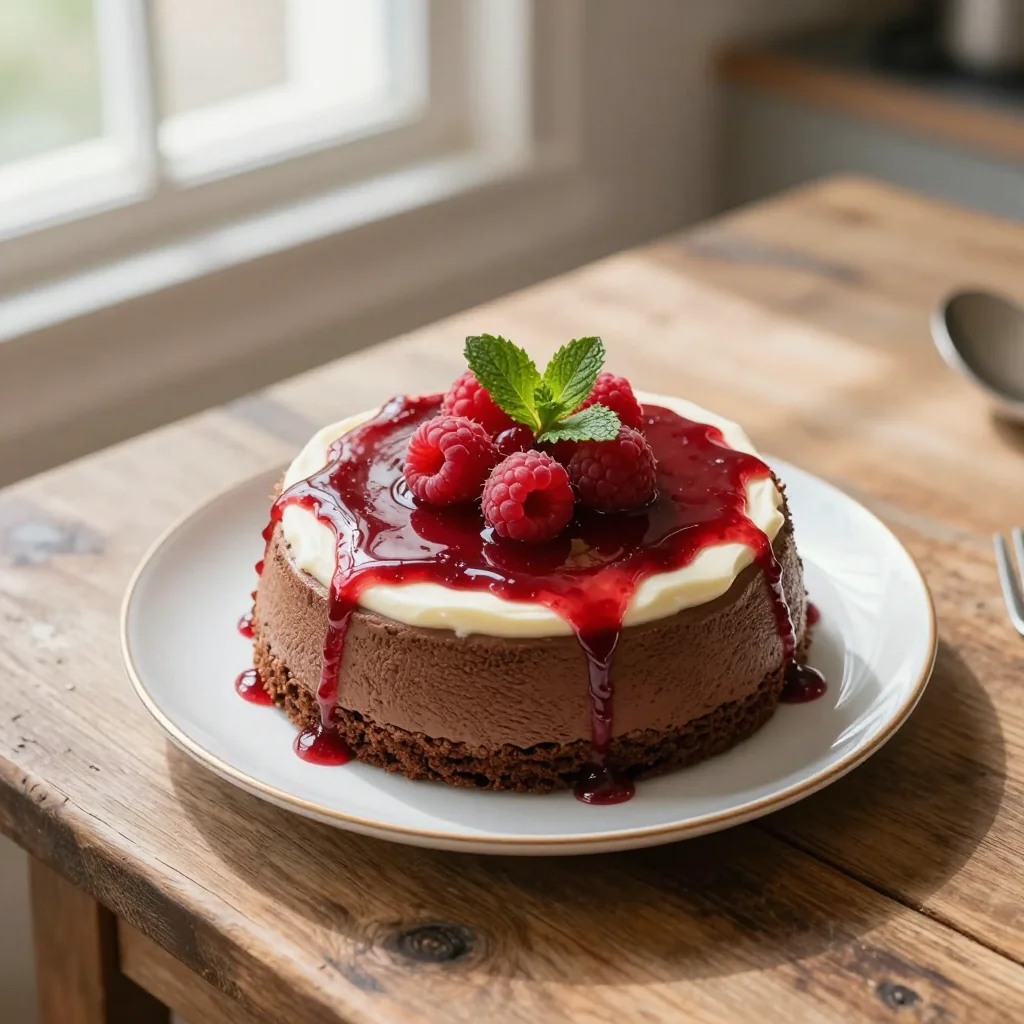
A silky chocolate mousse layered over a light sponge, drizzled with a vibrant raspberry sauce that sings of summer berries and midnight cocoa.
From the moment I first tasted a spoonful of airy chocolate mousse at a tiny Parisian patisserie, I was hooked. The way the silky texture melted on my tongue while the deep cocoa notes lingered felt like a love affair that had just begun. Years later, after countless experiments in my own kitchen, I finally perfected a version that balances lightness and richness, topped with a fresh raspberry sauce that adds just the right amount of tartness.
This cake draws inspiration from classic French desserts, yet it’s designed for home cooks who crave restaurant‑level elegance without the intimidation. The sponge provides a subtle structure, the mousse offers indulgent decadence, and the raspberry sauce brings a burst of fruit‑forward brightness that cuts through the chocolate’s intensity.
In this article, you’ll learn how to assemble each layer with confidence, how to achieve a mousse that holds its shape without gelatin, and how to craft a sauce that stays glossy and vibrant. I’ll also share tips on ingredient selection, timing, and presentation so you can serve a dessert that looks as impressive as it tastes.
Let’s dive in, roll up our sleeves, and create a show‑stopping chocolate mousse cake that will become the star of any gathering.
🌟 Why This Recipe Will Captivate You
Whether you’re planning a romantic dinner or a celebratory brunch, this chocolate mousse cake delivers unforgettable flavor, texture, and visual appeal.
- ✨ Effortless No‑Bake Assembly: The cake requires no oven, saving energy and time while still achieving a professional look.
- ✨ Layered Flavor Complexity: Dark chocolate, airy mousse, and tangy raspberry create a harmonious balance that pleases every palate.
- ✨ Adaptable for Any Occasion: From intimate gatherings to large parties, the portion adjuster lets you scale the recipe up or down without compromising taste.
- ✨ Visual Impact: The glossy raspberry glaze adds a pop of color that makes the dessert photograph beautifully for social media.
- ✨ Ingredient Flexibility: You can swap dairy for plant‑based alternatives while preserving the cake’s silky texture.
- ✨ Health‑Conscious Options: By using high‑quality dark chocolate (70% cocoa) you gain antioxidants without sacrificing indulgence.
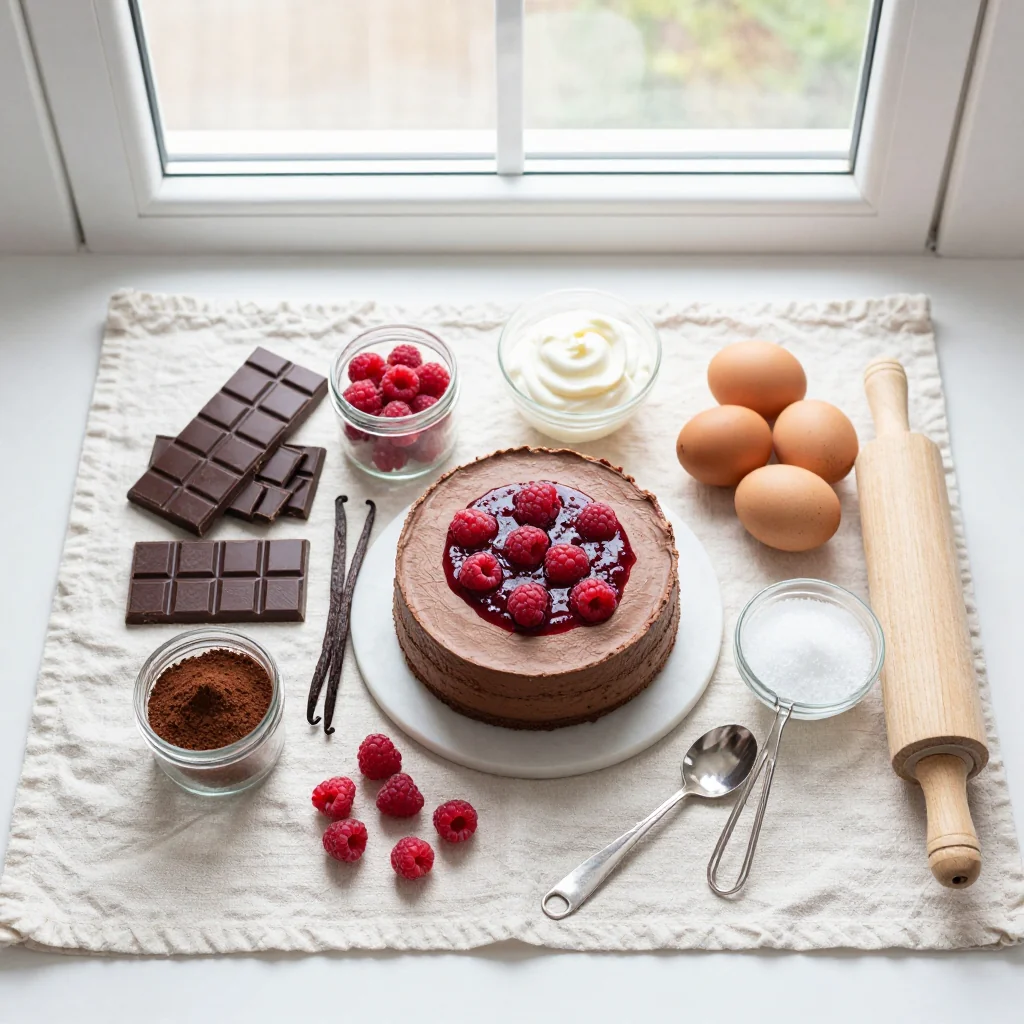
🥗 Ingredients
📝 Complete Ingredient List
For the Chocolate Sponge:
- 200 g dark chocolate (70% cocoa)
- 150 g unsalted butter
- 4 large eggs
- 100 g granulated sugar
- 80 g all‑purpose flour
- 1 tsp vanilla extract
For the Chocolate Mousse:
- 300 g dark chocolate (70% cocoa)
- 250 g mascarpone cheese
- 200 ml heavy cream
- 3 large egg yolks
- 3 large egg whites
- 50 g powdered sugar
- 1 pinch salt
For the Raspberry Sauce:
- 250 g fresh raspberries
- 80 g granulated sugar
- 1 tbsp lemon juice
- 1 tsp cornstarch + 2 tbsp water
🔍 Focus on Key Ingredients
Dark Chocolate (70% Cocoa)
Choosing high‑quality dark chocolate is the cornerstone of this cake. Look for a bar that lists cocoa solids as the first ingredient and has a glossy finish. The 70% cocoa level provides a deep, slightly bitter flavor that balances the sweetness of the mousse and raspberry sauce while delivering antioxidants.
Mascarpone Cheese
Mascarpone lends a luxurious creaminess to the mousse without adding excess sweetness. When selecting, opt for a product that feels thick and smooth, not watery. Its subtle tang helps to cut through the richness of the chocolate, creating a velvety mouthfeel.
Fresh Raspberries
Raspberries contribute a bright, tart contrast that awakens the palate. Choose berries that are deep red, firm to the touch, and free of bruises. If out of season, frozen raspberries work well—just thaw and drain them before cooking to avoid excess moisture.
🔄 Quick Substitutions
| If you don’t have... | Use instead... |
|---|---|
| Mascarpone | Cream cheese mixed with 2 tbsp heavy cream |
| Dark chocolate (70%) | Bittersweet chocolate (60‑65%) |
| Raspberries | Strawberries or mixed berries |
👨🍳 Step‑by‑Step Instructions
Follow these detailed steps to create a flawless chocolate mousse cake. Each phase builds on the previous, ensuring texture, flavor, and presentation are perfectly aligned.
📋 Phase 1: Preparation & Mise en Place
Gather all tools and ingredients, then prep the chocolate sponge and mousse base.
Prepare the chocolate sponge
Pre‑heat a water bath (double boiler) and melt 200 g dark chocolate with 150 g butter, stirring gently until smooth. Remove from heat and let cool slightly. In a separate bowl, whisk 4 eggs with 100 g granulated sugar until pale and fluffy, then fold in the melted chocolate mixture, vanilla extract, and sifted flour. Spread the batter evenly into a 20 cm springform pan lined with parchment.
Chill the sponge
Place the pan in the refrigerator for 20 minutes to set the sponge slightly, making it easier to handle when adding the mousse layer.
🔥 Phase 2: Mousse & Sauce Assembly
Create the airy mousse and the glossy raspberry sauce while the sponge rests.
Make the chocolate mousse
Heat 300 g dark chocolate in a bowl over simmering water until fully melted. In a separate bowl, beat 250 g mascarpone until smooth, then whisk in 3 egg yolks and 50 g powdered sugar until light. Fold the melted chocolate into the mascarpone mixture. In another clean bowl, whisk 3 egg whites with a pinch of salt until soft peaks form, then gradually add 50 g powdered sugar and continue whisking to stiff peaks. Gently fold the whipped egg whites into the chocolate‑mascarpone blend, creating a glossy, airy mousse.
Prepare the raspberry sauce
Combine raspberries, 80 g sugar, and lemon juice in a saucepan. Cook over medium heat, stirring occasionally, until the berries break down and the mixture thickens (about 5‑7 minutes). Dissolve 1 tsp cornstarch in 2 tbsp water, add to the sauce, and simmer for another 2 minutes until glossy. Strain through a fine mesh to remove seeds, then let cool.
Layer the mousse over the sponge
Remove the chilled sponge from the refrigerator. Pour the chocolate mousse over the sponge, spreading evenly with a spatula. Smooth the top and refrigerate the assembled cake for at least 2 hours to set.
✨ Phase 3: Finishing Touches & Serving
Finalize the dessert, add the sauce, and present it beautifully.
Check the set
After chilling, gently press the surface; it should feel firm yet give slightly under pressure. If the mousse is still soft, return to the fridge for another 30 minutes.
Drizzle raspberry sauce
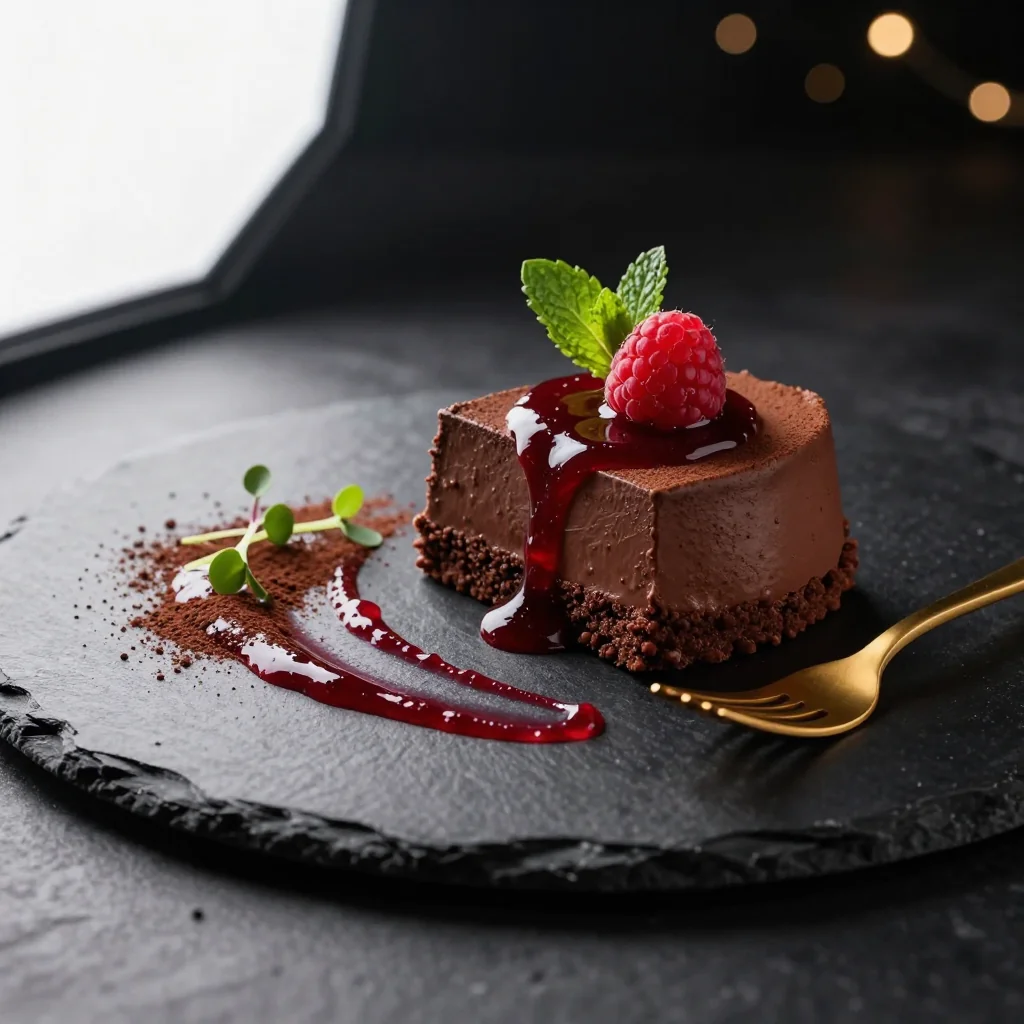
Just before serving, spoon the cooled raspberry sauce over the top, allowing it to cascade down the sides for a dramatic effect. Reserve a small amount for garnish.
Garnish and plate
Scatter a handful of fresh raspberries, a dusting of cocoa powder, and a few mint leaves for color contrast. Use a sharp knife warmed in hot water to cut clean slices.
Serve with optional accompaniments
Pair each slice with a dollop of lightly sweetened whipped cream or a scoop of vanilla bean ice cream for extra indulgence.
Enjoy!
Savor the contrast of silky chocolate, airy mousse, and bright raspberry sauce. Take a moment to appreciate the aroma before the first bite.
💡 Expert Tips & Tricks
🛒 Choosing the Right Ingredients
When shopping for dark chocolate, look for a cocoa content of at least 70% and a cocoa butter percentage above 30% for a smooth melt. Fresh raspberries should be firm, deep‑red, and free of mold; they provide the natural acidity needed to balance the chocolate’s bitterness. Opt for European‑style butter with a higher milk fat content, which yields a richer flavor and a more tender sponge.
🔪 Preparation Techniques
Separate the eggs early and keep yolks and whites at room temperature to ensure they whip properly. When folding the whipped whites into the mousse, use a gentle “cut‑through‑and‑turn” motion to preserve the air bubbles that give the mousse its lightness. Sift the flour twice to avoid lumps in the sponge batter.
🌡️ Mastering the Cooking Process
Maintain a gentle simmer for the raspberry sauce; a rolling boil can break down the fruit’s natural pectin, resulting in a watery glaze. Use a thermometer when melting chocolate—keep the temperature below 50 °C (122 °F) to prevent scorching. Chill the assembled cake on a flat surface to avoid uneven setting.
🍽️ Presentation & Service
For a restaurant‑style finish, run a thin knife around the springform pan before releasing the cake to keep the edges clean. Drizzle the sauce in a zig‑zag pattern for visual drama, and finish with a light dusting of powdered sugar using a fine mesh sieve. Serve on a chilled plate to keep the mousse firm longer.
🏆 Pro Tips
Professional chefs distinguish their desserts through precision, technique, and thoughtful adjustments that elevate a simple recipe into a masterpiece.
- 🎯 Temperature Control for Chocolate: Melt chocolate using a double boiler and keep the water just below boiling. This prevents the chocolate from seizing, which would create a grainy texture. Stir constantly and remove from heat as soon as the last piece melts.
- 🎯 Stabilizing the Mousse: Adding a small amount of gelatin (1 tsp dissolved in 2 tbsp warm water) can help the mousse hold its shape for longer, especially in warm climates, without altering flavor.
- 🎯 Egg White Whipping Secrets: Add a pinch of cream of tartar to the egg whites before whipping; it strengthens the foam and reduces the risk of over‑beating, which can cause a dry, grainy texture.
- 🎯 Raspberry Sauce Consistency: To achieve a perfect glaze, finish the sauce with a splash of cold butter (5 g). The butter adds shine and a silkier mouthfeel.
- 🎯 Portion Scaling Accuracy: When increasing or decreasing servings, adjust every ingredient proportionally, but keep the ratio of chocolate to cream constant (approximately 1.5 : 1) to preserve texture.
- 🎯 Final Chill Timing: Let the cake rest for a minimum of 4 hours before serving if you plan to transport it. This ensures the mousse sets fully and the flavors meld.
"The secret to a great dessert is not just in the ingredients, but in the patience you give it to become perfect." — Chef Dominique Ansel
🔄 Variations & Adaptations
This chocolate mousse cake is a versatile canvas. Below are several ways to tailor it to dietary preferences, flavor cravings, and seasonal twists.
🥬 Vegetarian/Vegan Version
Swap dairy components with plant‑based alternatives while preserving the cake’s richness. Use coconut cream instead of heavy cream, and replace mascarpone with a blend of silken tofu and coconut oil (1 cup tofu + 2 tbsp coconut oil, blended smooth). For the chocolate, ensure it’s dairy‑free. The egg whites can be substituted with aquafaba (the liquid from canned chickpeas) – three tablespoons of aquafaba equal one egg white.
- Replace 250 g mascarpone with 250 g silken tofu + 2 tbsp coconut oil.
- Replace 3 egg whites with 9 tbsp aquafaba, whipped to stiff peaks.
🌶️ Flavor Variations
Explore different flavor profiles by adjusting the mousse or sauce components. Each variation adds a new dimension while keeping the core structure intact.
Spicy Chili Chocolate:
Add ½ tsp finely ground cayenne pepper to the melted chocolate for a subtle heat that awakens the palate.
Mediterranean Orange‑Olive:
Infuse the chocolate with 1 tbsp orange zest and drizzle a thin olive‑oil glaze over the top for a savory‑sweet contrast.
Asian Matcha Twist:
Incorporate 1 tsp high‑quality matcha powder into the mousse, and replace raspberry sauce with a yuzu‑coconut glaze for an exotic finish.
⚠️ Dietary Adjustments
Gluten‑Free:
Swap the all‑purpose flour for an equal weight of almond flour or a certified gluten‑free flour blend. This also adds a subtle nutty flavor.
Lactose‑Free:
Use lactose‑free butter and a dairy‑free cream (such as oat or soy cream). Ensure the chocolate is labeled dairy‑free.
Low‑Calorie:
Reduce sugar in the raspberry sauce by half and replace half of the heavy cream with low‑fat Greek yogurt. This cuts calories while maintaining creaminess.
👶 Kid‑Friendly Version
For younger palates, tone down the bitterness by using semi‑sweet chocolate (55% cocoa) and add a swirl of strawberry puree into the mousse. Serve with a dusting of colorful sprinkles for visual appeal.
📦 Storage & Reheating
🧊 Conservation
Refrigerator:
- Duration: 3 days
- Recommended container: airtight glass cake dome
- Tip: Place a sheet of parchment on top of the mousse to prevent a skin from forming.
Freezer:
- Duration: 1 month
- Method: Wrap the entire cake tightly in plastic wrap, then foil.
- Defrosting: Transfer to the refrigerator overnight, then let sit at room temperature for 30 minutes before serving.
💡 For best texture, avoid freezing the raspberry sauce; prepare it fresh when you’re ready to serve.
♨️ Reheating
🔥 Oven (Recommended):
- Preheat to 150 °C (300 °F).
- Cover the cake loosely with aluminum foil.
- Warm for 10 minutes.
- Remove foil and continue for 2‑3 minutes to restore a slight sheen.
⚡ Microwave (Quick):
- Place a slice on a microwave‑safe plate.
- Cover with a microwave‑safe lid.
- Heat on medium power for 20‑30 seconds.
- Check and repeat in 10‑second bursts if needed.
🍳 Stovetop:
Gently warm the raspberry sauce in a small saucepan over low heat, stirring constantly, then drizzle over a freshly sliced piece of cake.
🍷 Perfect Pairings
🥗 Side Accompaniments
- Fresh Berry Salad: A mix of sliced strawberries, blueberries, and mint adds a refreshing contrast.
- Light Citrus Sorbet: A scoop of lemon or orange sorbet cleanses the palate between bites.
- Whipped Coconut Cream: Provides a subtle tropical note without overpowering the chocolate.
🍷 Wine & Beverage Pairings
- Ruby Port: Its rich, fruity sweetness mirrors the raspberry sauce while complementing the chocolate depth.
- Late Harvest Riesling: Offers bright acidity that balances the mousse’s richness.
- Non‑Alcoholic: Sparkling pomegranate juice adds a festive fizz and tartness.
🍰 Complementary Courses
Begin with a light citrus‑based appetizer such as a grapefruit and arugula salad, follow the mousse cake with a coffee‑infused petit fours, and finish with a palate‑cleansing herbal tea like chamomile.
❓ Frequently Asked Questions
Q: Can I use milk chocolate instead of dark chocolate?
Yes, you can substitute milk chocolate, but expect a sweeter, less intense flavor. To maintain balance, reduce the amount of added sugar in the raspberry sauce by about 10 g. The mousse will be lighter, and the overall dessert will feel more dessert‑like rather than sophisticated.
Q: How do I prevent the raspberry sauce from turning grainy?
Graininess often occurs when the sauce is over‑cooked or when cornstarch isn’t fully dissolved. Dissolve the cornstarch in cold water before adding, and stir continuously while the sauce reaches a gentle boil. Remove from heat as soon as it thickens and strain through a fine mesh to eliminate any remaining seeds.
Q: What’s the best way to store leftover mousse cake?
Cover the cake tightly with plastic wrap, then place it in an airtight container. Store in the refrigerator for up to three days. For longer storage, freeze as described in the storage section, ensuring the raspberry sauce is added fresh after thawing.
Q: My mousse collapsed after chilling—what went wrong?
Collapsing usually results from over‑whipping the egg whites or incorporating too much air into the chocolate mixture. Fold the whipped whites gently and avoid beating the chocolate‑mascarpone blend too vigorously. Also, ensure the chocolate isn’t too hot when combined with the yolks, as excess heat can destabilize the emulsion.
Q: Can I make this cake ahead of time for a party?
Absolutely. Assemble the cake up to the point of adding the raspberry sauce, then refrigerate it for up to 24 hours. Add the sauce just before serving to keep the glaze vibrant and prevent the cake from becoming soggy.
Q: How do I adjust the recipe for 12 servings?
Increase the basePortions variable to 12 in the portion adjuster. The script will automatically recalculate each ingredient’s quantity based on the new serving size, preserving the original ratios.
🎉 Let’s Get Baking!
This Chocolate Mousse Cake with Raspberry Sauce brings together the elegance of a classic French dessert and the playful spirit of a modern kitchen. The combination of silky chocolate, airy mousse, and bright berry sauce makes every bite a celebration of texture and flavor. With the detailed steps, expert tips, and flexible variations, you have everything you need to create a show‑stopping centerpiece for any occasion.
Give it a try, snap a photo, and share your results in the comments below. Your feedback helps the community grow, and you might discover a new favorite twist along the way.
Have you tried this recipe?
Leave a comment and rating below! Share your photos on Instagram with #MousseMagic to be featured.
Chocolate Mousse Cake with Raspberry Sauce
A luxurious layered dessert featuring airy chocolate mousse, a light sponge, and a vibrant raspberry glaze.
📝 Ingredients
Chocolate Sponge
Chocolate Mousse
Raspberry Sauce
👨🍳 Instructions
- 1
Melt dark chocolate and butter together, then let cool slightly.
- 2
Whisk eggs and sugar until pale, fold in chocolate mixture, vanilla, and sifted flour.
- 3
Spread batter into a lined springform pan and chill for 20 minutes.
- 4
Prepare the mousse by melting chocolate, mixing with mascarpone, yolks, and sugar, then fold in whipped egg whites.
- 5
Cook raspberry sauce, thicken with cornstarch slurry, strain, and cool.
- 6
Pour mousse over chilled sponge, smooth the surface, and refrigerate for at least 2 hours.
- 7
Check firmness, then drizzle raspberry sauce over the cake.
- 8
Garnish with fresh raspberries, mint, and a dusting of cocoa powder.
- 9
Slice with a warmed knife for clean cuts.
- 10
Serve immediately or store as instructed.
🥗 Nutritional Information (per serving)
*Values are estimates based on standard ingredient data.
📚 You Might Also Like