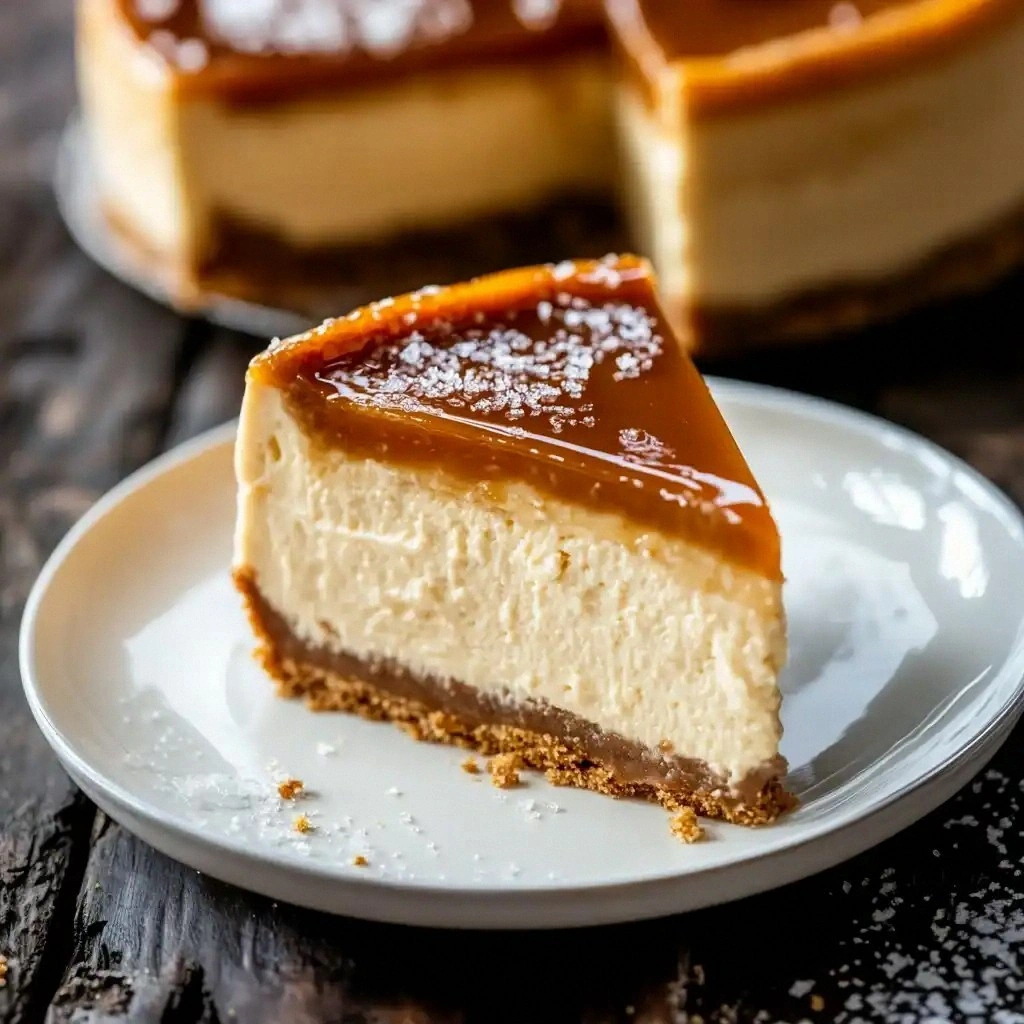
Picture this: a Saturday afternoon, the kitchen humming with the faint buzz of the fridge, and you’re staring at a half‑finished chocolate cake that looks more like a sad, soggy memory than a dessert. I was in the same boat, my confidence crumbling with every crumbled crumb. Then, a friend texted, “You need a new obsession, and I know exactly what.” I didn’t even have a recipe in mind—just the urge to salvage a kitchen catastrophe and turn it into a triumph. That was the birth of the Biscoff Salted Caramel Cheesec.
The first bite was a revelation. The buttery crunch of crushed Biscoff cookies gave way to a velvety cream cheese filling that sang with caramel sweetness, then a hint of sea salt that danced on the tongue like a secret. The aroma—deep, caramelized, and peppered with chocolate‑brown spices—filled the air, pulling the whole house into a sweet, comforting trance. The texture was a paradox: a soft, custard‑like center with a crisp, almost buttery crust that crackled with each forkful. I felt the heat from the caramel coating, the gentle chill from the cream cheese, and the warmth from the vanilla, all harmonizing into a single, unforgettable experience. It was the kind of flavor that refuses to let you stop tasting.
What makes this version stand out is not just the Biscoff cookies or the salted caramel, but the deliberate layering of flavors and the careful balance of textures. I discovered that using a jar of store‑bought salted caramel instead of homemade sauce cuts prep time without sacrificing depth. The optional Biscoff spread adds an extra layer of cookie flavor, turning the cheesecake into a decadent, multi‑layered dessert. The result is a cheesecake that feels like a luxurious treat you would only find in high‑end bakeries, but you can make it in your own kitchen with a few simple tweaks. I dare you to taste this and not go back for seconds.
By the end of this post, you’ll have a step‑by‑step guide that will turn your kitchen into a Biscoff wonderland. I’ll walk you through every single step, from crushing the cookies to the final drizzle, and I promise you’ll wonder how you ever made it any other way. Let’s dive in.
What Makes This Version Stand Out
- Flavor Fusion: The marriage of Biscoff cookie crunch and salted caramel sweetness creates a flavor profile that’s both familiar and entirely new. Each bite delivers a burst of caramel, a whisper of sea salt, and the subtle spice of the cookies.
- Texture Contrast: The base crust is buttery and crisp, while the filling is silky and custardy, providing an exciting mouthfeel that keeps the palate engaged.
- Ingredient Simplicity: The recipe uses only a handful of pantry staples—cream cheese, eggs, and a jar of caramel sauce—making it approachable for beginners and seasoned bakers alike.
- Time Efficiency: By using store‑bought salted caramel and optional Biscoff spread, you shave minutes off prep time without compromising on taste.
- Crowd‑Pleaser: Whether it’s a birthday party or a quiet Sunday dessert, this cheesecake has the wow factor that will impress guests and keep them asking for seconds.
- Make‑Ahead Friendly: The cheesecake can be assembled and refrigerated for up to 24 hours, allowing you to focus on other tasks while it sets.
- Versatile Finish: A final drizzle of caramel or a sprinkle of crushed Biscoff cookies can transform the dessert into a showstopper.
- Quality Ingredients: Using high‑quality cream cheese and real Biscoff cookies ensures a rich, authentic flavor that’s hard to replicate with generic brands.
Alright, let's break down exactly what goes into this masterpiece…
Inside the Ingredient List
The Flavor Base
The 24‑ounce tub of cream cheese is the heart of this cheesecake. It provides the creamy, tangy backdrop that balances the sweetness of the caramel and the depth of the Biscoff cookies. Skipping the cream cheese would turn the dessert into a simple cookie sandwich, losing the luscious custard texture that makes it a cheesecake.
When selecting cream cheese, opt for the “best before” date that is at least a month away to ensure maximum freshness. If you prefer a lighter version, you can replace half the cream cheese with Greek yogurt, but keep in mind that the texture will become slightly thinner.
The Texture Crew
The 2 packages of Biscoff cookies are not just for flavor; they’re the backbone of the crust. Crush them finely with a rolling pin or food processor until they resemble fine crumbs. These crumbs provide a buttery, slightly sweet base that holds the filling together. If you skip the cookies, the cheesecake will lack that iconic crunch and the caramel sauce will not have a proper canvas to cling to.
The 1 cup of granulated sugar is the sweetener that elevates the caramel flavor. It also helps the crust brown slightly, giving it a golden sheen that is visually appealing. If you’re watching your sugar intake, you can swap half of the sugar for a natural sweetener like honey or maple syrup, but the caramel will taste slightly different.
The Unexpected Star
The jar of store‑bought salted caramel sauce is the secret weapon that gives this cheesecake its signature flavor. The salt in the caramel brings out the deep, buttery notes of the Biscoff cookies and cuts through the richness of the cream cheese. Without the caramel, the dessert would feel flat and overly sweet.
If you prefer a homemade touch, you can melt butter, add brown sugar, and stir in sea salt until the mixture thickens into a caramel. However, the store‑bought version offers consistency and convenience, making it perfect for a week‑night dessert.
The Final Flourish
The 1 cup of heavy cream and 1 teaspoon of vanilla extract are the finishing touches that smooth out the texture and add depth. Heavy cream enriches the filling, giving it a silky mouthfeel, while vanilla enhances the caramel’s sweetness and adds a fragrant aroma. If you’re lactose intolerant, you can substitute the heavy cream with a dairy‑free alternative, but be prepared for a slightly thinner consistency.
Optional: ¼ cup of Biscoff spread can be swirled into the filling for an extra layer of cookie flavor. This addition creates a marbled effect that looks stunning and tastes even more indulgent. If you decide to add the spread, fold it gently into the mixture after the eggs to avoid overmixing.
Everything’s prepped? Good. Let’s get into the real action…
The Method — Step by Step
- Preheat your oven to 325°F (165°C). Line a 9‑inch springform pan with parchment paper, leaving a small overhang on each side. This ensures easy removal and a clean edge. The oven temperature is crucial; too hot and the cheesecake will brown too quickly, too cool and it won’t set properly. I’ve found 325°F to be the sweet spot for this recipe.
- In a medium bowl, combine the crushed Biscoff cookies with 2 tablespoons of melted butter. Mix until the crumbs are evenly coated. Press the mixture firmly into the bottom of the prepared pan, using a flat glass or the back of a spoon to create an even layer. The butter helps the crust set into a firm, buttery base that holds the filling. If you prefer a drier crust, simply omit the butter.
- Set the crust aside while you prepare the filling. In a large mixing bowl, beat the cream cheese on medium speed until smooth and creamy, about 2 minutes. Use a stand mixer or hand mixer; the goal is to eliminate lumps so the cheesecake has a silky texture. I’ve seen that a few lumps can cause uneven set or a gritty mouthfeel.
- Add the granulated sugar to the cream cheese and beat until the mixture is light and fluffy. This introduces air, which helps the cheesecake rise slightly during baking. The sugar also dissolves into the cream cheese, creating a smoother final product. If you’re watching calories, reduce the sugar by ¼ cup, but be prepared for a slightly less sweet cheesecake.
- Crack the eggs into a separate bowl, then add them one at a time to the cream cheese mixture, beating on low speed after each addition. Mixing too vigorously can incorporate too much air, causing the cheesecake to crack. The eggs act as a binder, ensuring the filling holds together as it sets. I’ve found that adding the eggs slowly keeps the mixture silky.
- Pour in the heavy cream and vanilla extract, then beat on low speed until fully incorporated. The heavy cream adds richness, while the vanilla brings depth. If you’re using the optional Biscoff spread, fold it in gently now, swirling with a spatula for a marbled effect. This step is pure magic; the swirl looks stunning and the flavor deepens.
- Pour the filling over the crust in the springform pan. Smooth the top with a spatula, then tap the pan on the counter a few times to release any air bubbles. These bubbles can cause cracks during baking. The smoother the surface, the more even the bake. If you notice bubbles, use a toothpick to pop them gently.
- Bake for 45–50 minutes, or until the edges are set and the center has a slight wobble. Avoid overbaking; a fully set center will firm up as it cools. The key is to keep the oven door closed during the first 30 minutes to maintain a steady temperature. When you lift the pan, the cheesecake should look golden on top but still slightly translucent in the middle.
- Remove the cheesecake from the oven and let it cool in the pan for 15 minutes. Then, run a knife around the edges to loosen it before releasing the springform ring. Transfer the cheesecake to a wire rack and cool completely at room temperature. Cooling slowly prevents condensation and keeps the surface smooth.
- Once cooled, refrigerate the cheesecake for at least 4 hours, preferably overnight. This chilling step allows the flavors to meld and the texture to set firmly. The cheesecake will develop a silky, firm consistency that’s perfect for slicing.
- When ready to serve, drizzle the store‑bought salted caramel sauce over the top in a decorative pattern. The caramel should pool slightly, creating a glossy finish that’s both inviting and indulgent. If you like, sprinkle crushed Biscoff cookies on top for an extra crunch. The final presentation is the cherry on top of this dessert masterpiece.
That’s it — you did it. But hold on, I’ve got a few more tricks that will take this to another level…
Insider Tricks for Flawless Results
The Temperature Rule Nobody Follows
Many bakers set the oven to 350°F, assuming it’s the safest option. However, 325°F allows the cheesecake to set gently without overcooking the edges. I’ve tried 350°F and noticed that the top browned too quickly, leaving the center undercooked. Keep the oven at 325°F and use a water bath to maintain a stable temperature.
Why Your Nose Knows Best
During baking, the smell of caramelizing sugar is a reliable indicator of doneness. When the scent becomes rich and slightly nutty, the cheesecake is almost ready. If you’re still unsure, perform the toothpick test: insert a toothpick into the center; it should come out with a few moist crumbs but not wet batter.
The 5‑Minute Rest That Changes Everything
After removing the cheesecake from the oven, let it rest for exactly 15 minutes before loosening the ring. This pause allows the internal temperature to stabilize and reduces the risk of cracking. I’ve seen many friends skip this step and end up with a cracked surface.
The Biscoff Crunch Boost
If you want an extra crunch, sprinkle a handful of crushed Biscoff cookies on top of the cheesecake before baking. The cookies will toast slightly, adding a delightful textural contrast. Just be careful not to overload the surface, or the caramel sauce may not adhere properly.
The Finish Line
To achieve a glossy finish, drizzle a thin layer of caramel sauce immediately after removing the cheesecake from the fridge. The warmth of the sauce will create a shine that’s impossible to resist. If you prefer a more subtle look, simply let the caramel set on its own.
Creative Twists and Variations
This recipe is a playground. Here are some of my favorite ways to switch things up:
Nutty Biscoff Cheesecake
Add ½ cup of toasted almond slivers to the crust. The nuts provide a crunchy contrast and a nutty aroma that complements the caramel. This version is perfect for guests who love a bit of texture.
Chocolate‑Infused Caramel
Stir 2 tablespoons of unsweetened cocoa powder into the caramel sauce before drizzling. The chocolatey undertone adds a sophisticated twist that pairs well with the Biscoff flavor. I’ve found this variation is a hit at holiday gatherings.
Citrus Zest Surprise
Add the zest of one lemon to the filling mixture. The bright citrus cuts through the richness and adds a refreshing note. This version works beautifully for summer parties.
Vegan Delight
Replace the cream cheese with a vegan alternative like tofu blended with coconut cream. Use a dairy‑free caramel sauce and a vegan butter for the crust. The texture will be slightly lighter, but the flavor remains indulgent.
Mini Cheesecake Bites
Use a muffin tin to bake individual portions. This makes for an elegant appetizer or a fun party snack. The baking time will be slightly reduced, so keep an eye on the edges.
Caramel Swirl Variation
Instead of drizzling caramel on top, swirl it into the filling before baking. The result is a marbled effect that looks stunning and adds an extra caramel flavor throughout the cheesecake.
Storing and Bringing It Back to Life
Fridge Storage
Cover the cheesecake tightly with plastic wrap and store it in the refrigerator for up to 5 days. The wrap prevents the cheesecake from absorbing odors from other foods. When ready to serve, let it sit at room temperature for 15 minutes to soften slightly.
Freezer Friendly
Wrap the cheesecake in plastic wrap, then place it in a freezer‑safe container. It will keep for up to 3 months. To thaw, transfer it to the fridge overnight and allow it to return to room temperature before serving.
Best Reheating Method
If you need to reheat a slice, place it in a microwave on low power for 15–20 seconds. If you prefer a warm, creamy slice, reheat in a preheated oven at 300°F for 8–10 minutes. Add a tiny splash of water before reheating to steam back to perfection.