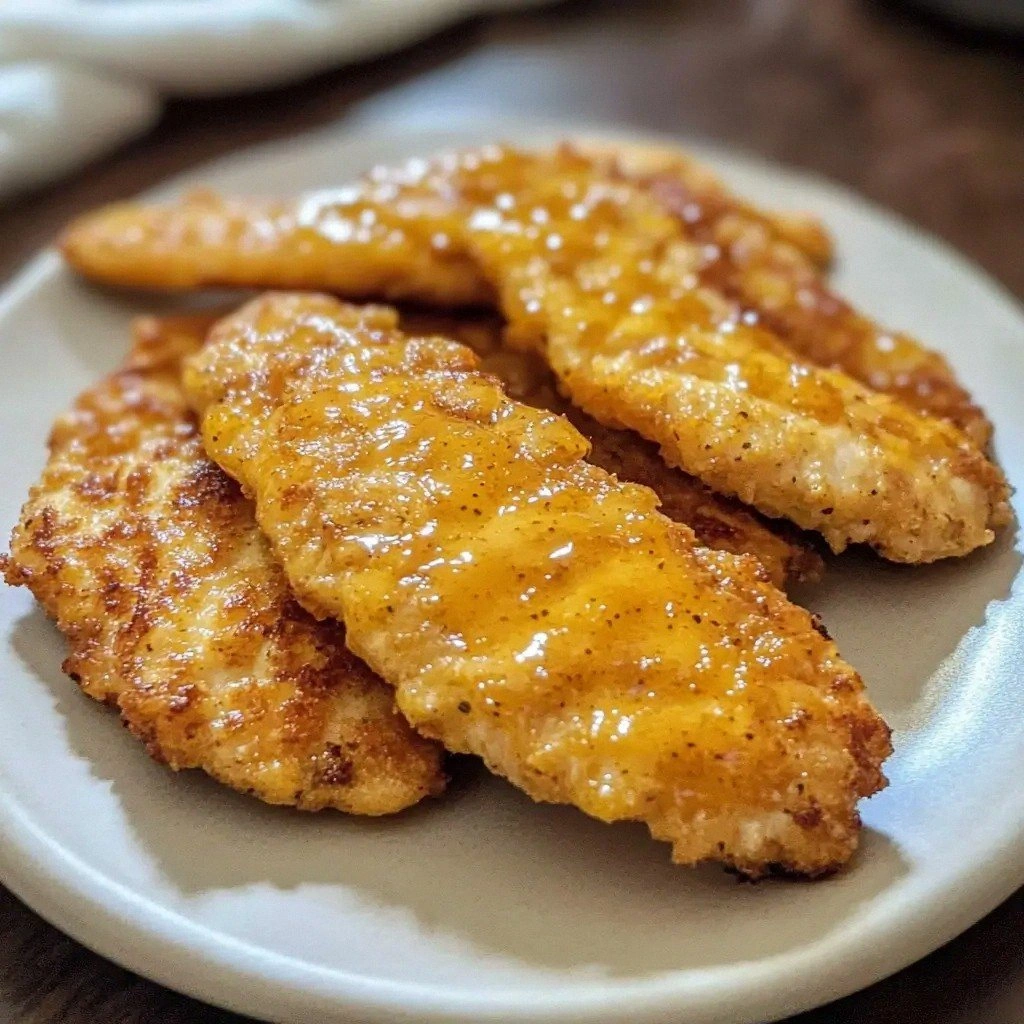
I was standing in my kitchen, staring at a bag of chicken tenders that had been sitting in the fridge for too long. The smell was faintly metallic, the texture a little limp. I could almost hear the clatter of the oven door as I imagined a crispy, golden masterpiece. That moment sparked a dare I whispered to myself: “I will turn this bland batch into the most irresistible mustard‑infused chicken ever.”
Picture this: a sizzling pan, the sound of the first tender meeting hot oil, a fragrant swirl of garlic and Dijon mustard that paints the air with citrusy heat, and a whisper of honey that balances the bite. The kitchen fills with a caramelized aroma that makes you pause mid‑task to breathe it in. The texture is a dance—crunchy on the outside, succulent on the inside, with a buttery finish that lingers on the palate. Every bite is a revelation, a bite that tells you it’s not just food; it’s a moment of culinary triumph.
What makes this version stand out is not just the blend of flavors but the methodical approach that turns a simple protein into a showstopper. I’ve spent months tweaking ratios, swapping ingredients, and timing the sear just right. The result? A dish that is hands down the best version you’ll ever make at home. It’s a recipe that invites you to experiment while guaranteeing a flawless outcome. If you’re tired of the same old chicken, this is the game‑changer you’ve been waiting for.
I dare you to taste this and not go back for seconds. The first bite will have you questioning every other chicken recipe you’ve ever tried. The second bite will make you wonder why you ever settled for plain. The third bite? Well, that’s a secret I’ll share later. For now, let me walk you through every single step—by the end, you’ll wonder how you ever made it any other way.
What Makes This Version Stand Out
- Flavor: The marriage of Dijon mustard and honey creates a balanced sweet‑savory profile that cuts through the richness of chicken.
- Texture: A double‑coating of flour and panko delivers a crisp exterior while the interior stays juicy.
- Ease: Every step is straightforward, making this dish accessible to both novice cooks and seasoned chefs.
- Versatility: It can be served as a main dish, a party appetizer, or a quick weeknight dinner.
- Crowd‑Pleaser: The bold flavors and satisfying crunch make it a hit at gatherings.
- Ingredient Quality: Using fresh garlic, real Dijon, and high‑quality butter elevates the dish beyond the ordinary.
- Make‑Ahead Potential: You can marinate and coat the chicken a day in advance for extra convenience.
- Health‑Friendly Options: Swap panko for whole‑wheat breadcrumbs or use a light oil to reduce calories.
Alright, let’s break down exactly what goes into this masterpiece…
Inside the Ingredient List
The Flavor Base
Dijon mustard is the star of this dish, offering a sharp, tangy kick that pairs perfectly with the subtle sweetness of honey. The mustard’s bright acidity cuts through the richness of the chicken, creating a harmonious balance that lingers on the tongue. If you’re allergic or simply dislike mustard, a mix of yellow mustard and a splash of apple cider vinegar will mimic the tang without the heat. A good quality mustard is essential; a cheap brand will leave the dish flat.
The Texture Crew
Flour and panko breadcrumbs work in tandem to provide that coveted crunch. The flour forms a thin, golden crust that seals in moisture, while the panko adds a light, airy bite that shatters like thin ice when you bite into it. Skipping the panko will make the chicken soggier, so keep both. If you’re gluten‑free, swap the flour for almond flour and the panko for crushed cornflakes.
The Unexpected Star
Honey is the secret to that sweet‑savory harmony. It caramelizes during cooking, creating a glossy glaze that clings to the chicken. The honey also helps the mustard adhere better, ensuring a uniform coating. A darker honey will give a deeper flavor, but be careful not to burn it. If you prefer a less sweet version, replace half the honey with a splash of soy sauce for umami.
The Final Flourish
Fresh garlic and lemon juice finish the dish with brightness and depth. Garlic brings warmth and depth, while lemon juice adds a zesty lift that cuts through the richness. The butter adds a silky mouthfeel and helps the coating brown beautifully. Together, they elevate the dish from simple to spectacular.
Everything’s prepped? Good. Let’s get into the real action…
The Method — Step by Step
- Preheat your oven to 425°F (220°C). While the oven warms, set a large skillet on medium heat and add 2 tablespoons of olive oil. The oil should shimmer but not smoke—this is the foundation for that golden sear.
- In a shallow dish, whisk together 1 cup of all‑purpose flour, 1 teaspoon of salt, ½ teaspoon of black pepper, and ½ teaspoon of smoked paprika. This dry mix will form the first coating that locks in moisture.
- Pat the chicken tenders dry with paper towels. Dip each tender in the flour mixture, shaking off excess. The coating should cling like a second skin. This step is crucial for that crisp exterior.
- In a separate bowl, whisk ¼ cup Dijon mustard, 2 tablespoons honey, 2 minced garlic cloves, 1 tablespoon lemon juice, and 2 tablespoons of milk (or buttermilk). This sauce will be the flavor engine that drives the dish.
- Toss the floured chicken in the mustard‑honey mixture until each piece is evenly coated. The sauce should cling like a velvety blanket, ready to caramelize.
- Transfer the coated tenders to a baking sheet lined with parchment paper. Sprinkle 1 cup of panko breadcrumbs over the top, pressing lightly to ensure they adhere. The panko will give you that satisfying crunch.
- Slide the sheet into the preheated oven. Bake for 15–18 minutes, flipping halfway through. The chicken should reach an internal temperature of 165°F (74°C) and the coating should be a deep golden brown.
- While the chicken rests, melt 2 tablespoons of butter in a small saucepan over low heat. Add the remaining 1 tablespoon of honey and a pinch of salt, stirring until the mixture is glossy. This glaze will add a final burst of flavor.
- Drizzle the honey‑butter glaze over the cooked tenders, letting it pool into the nooks of the panko. Let the chicken rest for 5 minutes—this allows the juices to redistribute, keeping the meat juicy.
- Serve immediately, garnished with chopped fresh parsley if desired. Pair with a crisp green salad or roasted vegetables for a balanced meal.
That’s it—you did it. But hold on, I’ve got a few more tricks that will take this to another level. Let’s dive into insider tips that will ensure your chicken is flawless every time.
Insider Tricks for Flawless Results
The Temperature Rule Nobody Follows
Many cooks bake at a standard 400°F, but I found 425°F yields a crispier exterior while keeping the interior moist. The higher heat caramelizes the sugars faster, creating a caramelized glaze that’s impossible to resist. If your oven runs hot, reduce the temperature by 25°F to avoid burning.
Why Your Nose Knows Best
Before flipping the chicken, listen for a subtle crackle and a golden hue. That’s the moment the coating has set. If you wait too long, the coating will stick to the pan; too early, and it’ll be soggy. Trust your senses—your nose will tell you when it’s ready.
The 5‑Minute Rest That Changes Everything
Resting the chicken after baking lets the juices redistribute, preventing a dry bite. During this short pause, the coating also firms up, making it easier to cut and eat. Skipping this step will leave you with a soggy mess.
Use Fresh Ingredients for a Brighter Flavor
Fresh garlic and lemon juice are critical. A jarred version will taste flat. If you can’t find fresh lemons, a splash of white wine vinegar works, but the flavor profile will shift slightly.
Double‑Coating for Extra Crunch
If you love crunch, dip the chicken in the flour mix, then the mustard mixture, and again in the flour mix before baking. The extra coating layers create a multi‑textured bite that’s unforgettable.
With these tricks, you’ll consistently produce chicken that’s juicy inside, crisp outside, and bursting with flavor. No more second‑rate attempts.
Creative Twists and Variations
This recipe is a playground. Here are some of my favorite ways to switch things up:
Spicy Kick
Add a pinch of cayenne pepper to the flour mixture or mix a teaspoon of sriracha into the mustard sauce. The heat will contrast nicely with the sweet honey.
Herb‑Infused
Stir chopped rosemary or thyme into the flour coating. The earthy aroma will complement the mustard’s sharpness.
Citrus Twist
Replace the honey with orange marmalade and add zest from a fresh orange. The citrus notes will brighten the dish.
Cheesy Delight
Sprinkle shredded cheddar between the panko and the chicken before baking. The cheese will melt into a gooey layer, adding richness.
Gluten‑Free Version
Use almond flour for the first coating and crushed cornflakes for the panko substitute. The texture will differ slightly but still be delicious.
Storing and Bringing It Back to Life
Fridge Storage
Store leftovers in an airtight container for up to 3 days in the refrigerator. Keep the chicken on a paper towel to absorb excess moisture, preventing sogginess.
Freezer Friendly
Freeze cooked chicken in a single layer on a baking sheet before transferring to a freezer bag. This prevents clumping. Reheat for 10 minutes at 375°F (190°C) until hot.
Best Reheating Method
To revive the crispness, reheat in a preheated oven at 350°F (175°C) for 8–10 minutes. Add a splash of water to the pan to create steam, then cover loosely with foil for the last 2 minutes.
Add a tiny splash of water before reheating, and it steams back to perfection. This trick keeps the chicken juicy while restoring that irresistible crunch.